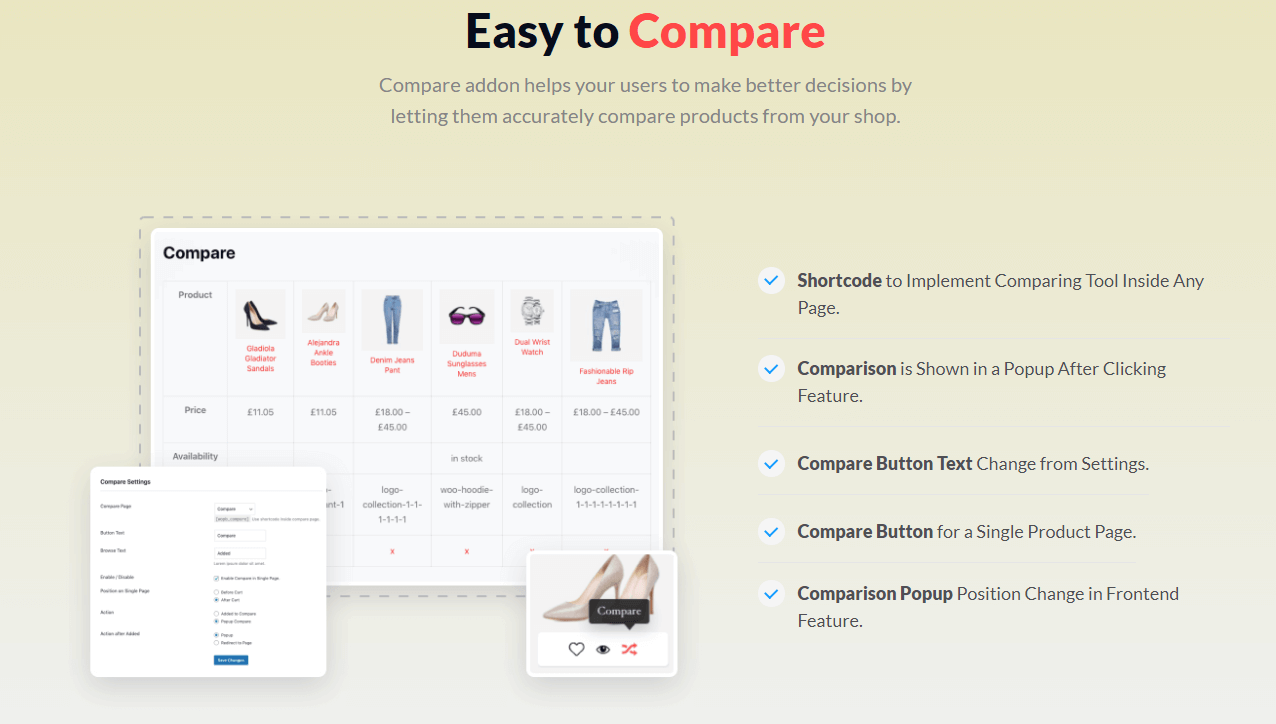
The WowStore Compare Addon has been revamped completely. Users will now have an advanced feel of the compare feature with WowStore. Here’s how the new compare addon works:
In order to use the Addons of the WowStore WooCommerce Plugin, you’ll need to:
- Navigate to the WowStore plugin of your WordPress dashboard.
- Now click on ‘Addons‘.
***Some of the add-on features work only with the Pro Version of WowStore. So you will need to upgrade to the Pro version to start using the Addons.
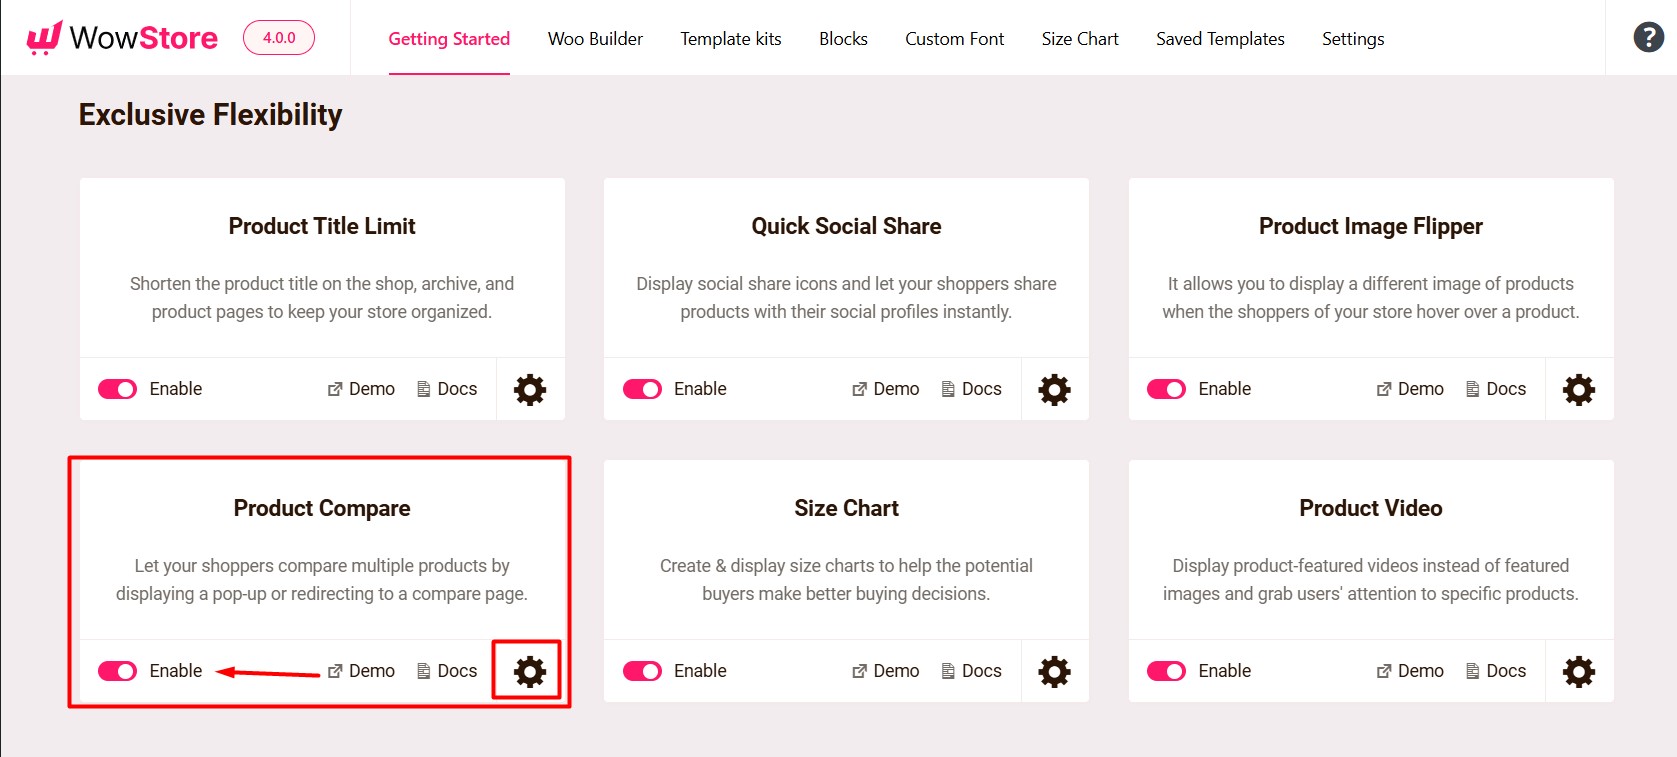
Now you can enable the ‘Compare’ addon. Once done, you’ll have to return to WowStore>Settings to make changes to the product compare settings.
There are 2 different tabs in the compare addon feature. One is the “Settings” and the other is called the “Design”.
In the settings tab, you will find options regarding the placement of the compare feature in your store, the loading animations, and more.
In the Design tab, you will find the options to change the outlook of the table. You will be able to bring changes to your layouts, use the pre-made templates, and more.
Let’s explore the different options in each of the tabs:
The Settings Tab
Under the settings tab, you will find the following options:
Selecting the Compare Page
The very first setting in the panel is to select the compare page.
If you leave this setting as “Default”, the default woocommerce compare page will show you the product comparison.
If you don’t have a compare page by default, you can create a custom page and use that as your compare page. To do that, you need to:
- Go to the WowStore Compare Addon Settings and copy the shortcode [wopb_compare].
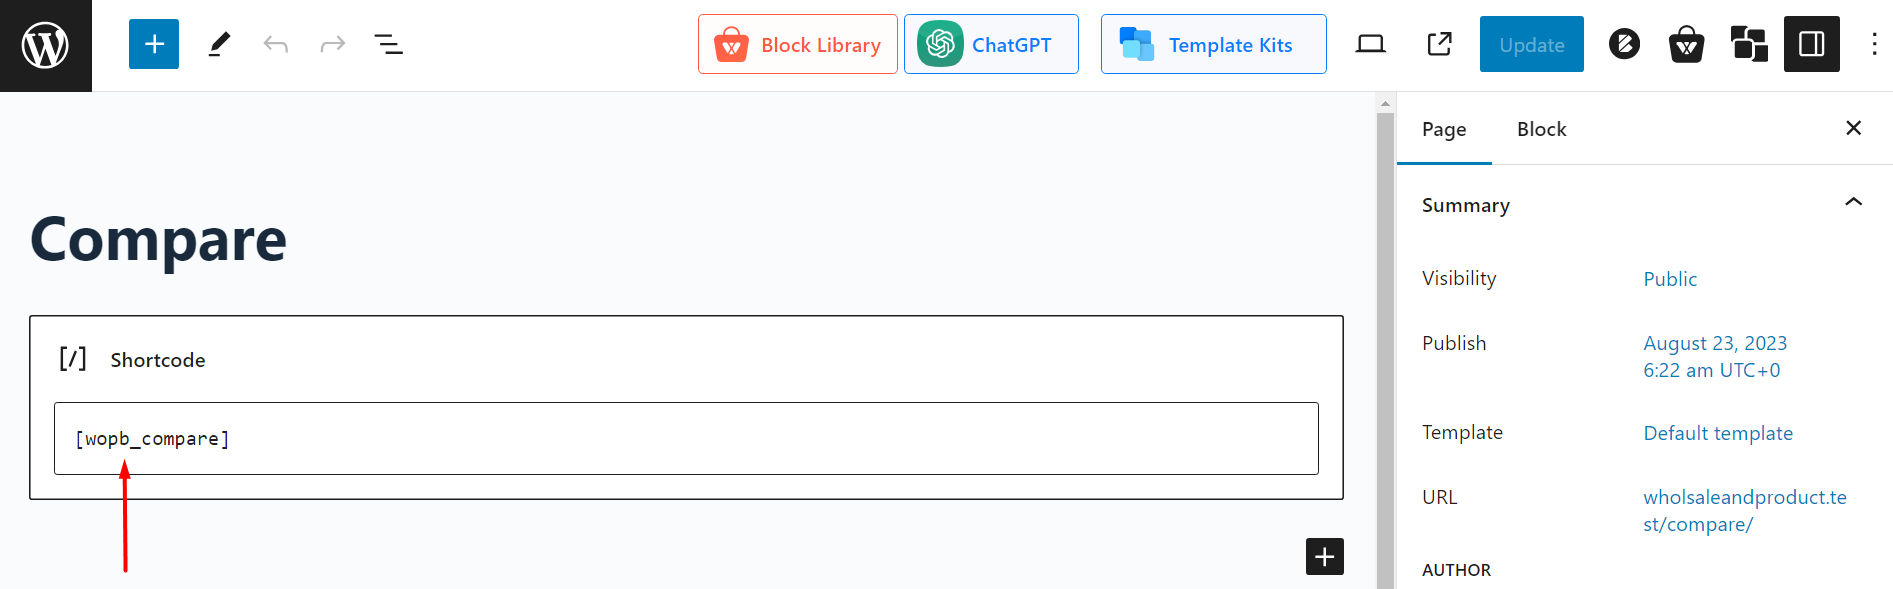
- Save the Settings
- Go to Pages > Add New Page from the WordPress dashboard
- Paste the shortcode on the page
- Publish the page
- Now, go back to the compare addon
- Select the page from the “Select Compare Page Menu”
- Save the Settings
Once you save and go to the compare page, you will see the product comparison.
Showing the Compare Feature in Particular Pages
There are 4 choices here:
- You can enable/disable the comparison feature on the shop page
- You can enable/disable the comparison feature on the Single-Product page
- You can enable/disable the comparison feature on the “My Account” page
- You can keep all the options disabled
***Remember to change the settings once you’re done. Otherwise, the settings will not take effect.
***Note that the grid design will design whether the compare feature appears or not. For example, if you disable the compare feature for a grid in the Shop Page from the WooCommerce Builder Settings, the compare button will not show.
What Happens After You Click the Compare Button?
You have 4 options to explore here. Once you click to add a product for comparison, the user will see one of the 4 things.
***You can enable only one option at a time:
Compare As a Pop-up
Activate this by choosing “Popup” and saving the settings.
If a user clicks on the compare button on one of the products, a pop-up will appear on the page. There, the user will be able to add or delete products or close the window to explore the site.
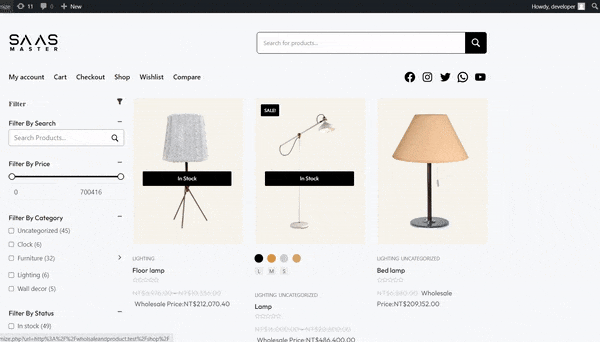
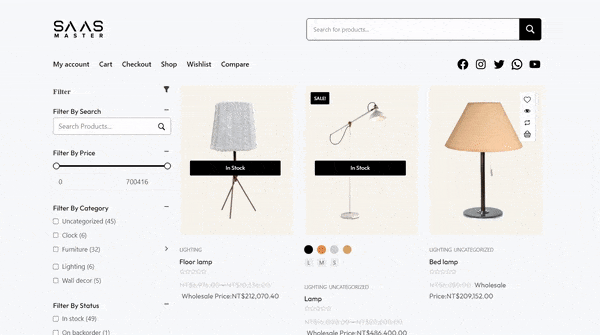
Redirect the User to a Comparison Page
If you select “Redirect to Page” from the “Action After Add to Compare” Setting and a user looks to compare products, then he or she will be redirected to the Compare Page you created.
Here’s the settings menu:
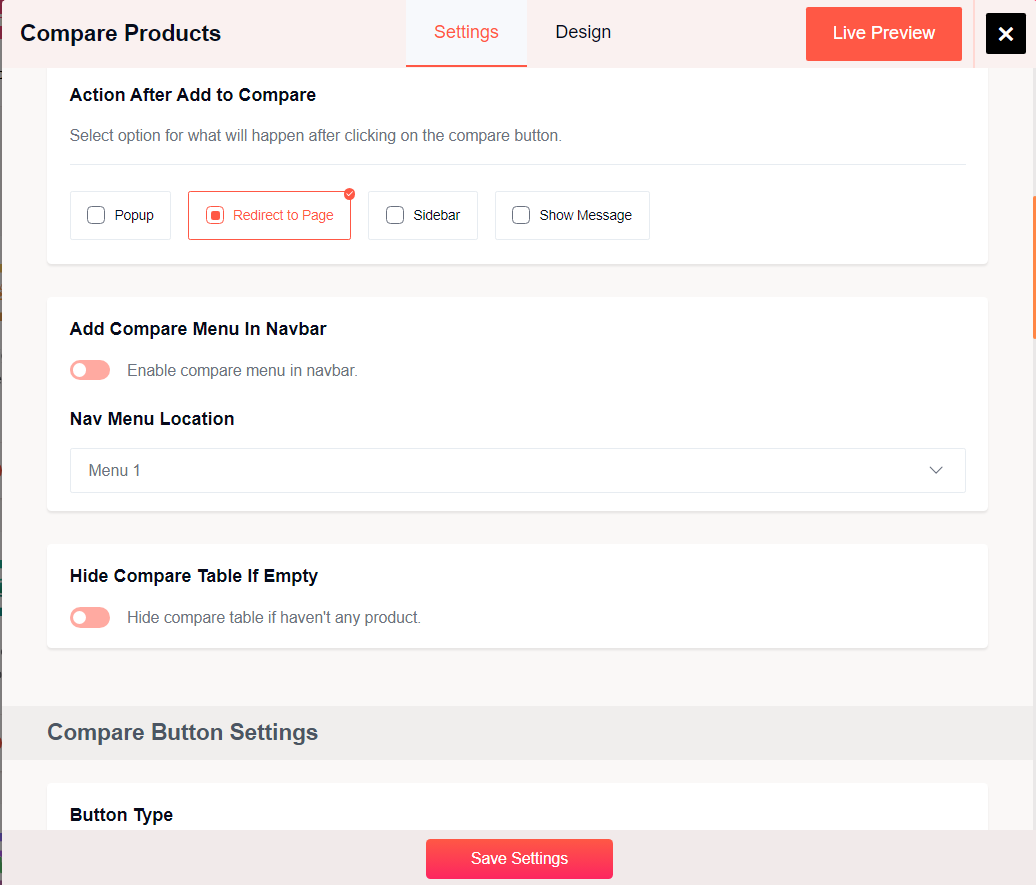
Here’s the compare page where the user is being redirected:

Show Product Comparison as a sidebar
Activate this option by enabling “Sidebar” and saving the settings.
If you select this option, the user will find a sidebar that shows the product comparison.
Show Message Only
If you select the “Show Message” button and save the settings, once a user adds a product for comparison, he or she will only see the message that the product has been added for comparison.
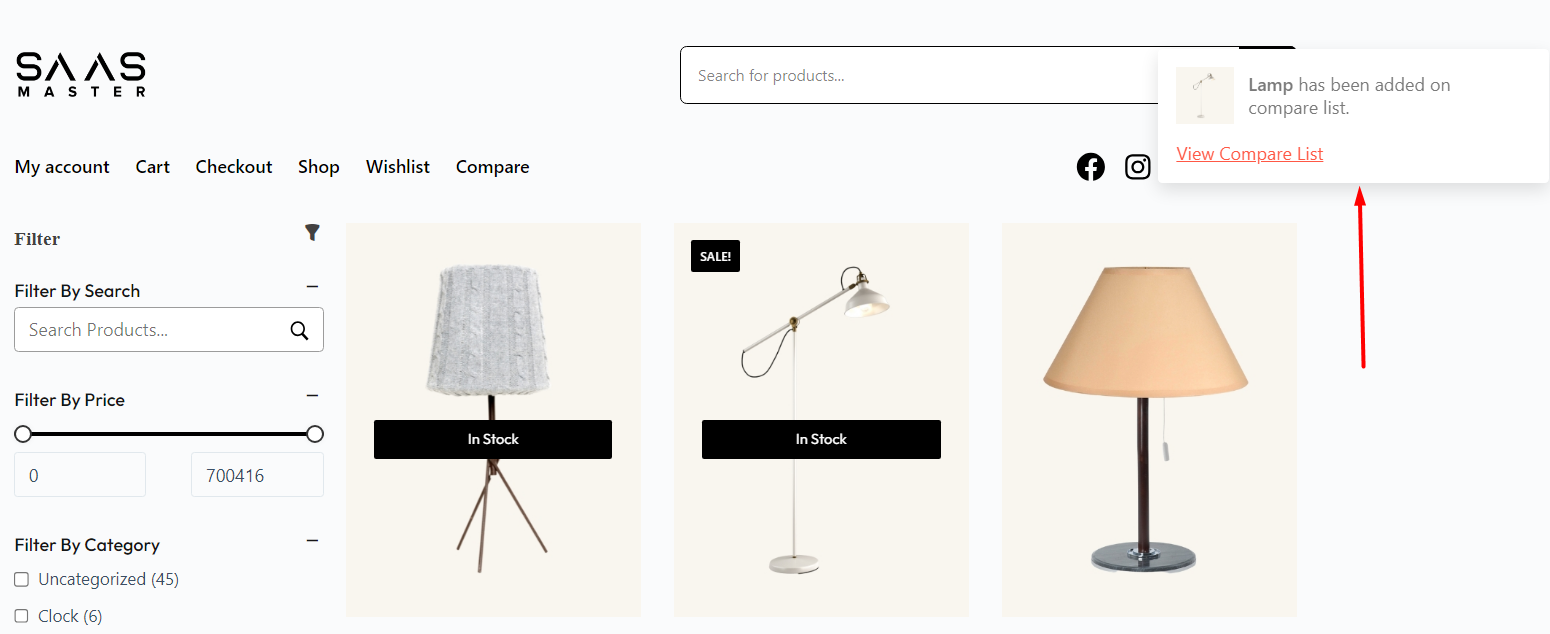
There will be a button to see the product comparison data in the message.
Compare Addon Modal Loading
The compare modal loading feature has 3 parts:
Modal Loading Icon
There are 7 loading icons at this time. You can select any of these icons and choose the animation type.
Modal Loading Animation
The modal loading animation requires 2 inputs:
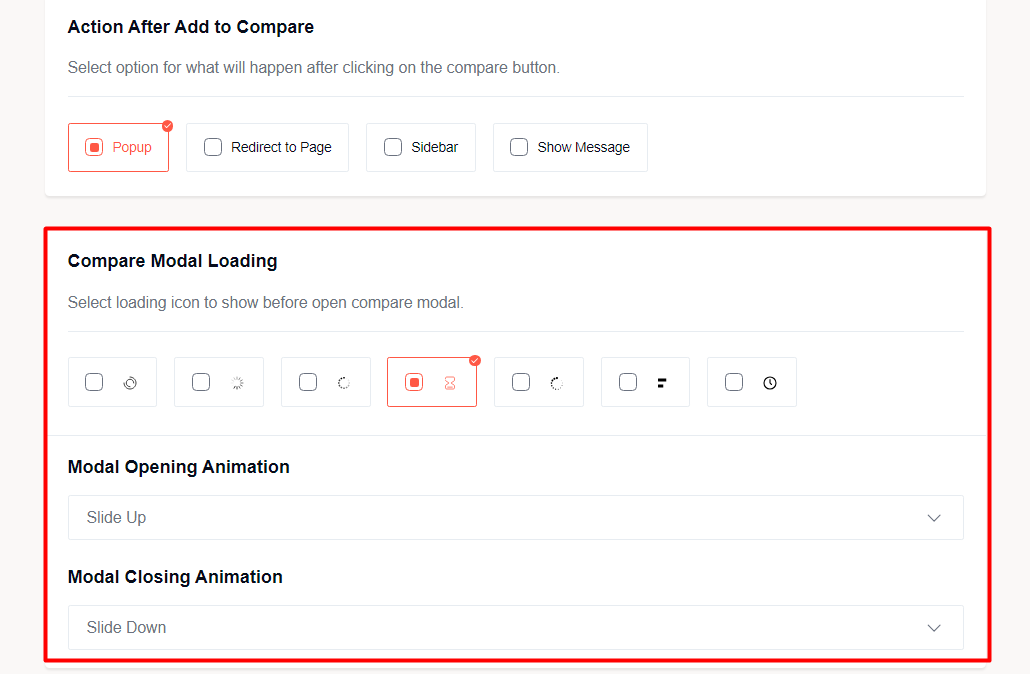
- Modal Opening Animation
- Modal Closing Animation
Both these options have 10 choices each (at the time of writing). You can use a combination of these to show a loading animation for the compare addon.
Here’s a list of steps to add a proper modal animation:
- Select one of the modal icons
- Choose a modal opening animation
- Choose a modal closing animation
- Save the settings
Here’s the end result:
Showing the Compare Feature in a Custom Position in the Menu
You can add the compare feature to the menu. To add the compare feature to the menu, you need to:
Enable the Compare Feature in the Navbar
To use the compare feature in the Navigation menu, you need to turn on the “Enable Compare Menu in Navbar” in the setting.
Type of the Compare Button
You can enable the compare button with text or without text.
Compare Button Icon
There is a selection of 8 compare button icons. You can show any of these icons in the menu bar from the “Choose Icon” section.
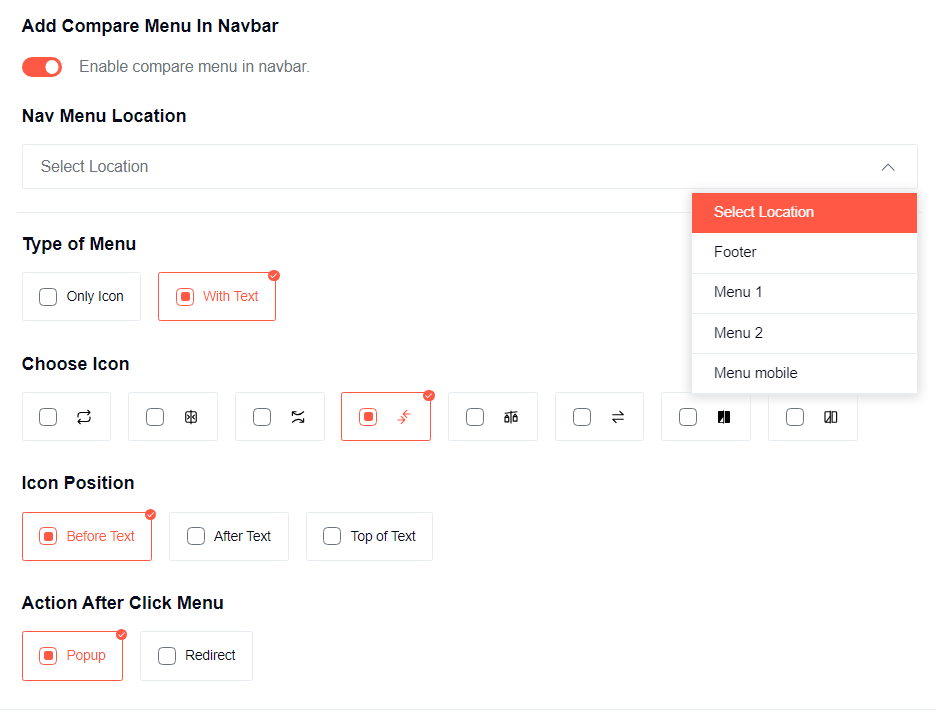
Icon position
From the “Icon Position” Setting, you can select between 3 options. You can:
- Show the icon before the text
- Show the icon after the text
- Show the icon on top of the text
Where to Go After Clicking the Icon
The “Action After Click” menu allows you to choose between two options:
- Pop-up: After clicking the compare button on the menu, a pop-up will open up for product comparison.
- Re-Direct: You will be taken to the compare page after you click the button.
Custom Position for the Compare Button on the Menu
You can show the compare button on a custom position of the menu. To do that, you need to paste a shortcode “[wopb_compare_nav]“ on the menu part where you want to show the compare button.
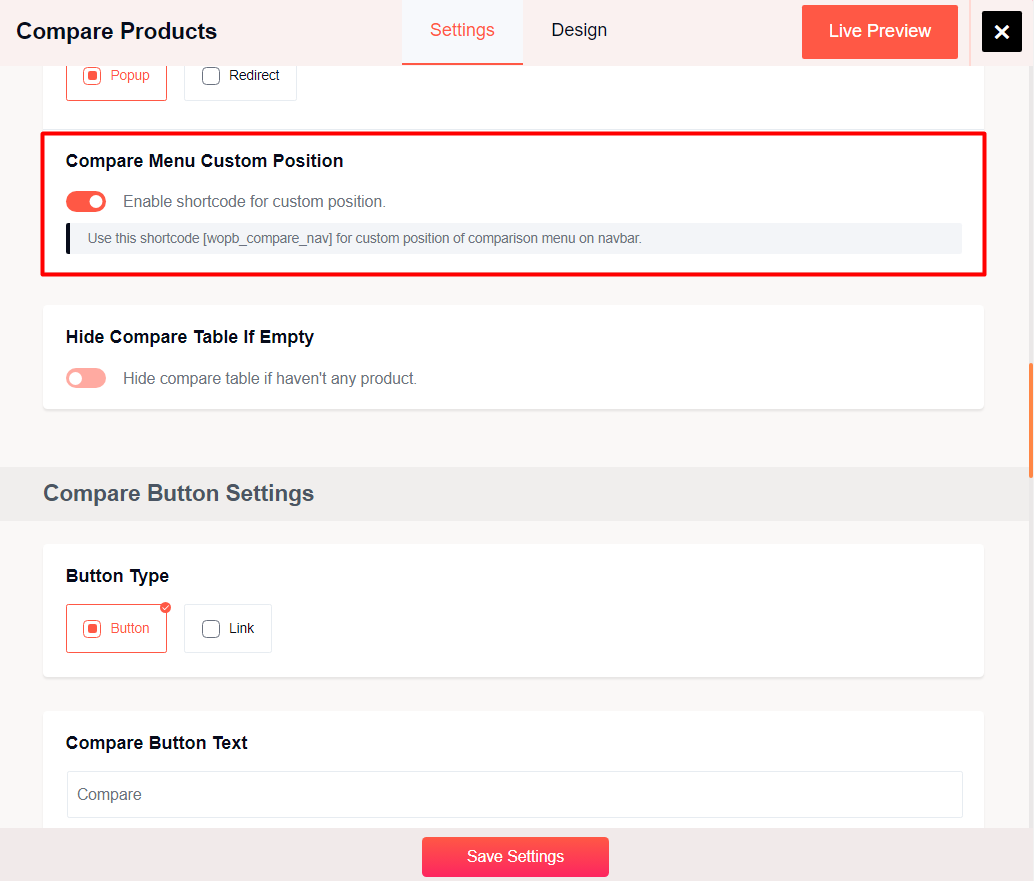
Hide the Compare Table – When it’s Empty
If you don’t have anything on the compare page, then you can hide it. Just enable the “Hide Compare Table if Empty” setting and save the changes.
The Compare Button Settings
There are a couple of settings within this section:
The Button Type
There are 2 types here:
- You can use it as a regular compare button, or,
- You can use it as a link
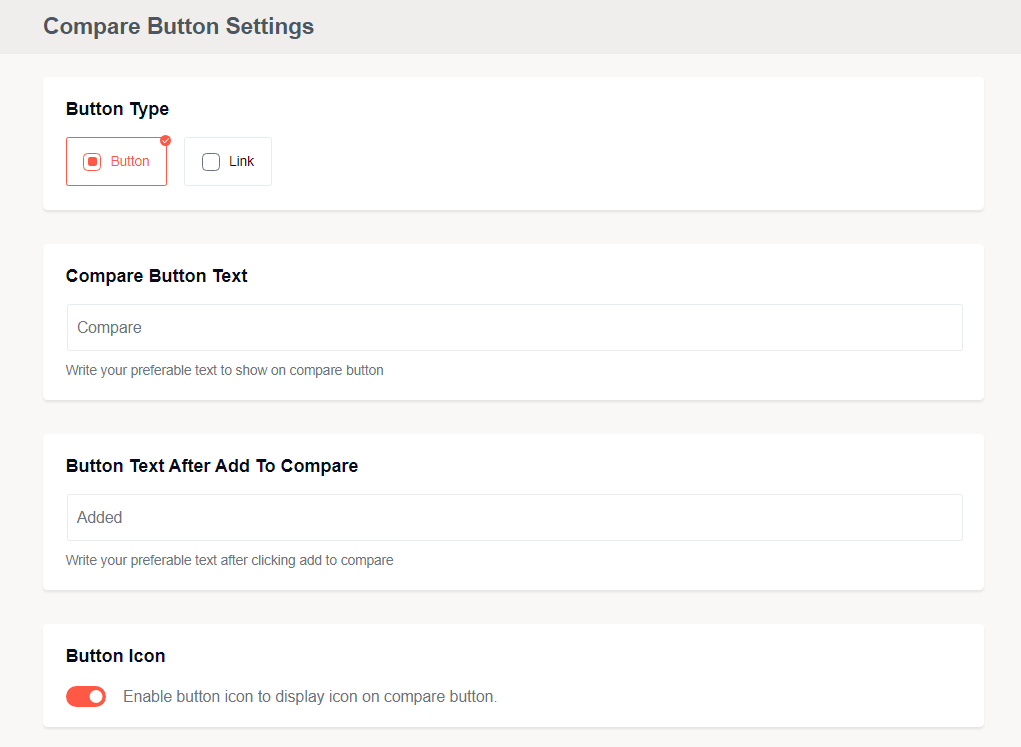
The Button Text
You can change the button text – what the button will show before it’s clicked.
The “Browse” Button text
The browse button text shows the state after the button is clicked (Once a product is added for comparison). You can change that through the settings as well.
The Button Icon
You can enable or disable the button icon from this setting.
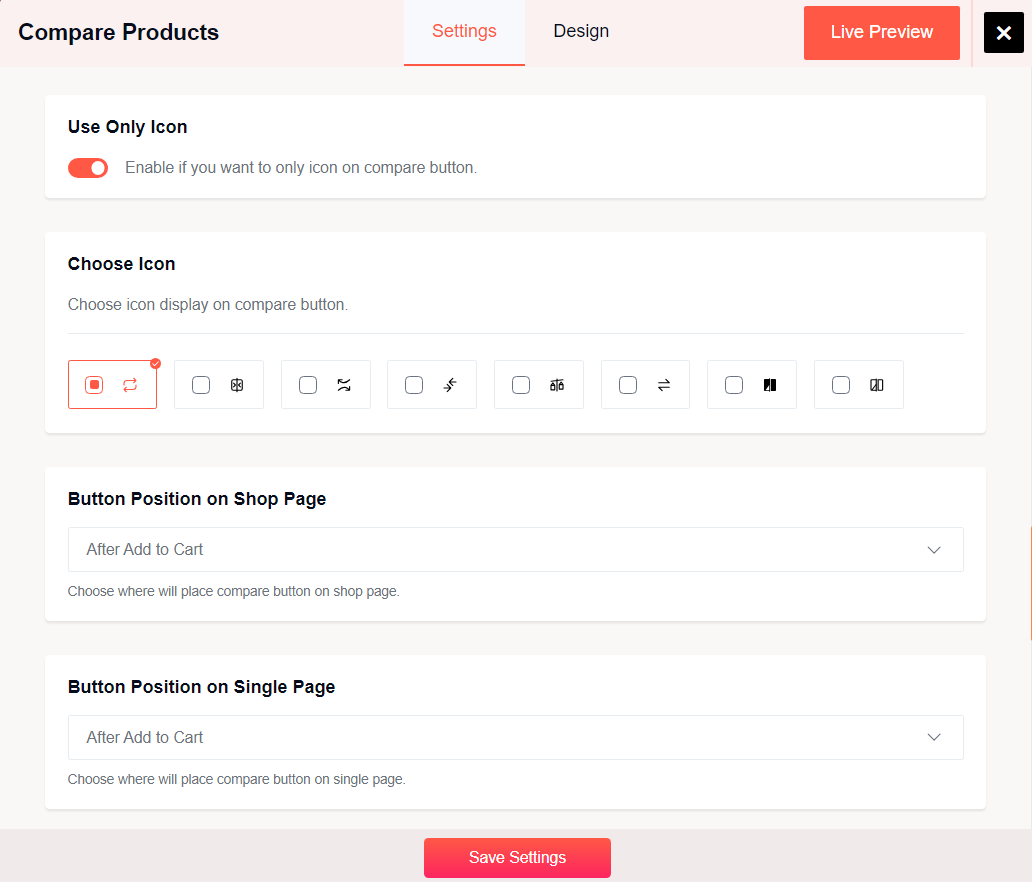
Only Using the Icon
You can only use an icon for the compare button. If you enable the “Use Only Icon” setting, then you will only have the icon for a compare button.
Compare Button Icon and Position
You can choose the button icon from a selection of 8 icons. Also, you can also change the position of the icon (before or after the text).
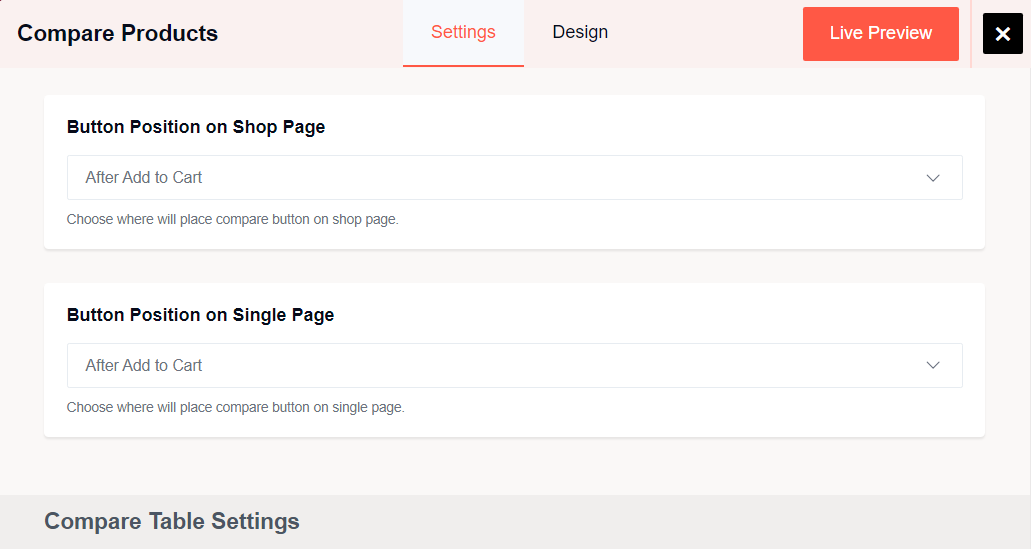
Button Position on the Page
The compare button position can be shown on the Shop Page and the Single Product Page:
- Select where to show the compare button on the Shop Page using the “Button Position on Shop Page”.
- Similarly, you can choose where to show the compare button on the Single Product page using the “Button Position on Single Page”.
You can choose between 6 choices. Show the button:
- After the “Add to Cart” Button
- Bottom of the “Add to Cart” Button
- Top of the “Add to Cart” Button
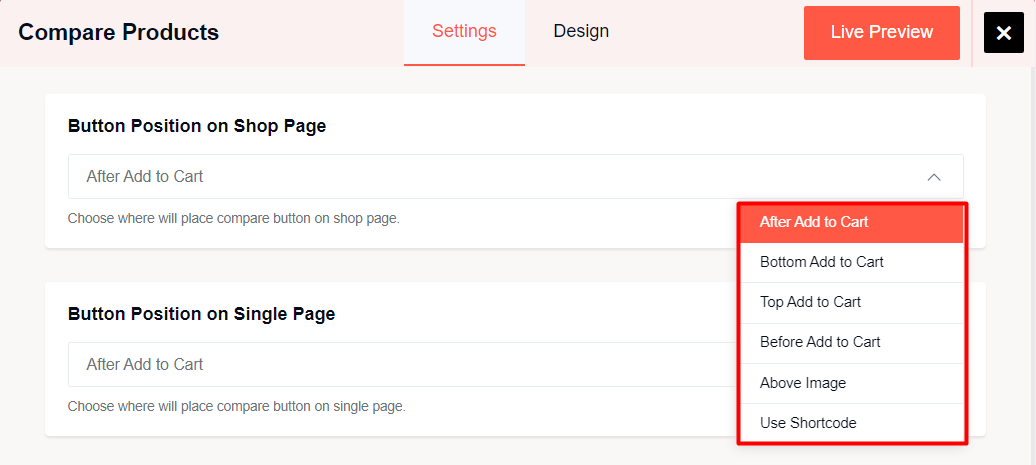
- Before the “Add to Cart” Button
- Above the product image
- Use the Shortcode
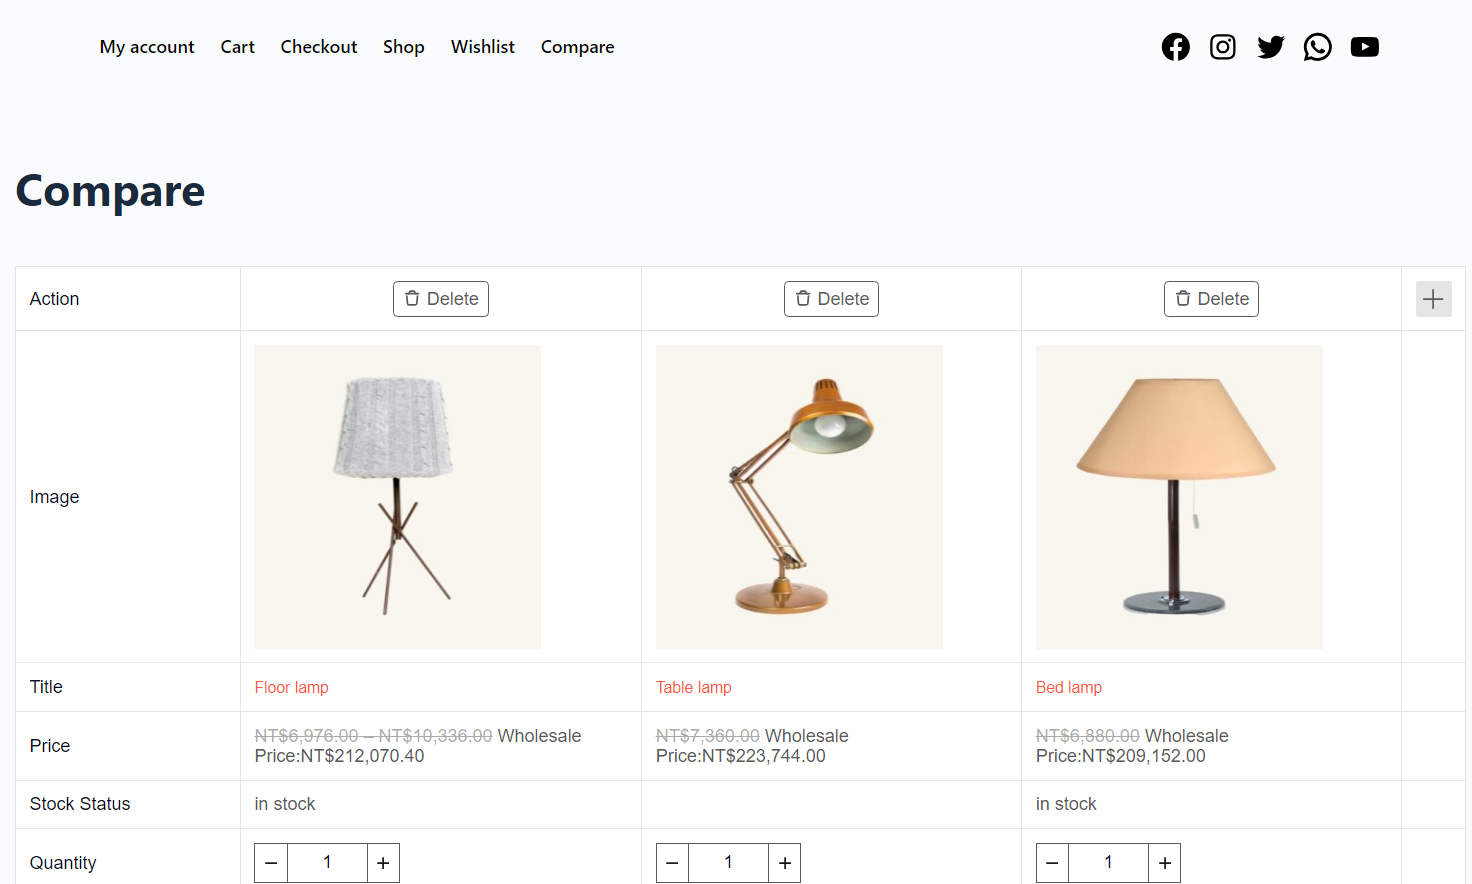
Custom Fields on the Comparison Table
You can design the product comparison table with various fields (including some custom options). The fields that are important are already in the table:
- The Product Image
- Product Title
- Product Price
- Product Stock Status
- Product Quantity
- Product Add to Cart
- Product Review
There are other fields available like the SKU, product description, weight, dimensions,

You can add custom fields from the dropdown. Just select a field and click on the “Add” button.
Also, you can edit the custom field (change the name or rearrange it) or delete it from the table.
Freezing the Table Row and Column on the Compare Table
You will find 2 settings at the very end of the product compare addon:
- Use “Freeze Table First Column” to freeze the first column of the product comparison table
- Use the “Freeze Table First Row” to freeze the first row of the product comparison table
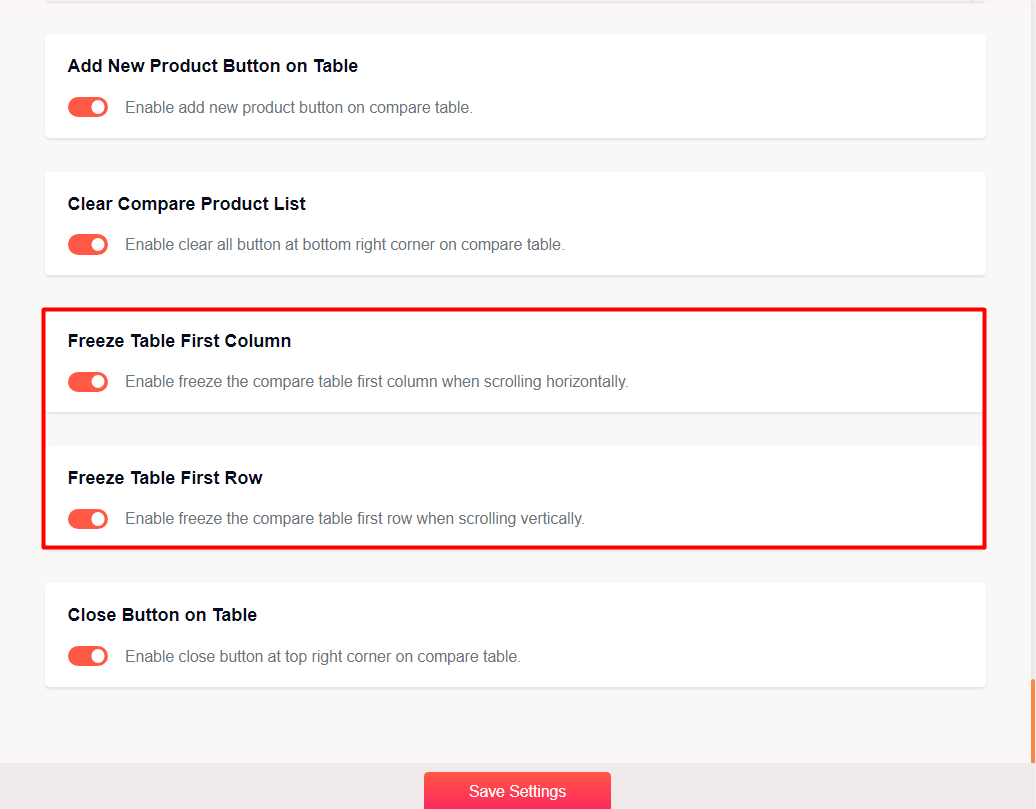
Other Essential Options
There are some other options at the very end:
- Use the “Add New Product Button on Table” to enable or disable the addition of new products on the table.
- Use the “Clear Compare Product List” to add a “Clear all” button in the comparison table. The button will clear all the products on the comparison table.
- Use the “Close Button on Table” Setting to add a close button to the top right of the comparison table.
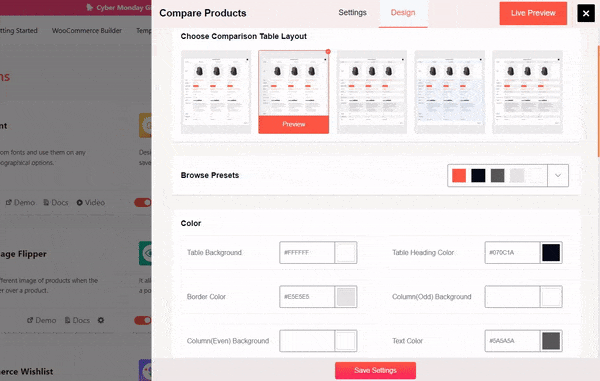
The Design Tab
Under the Design Tab, you will find the following settings:
A Set of Pre-Made Designs
There are 5 pre-made layouts currently available for the compare addon. You can select either of them and start experimenting with other settings.
***Please note that one of the presets will be chosen by default. You will be able to change the custom color presets and change the other design properties.
Changing the Typography for Different Attributes
The typography control is available for the different table attributes. Currently, support for 4 attributes is available:
- Change the typography of the table title
- Update the typography of the product title
- Change the text of the compare table
- Updating the text style of the button
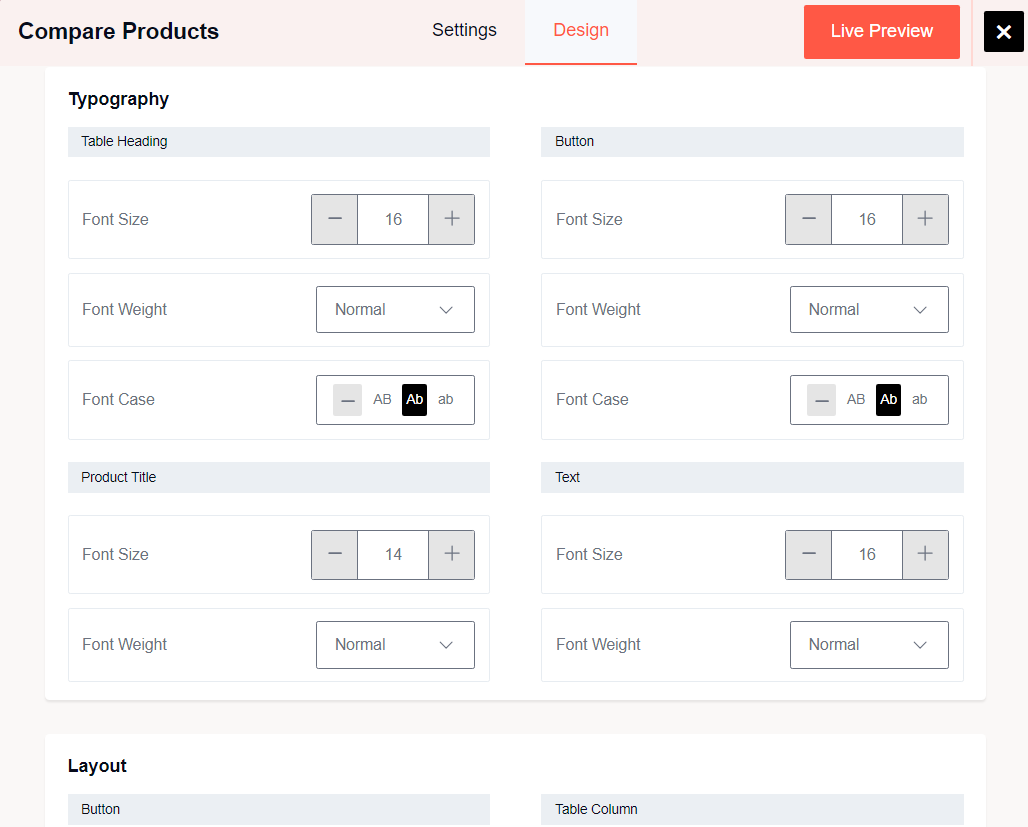
Within these 4 attributes, you can change the following font settings:
- The Font Size
- The Font Case
- The Font Weight
***Please note that the Font Case Setting is not available for the Product Title and the Table Text.
Changing the Color Settings for the Table
There are two things here:
- If you choose one of the color presets, then you won’t have to worry about setting a custom color for the table.
***Please note that if you select one of the color presets, it will change the colors in the color panel.
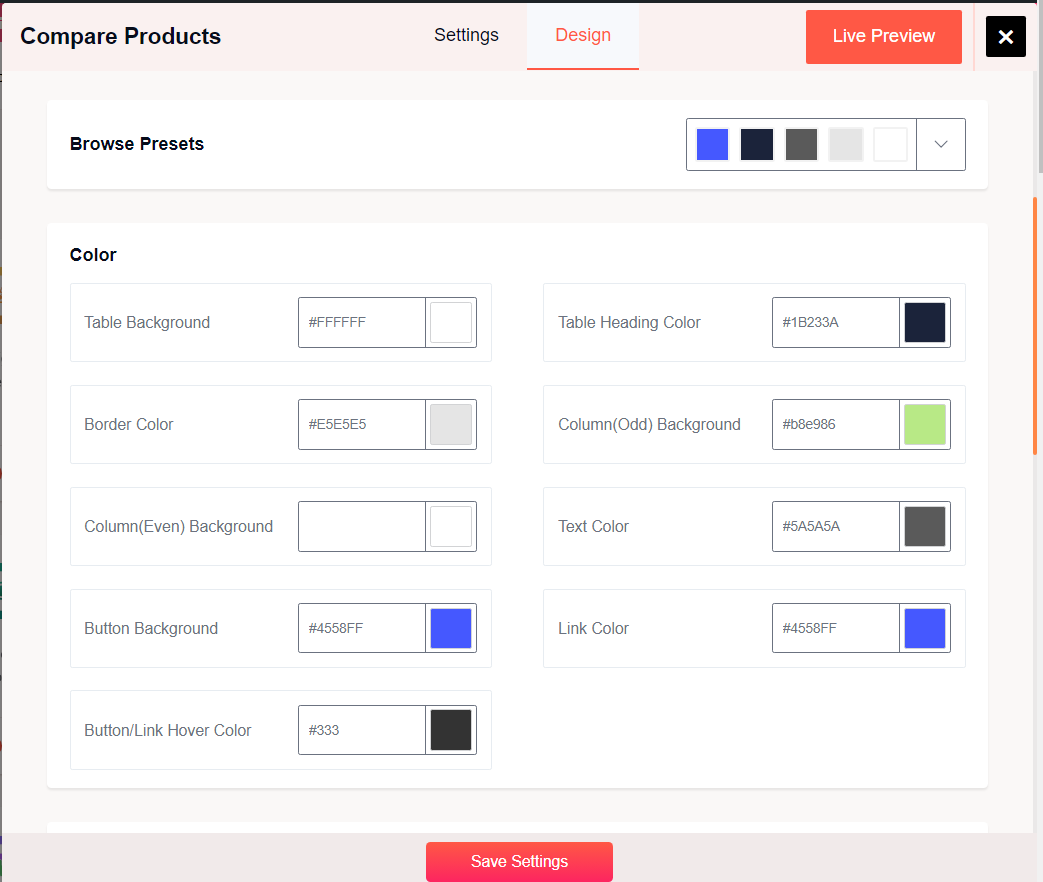
But, if you want to go into more detail, you can change the following color settings in the color panel:
- Change the table background and the border-color
- Change the color of the heading
- The color of the even background and the odd background
- The Text Color
- The Button Background and the Link Background
- Button Hover Color
The Button Layout
You can change the:
- The top and bottom padding of the button
- Left and Right Padding of the button
- The Border Radius of the Button
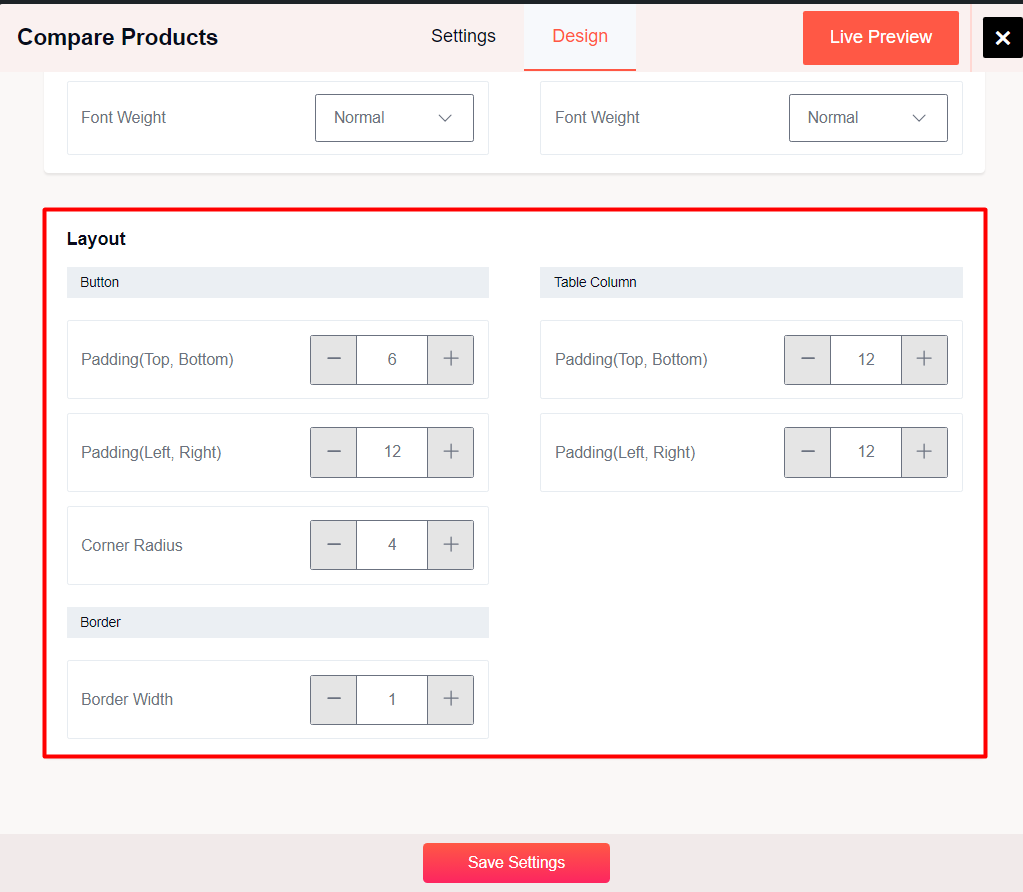
The Table Column Layout
Here you can change:
- The top and bottom padding
- The left and right padding
Finally, you can change the Border Width of the table.