Beaver Builder is a highly popular builder for WordPress. However, the Gutenberg block builder is gaining massive popularity due to its user-friendly interface. Recently, with PostX and its post blocks & premade templates, many users want to use these blocks in Beaver Builder.
To address this, PostX is thrilled to introduce Beaver Builder Integration. This integration makes it extremely easy to use Gutenberg blocks in Beaver Builder.
Continue reading to discover how to use Gutenberg blocks in Beaver Builder.
Why Use Gutenberg Blocks in Beaver Builder
You already know about Beaver Builder and Gutenberg Builder, and that’s why you’re here. But, for newbies who don’t know, both are WordPress-based builders and help create outstanding websites. We won’t go for an exact comparison, but both have pros and cons.
Default Gutenberg editors have excellent points for using those blocks in Beaver Builder. Gutenberg offers you reusable blocks, is mobile-friendly, and gives you a clean interface full of diverse elements. Which altogether helps you to create well-organized content structures.
And PostX enhances these capabilities to the fullest, like Gutenberg, by default, cannot create complex layouts. But with the PostX Row/column block, you can easily create complex layouts and a website just as you want. It also provides multiple other features like post slider, post modules, ChatGPT addons, custom fonts, featured video thumbnails, and a lot more.
And that’s why you should use PostX blocks and other Gutenberg blocks in Beaver Builder for the ultimate website creation.
In short, PostX integration with Beaver Builder creates unlimited design possibilities, enhances customization, and simplifies editing to give your site the ultimate outlook.
PostX also has integration with builders like Elementor and Divi.
How to Use Gutenberg Blocks in Beaver Builder
PostX is introducing Beaver Builder integration to let you easily use Gutenberg blocks in Beaver. And just like the PostX Divi integration, it’s quite simple and easy to use.
Let’s see how you can use Gutenberg Blocks in Beaver Builder with PostX.
Video Tutorial
If you want to watch a tutorial on the entire process, you can check our YouTube video here:
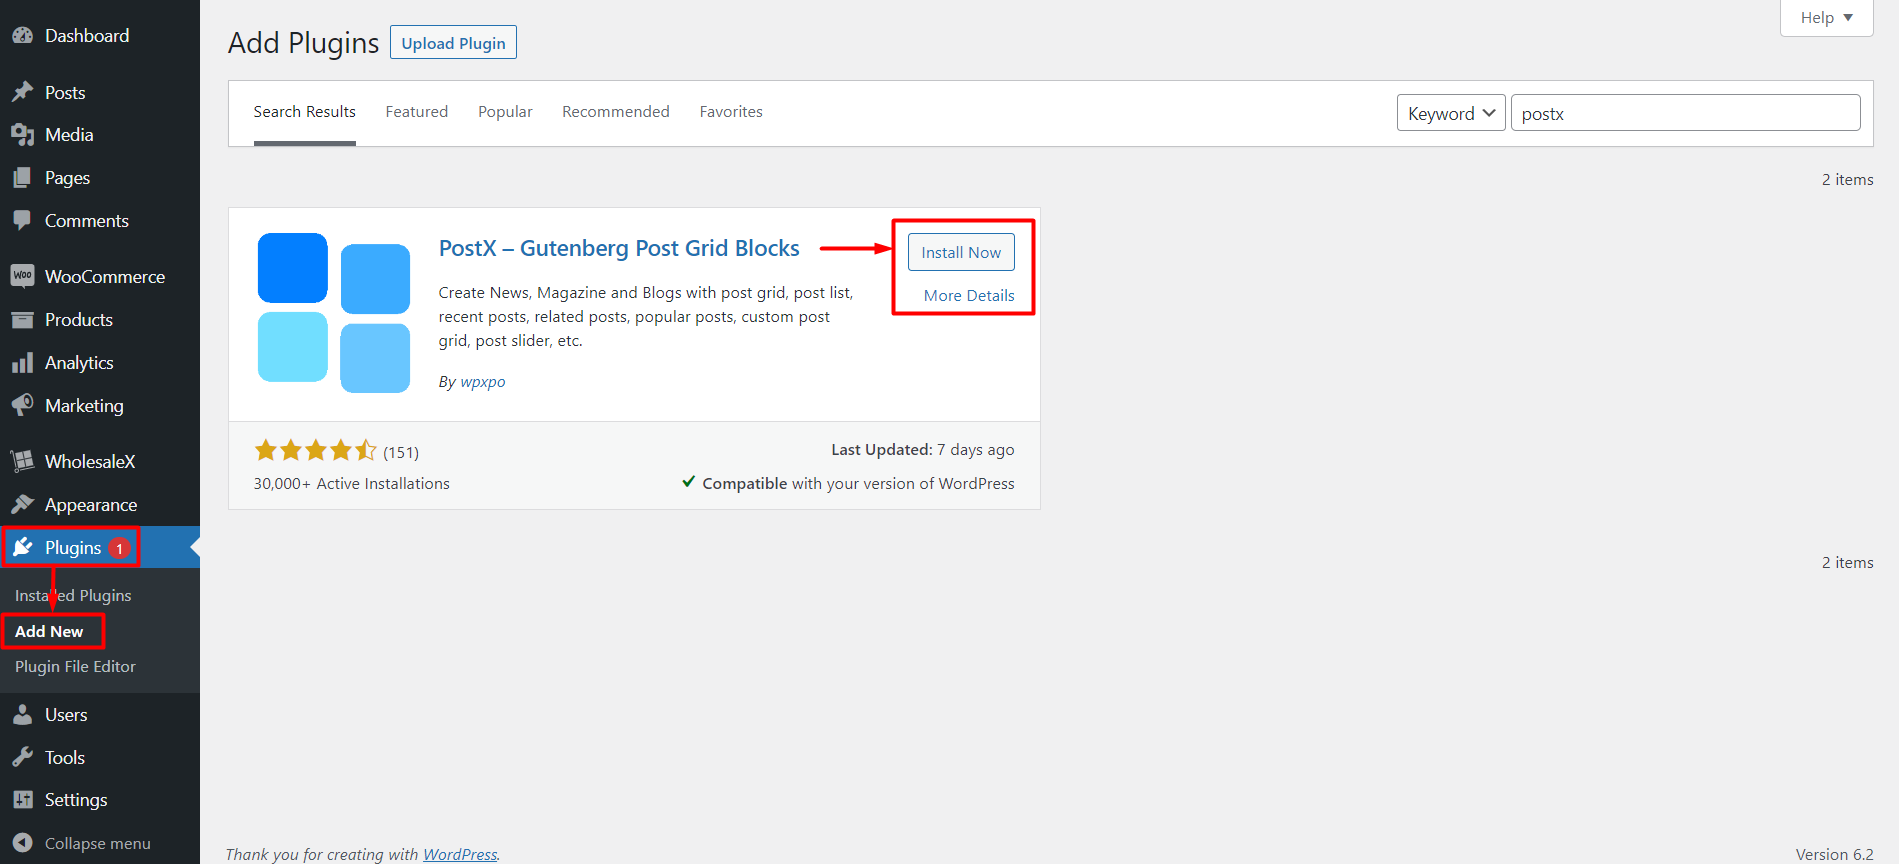
Step 1: Install and Activate PostX
First things first, you need to install and activate the PostX plugin. Once you activate it, you will have the Beaver addon to use Gutenberg blocks in Beaver Builder.
Step 2: Enable Beaver Builder and Saved Template Addon
After activating PostX successfully, you will unlock all of its features and add-ons, and it will be ready to use.
You have to enable 2 add-ons by PostX, which are:
- Beaver Builder
- Saved Templates
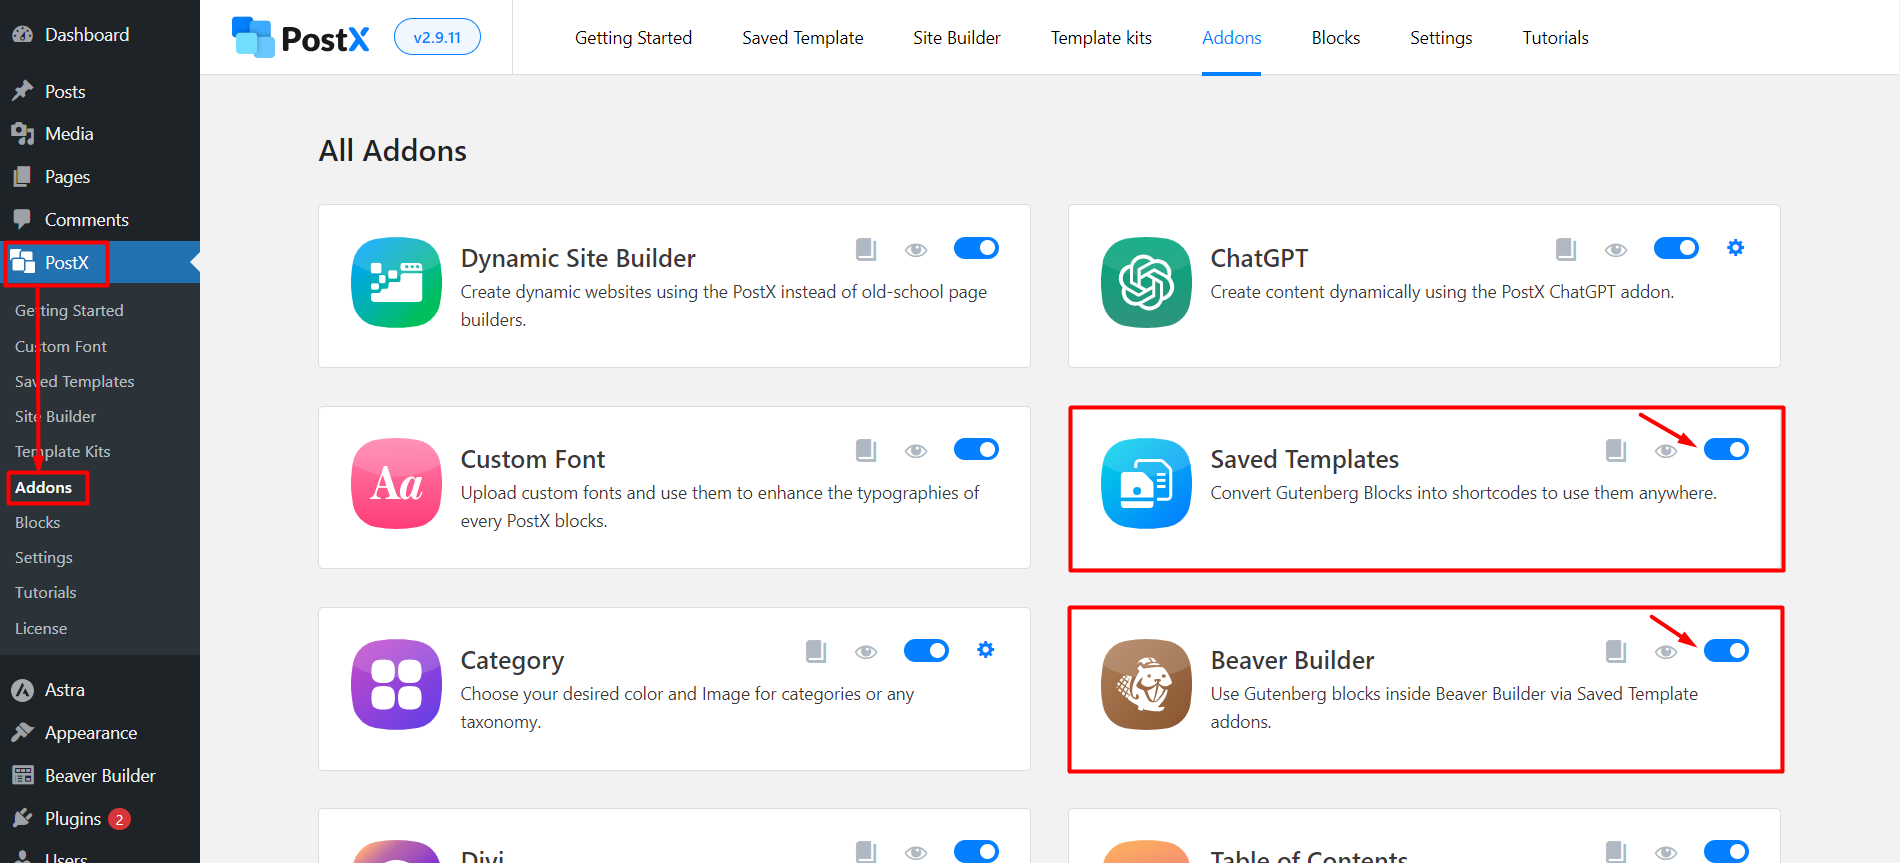
Go to the PostX Addons Section, and you will find them both. Use the toggle bar to enable the Saved Templates and Beaver Builder addon.
Step 3: Create a Saved Template with PostX
You need to create a Saved Template with PostX to use Gutenberg blocks in Beaver Builder.
Go to the PostX Saved Templates, and you can create new saved templates by clicking the “Add New Template” button. You can also edit the existing ones from here.
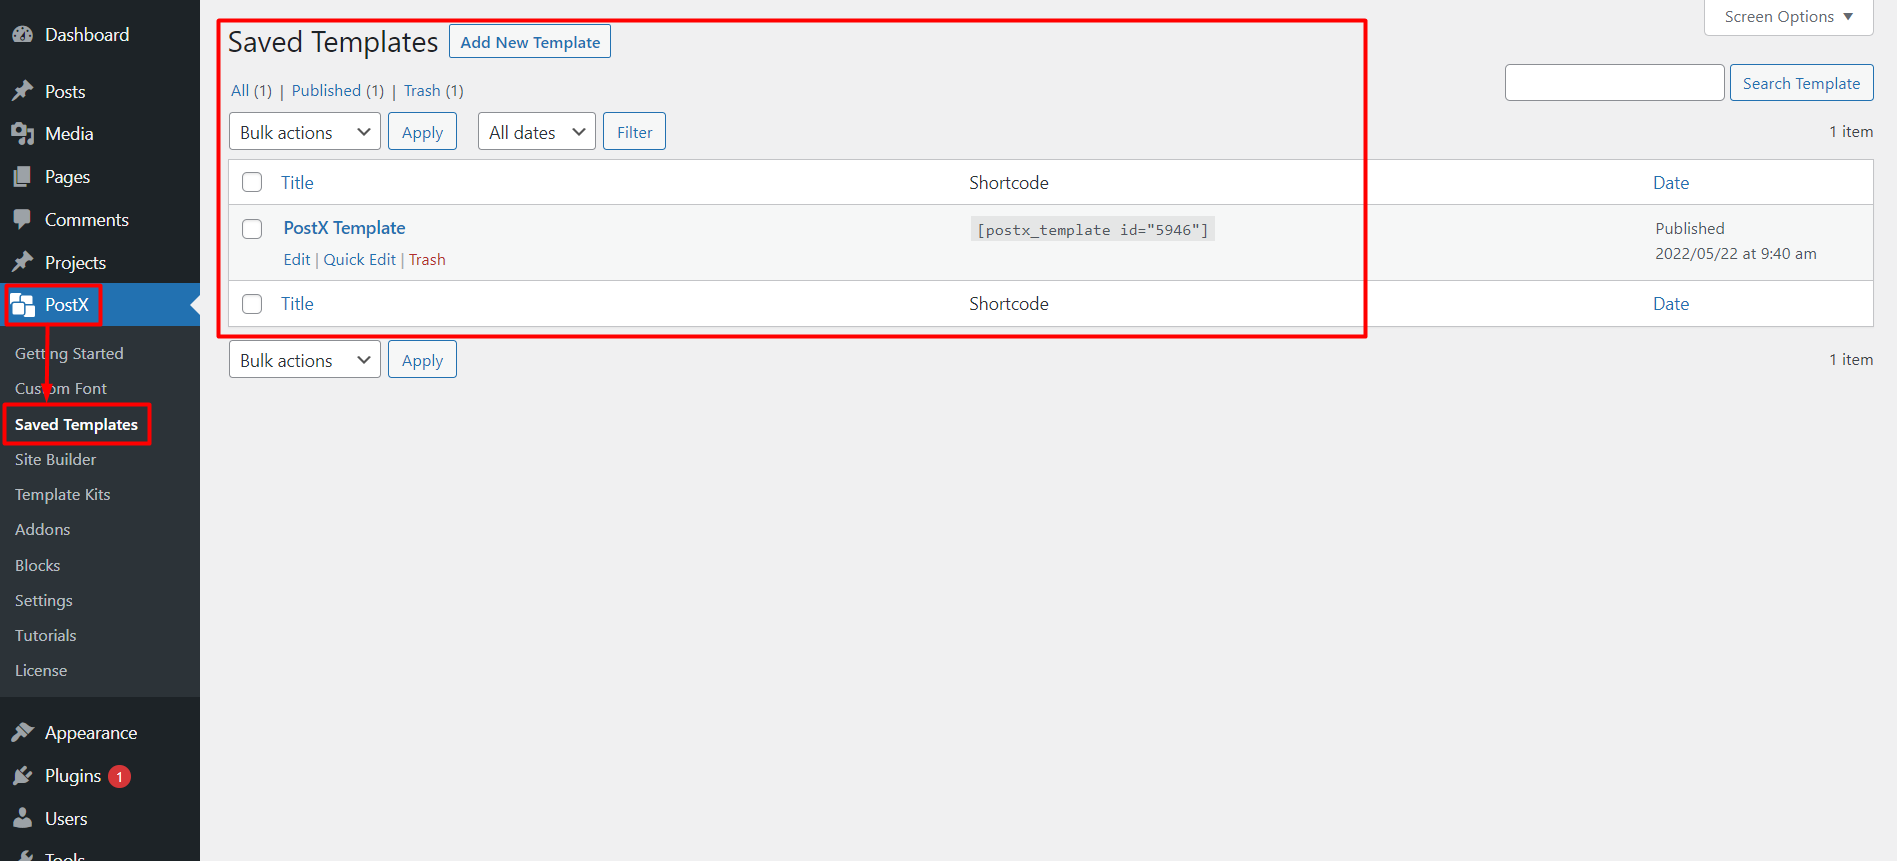
Let’s show you from scratch, so Click the “Add New Template” button, and it’ll load the Gutenberg editor. And you can easily create your template using PostX Blocks, PostX Premade patterns, or any other Gutenberg Blocks.

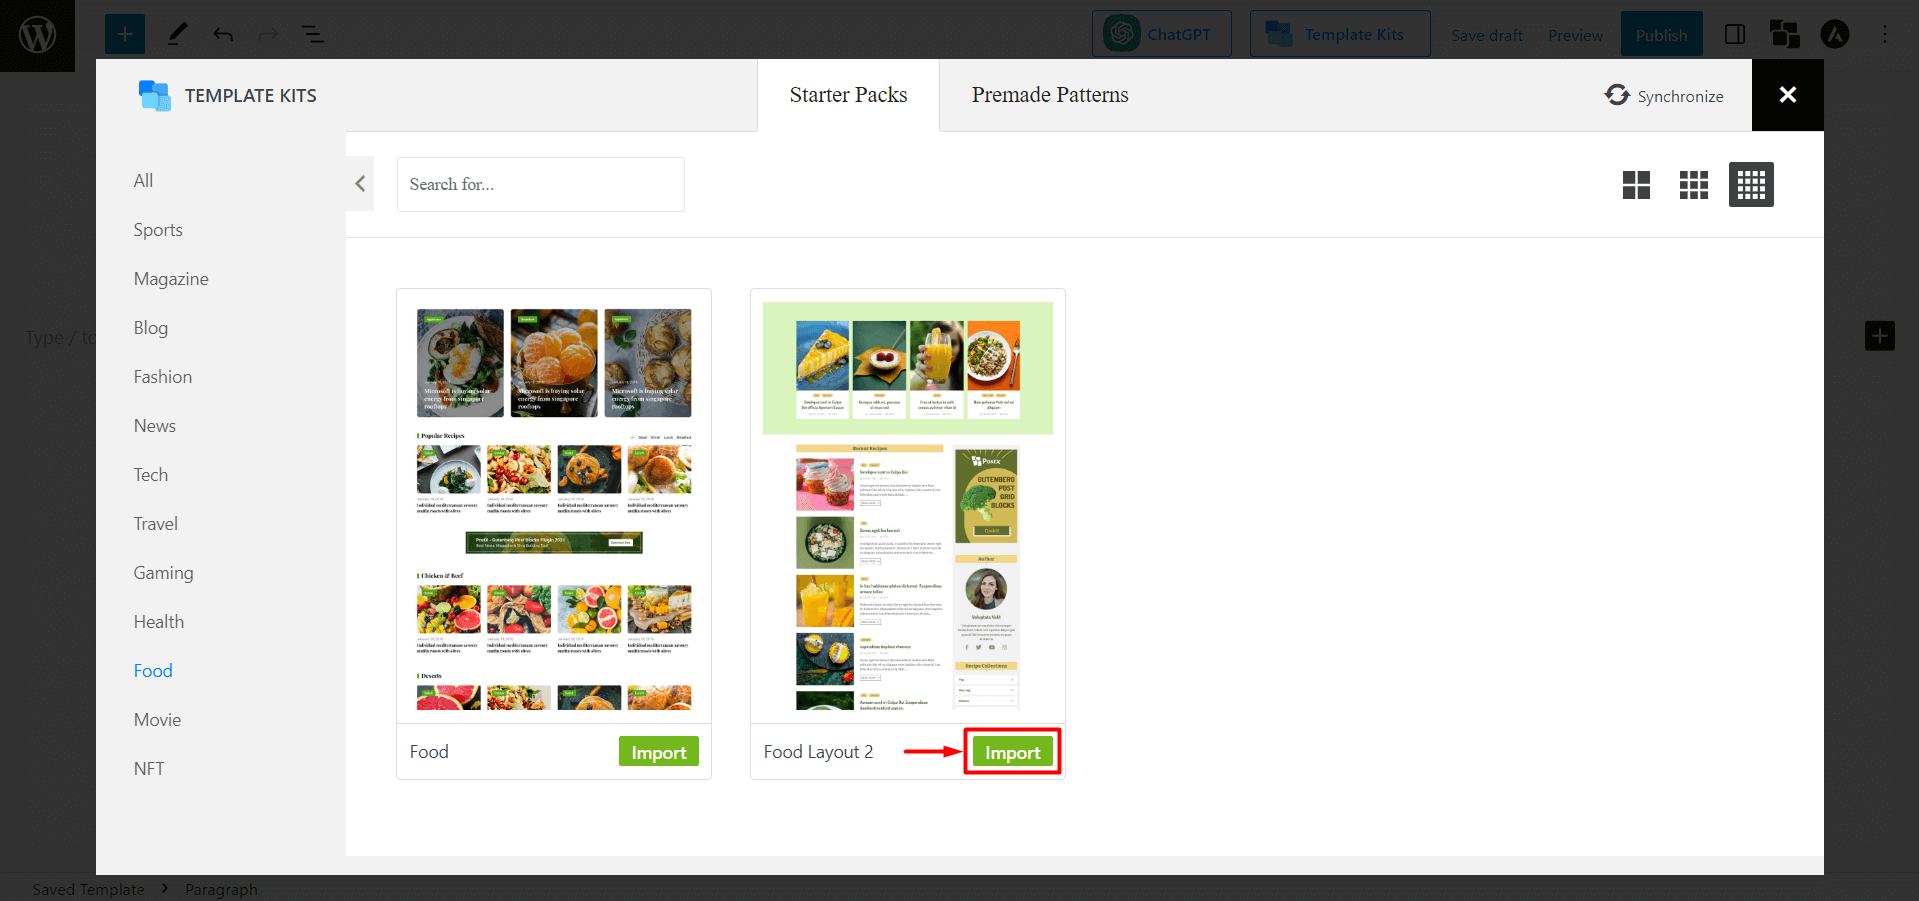
Now, let’s use PostX Template Kits library to make things easy. Click the Template Kits button to open the PostX Premade library.
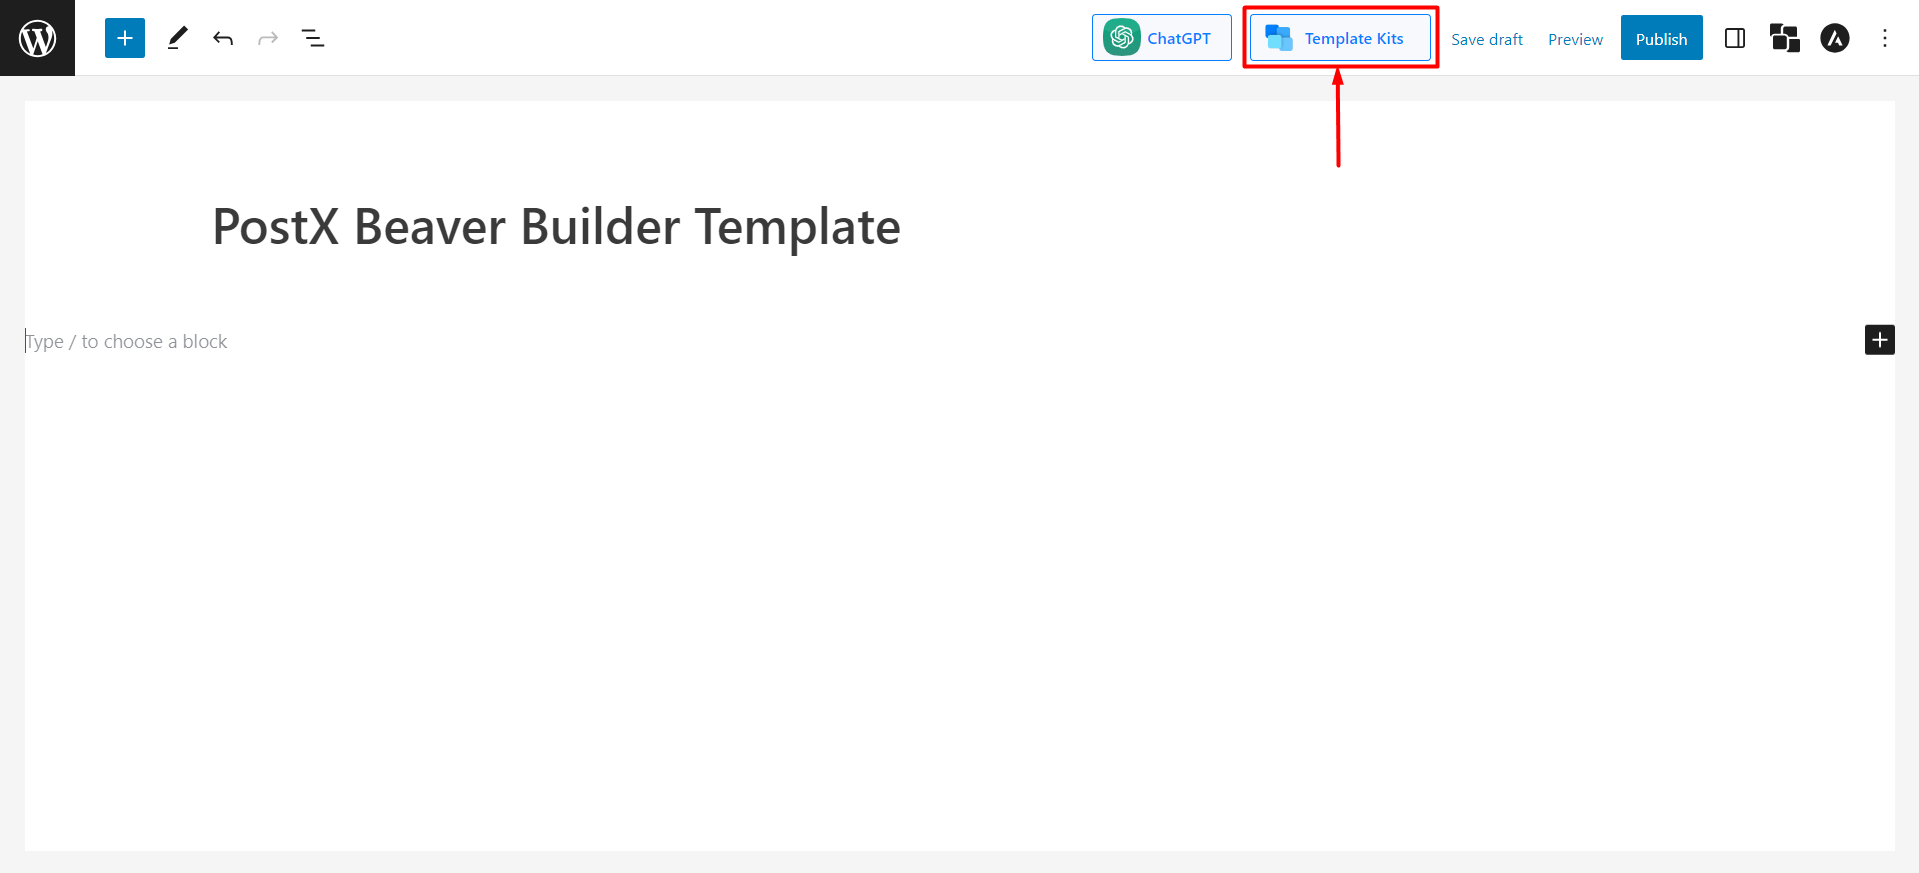
PostX provides Premade Starter Packs and Templates to help you create layouts in one click. Once you click it, you will see all the Starter Packs/Premade Templates by PostX. Select your desired one and click “Import.” We will use Food Layout 2 as an example.
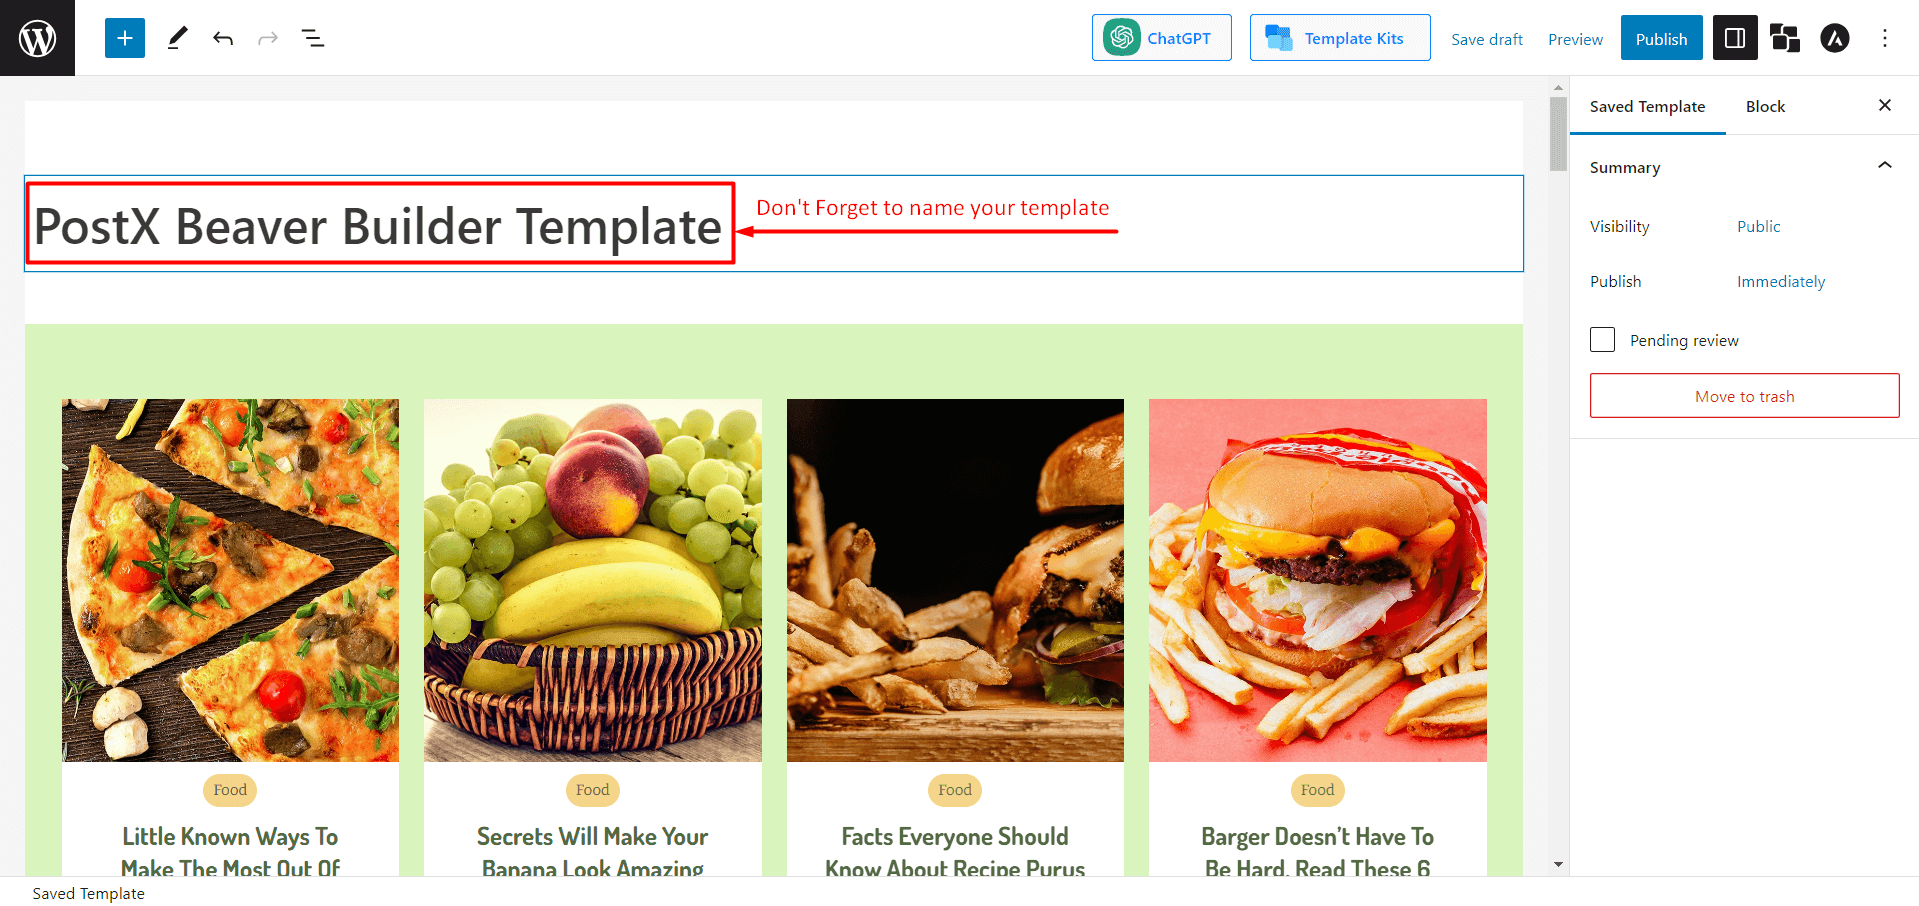
You must give this template a name, as you have to select this template in the Beaver Builder module.
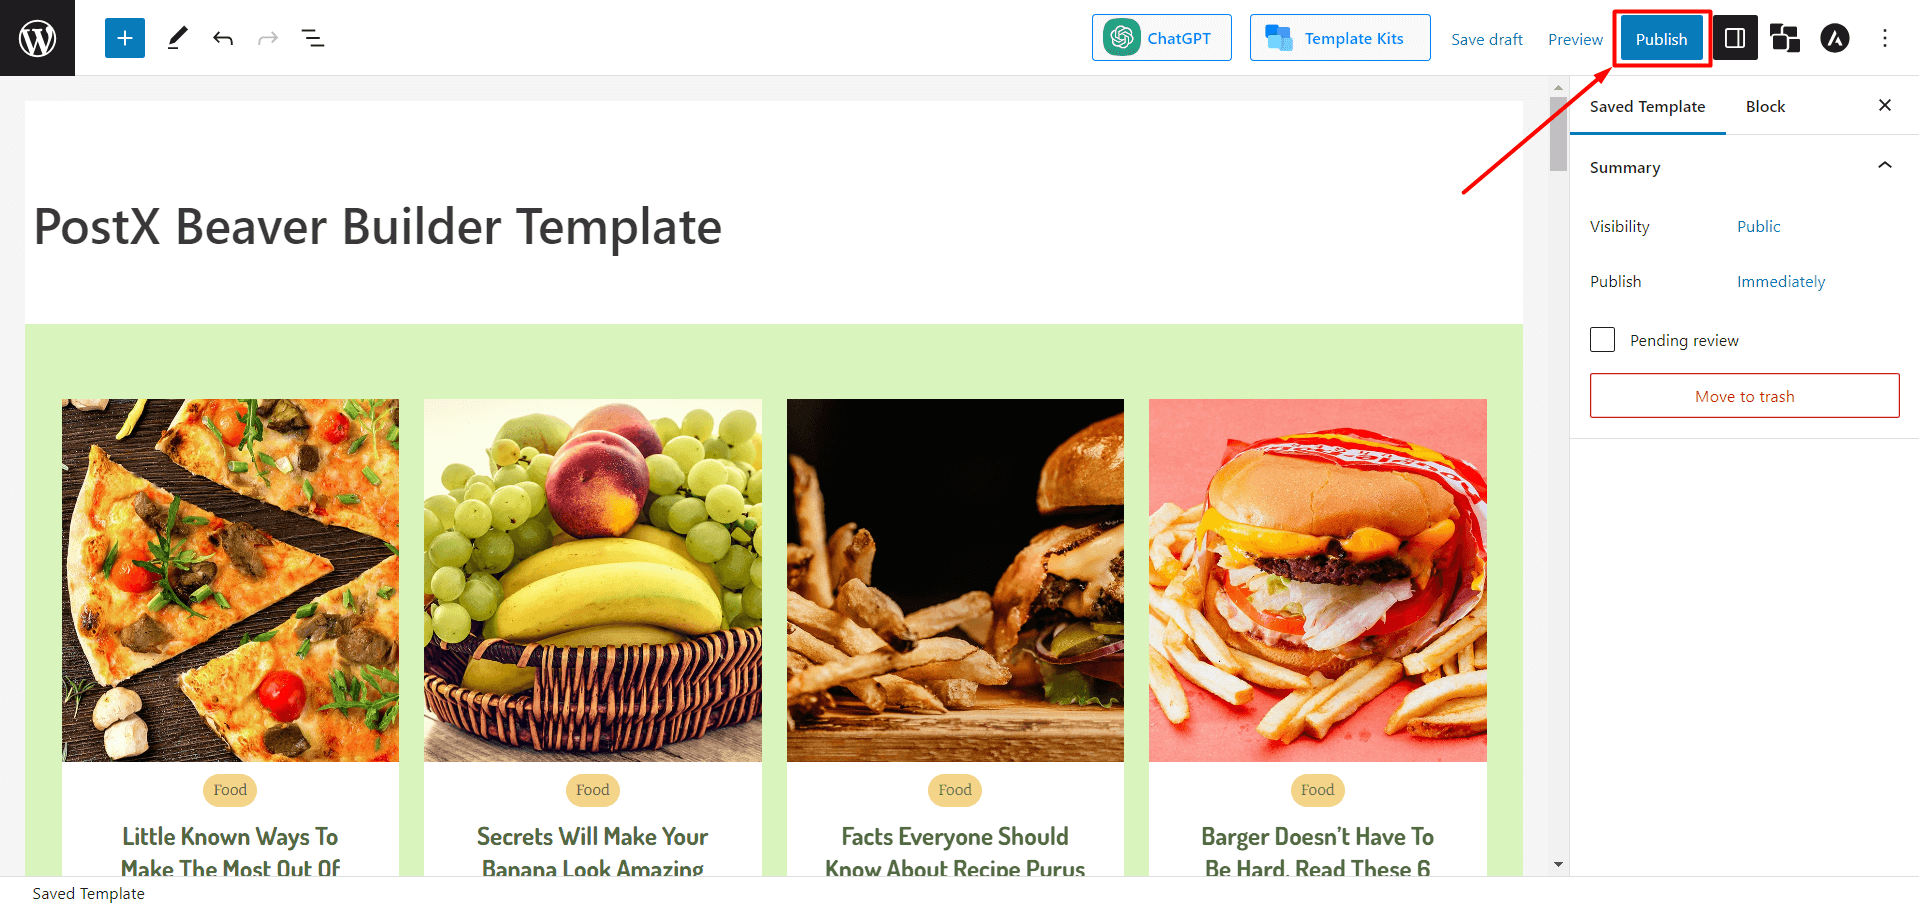
After creating your template, click “Publish.” Now you can use this template in Beaver Builder.
Step 4: Use PostX Template in Beaver Builder
We showed you how to create a PostX Saved Template in the previous step. So, now we will show you how to use it in Beaver Builder.
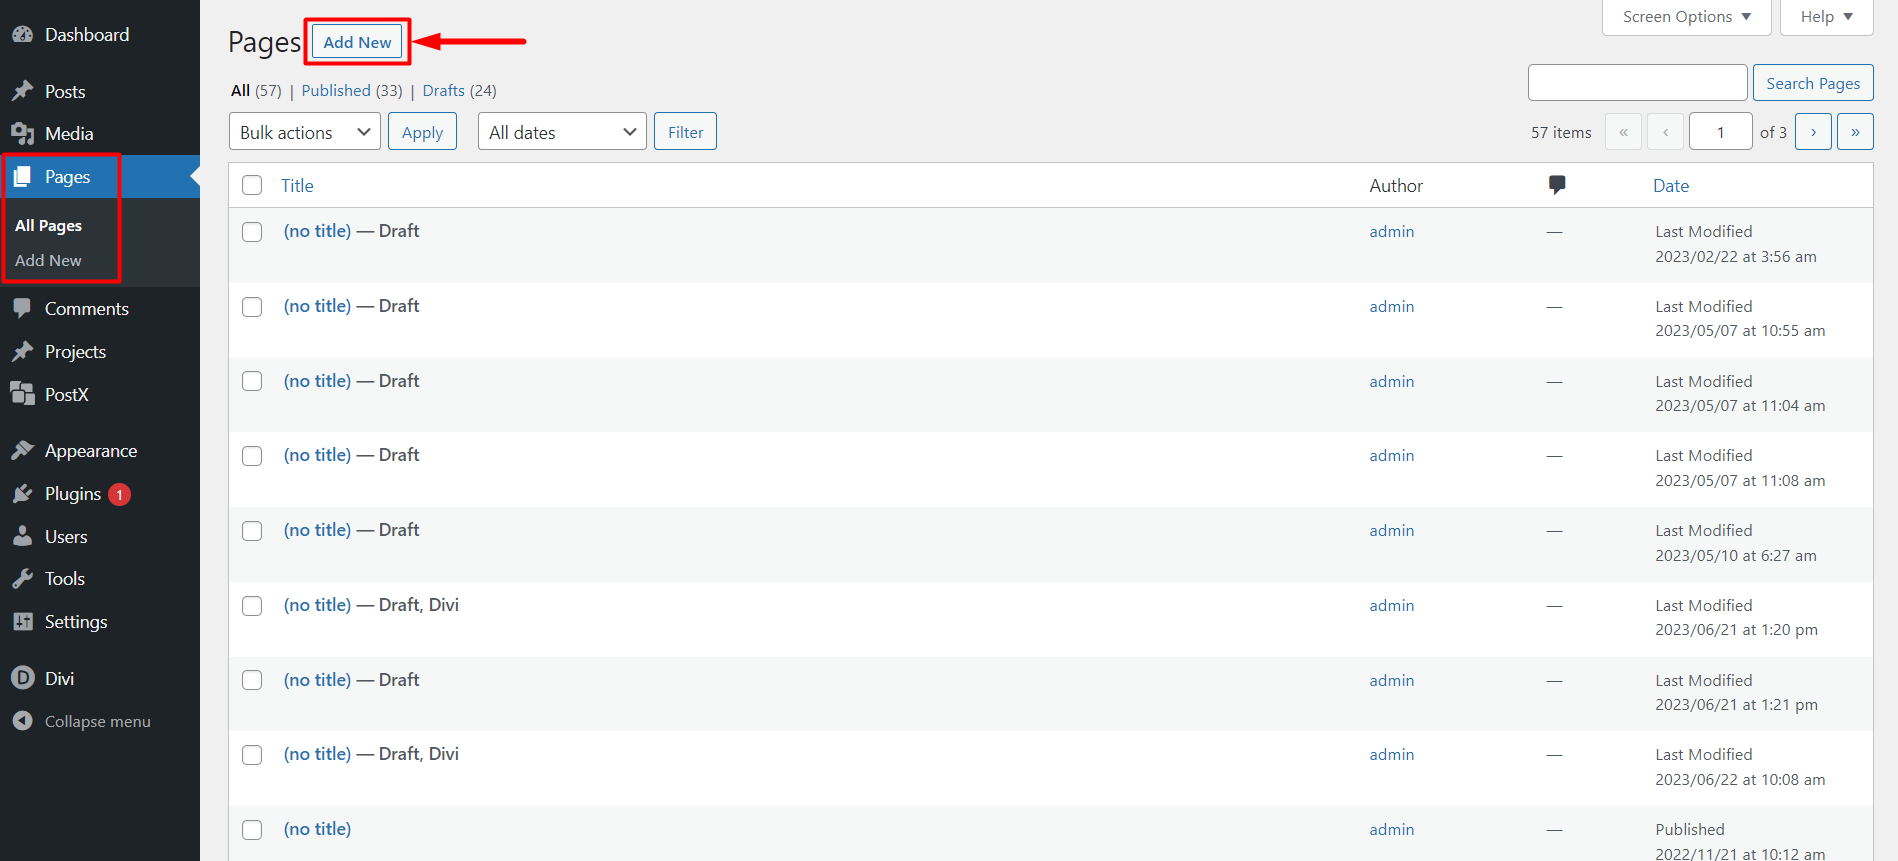
From the WordPress Dashboard, go to Pages and click “Add New Page.”
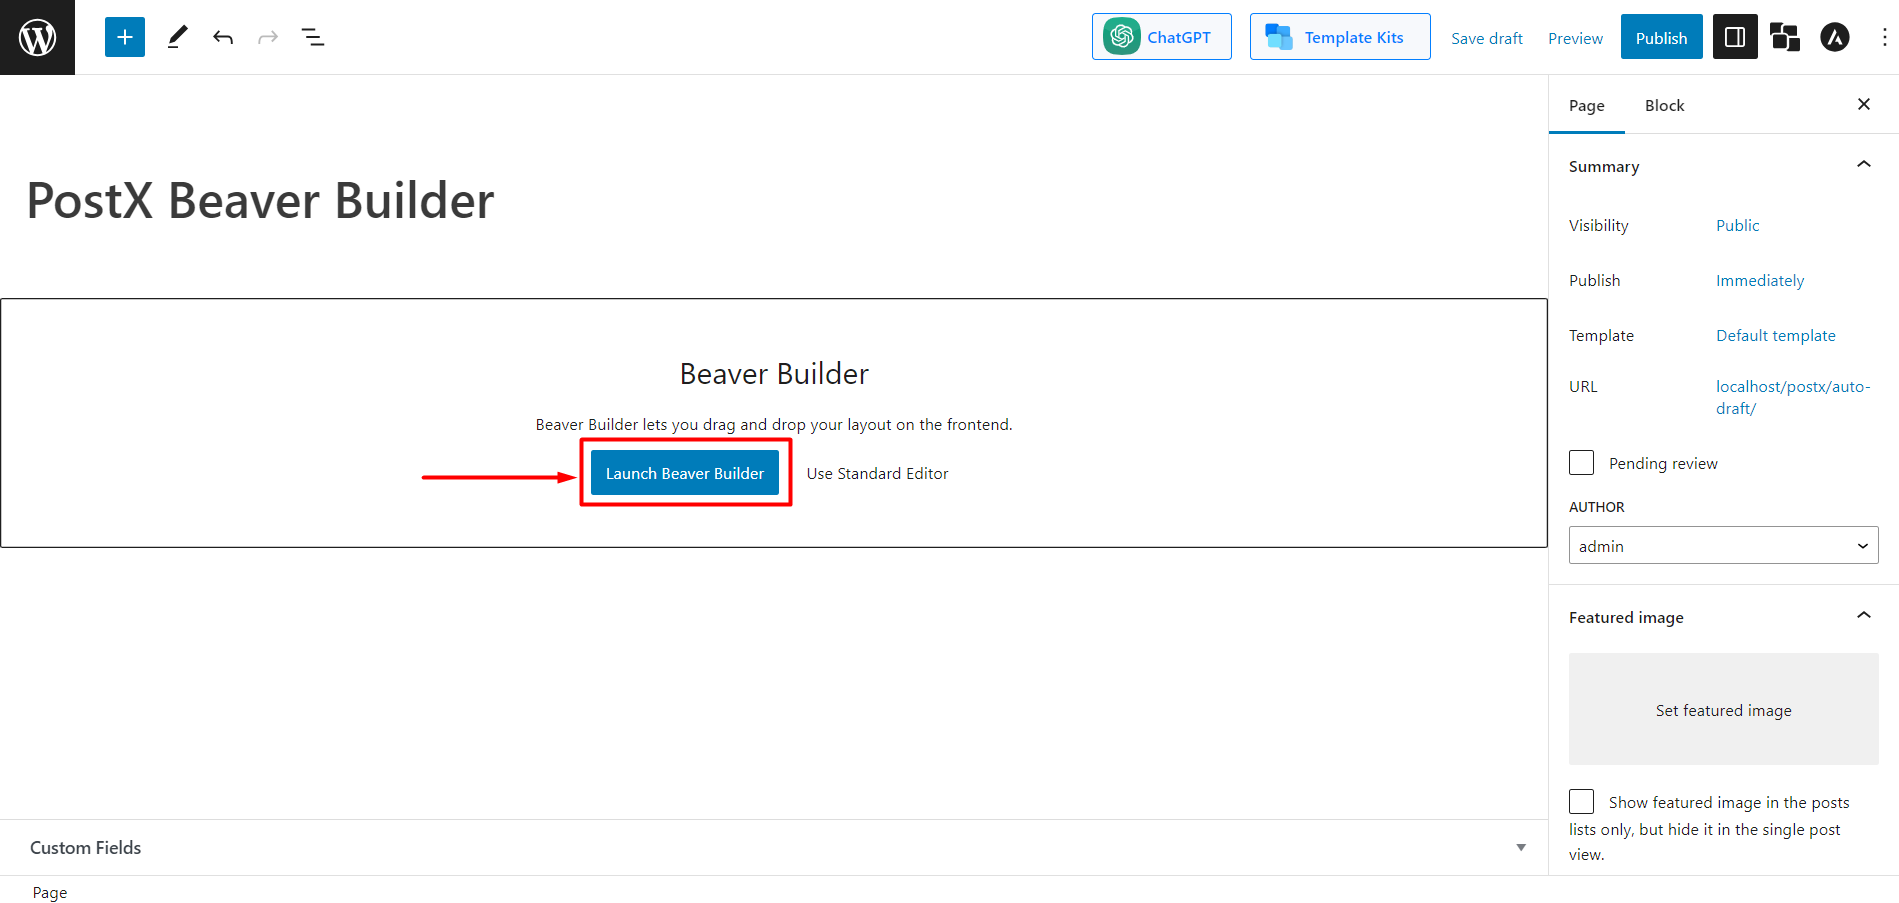
Once in the page editor, you will see a pop-up from Beaver Builder to “Launch Beaver Builder.” Click on it, and it will redirect you to Beaver Builder.
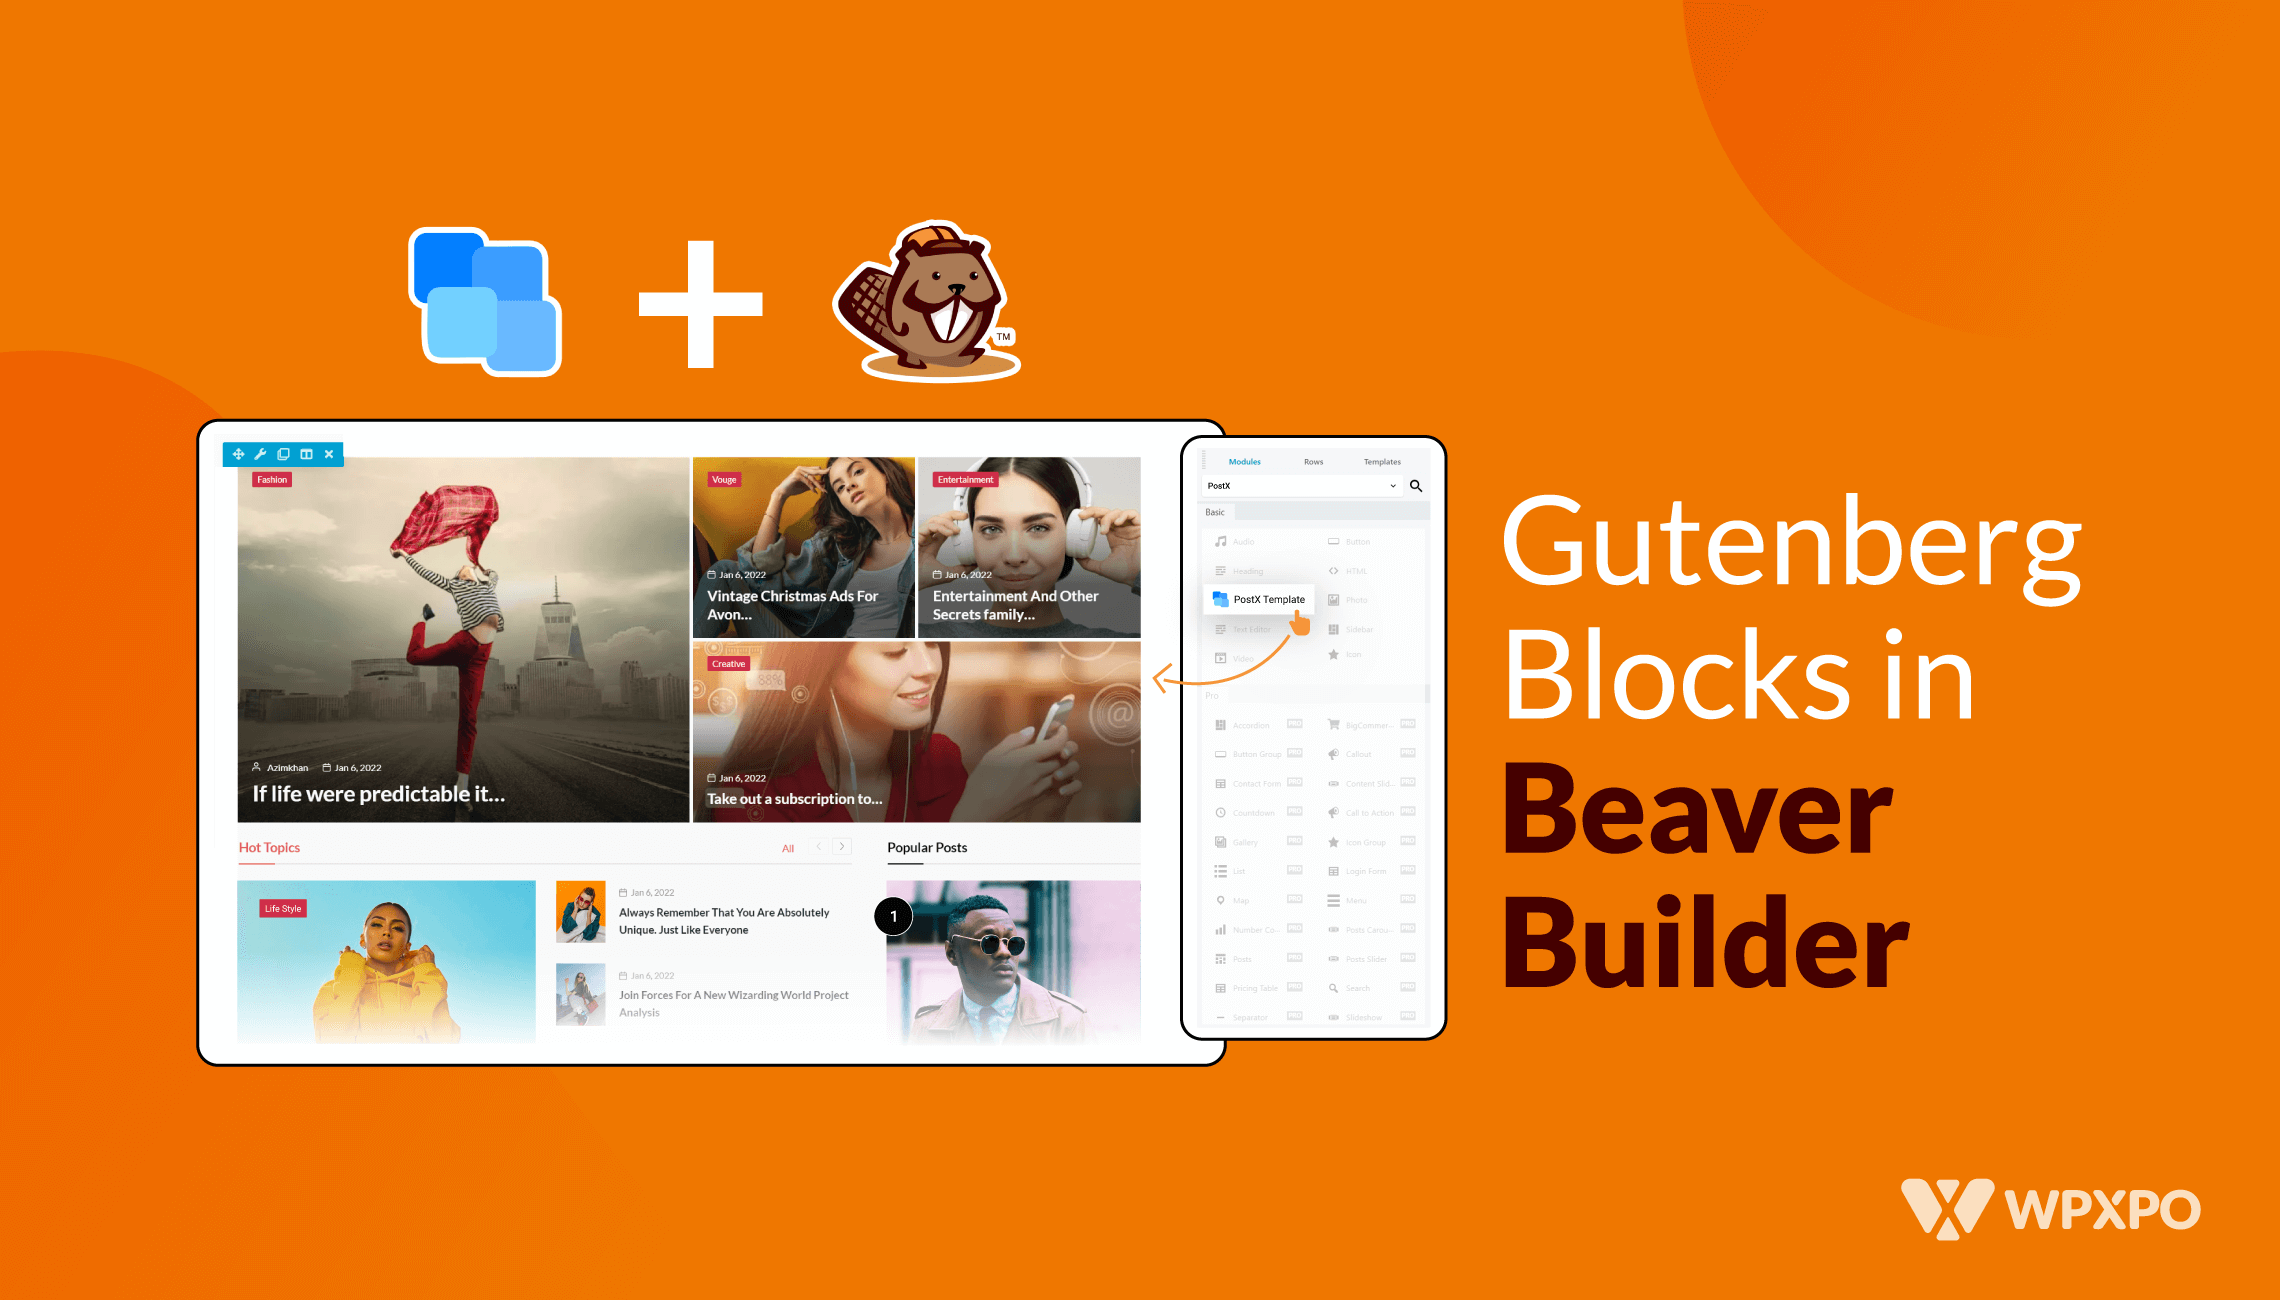
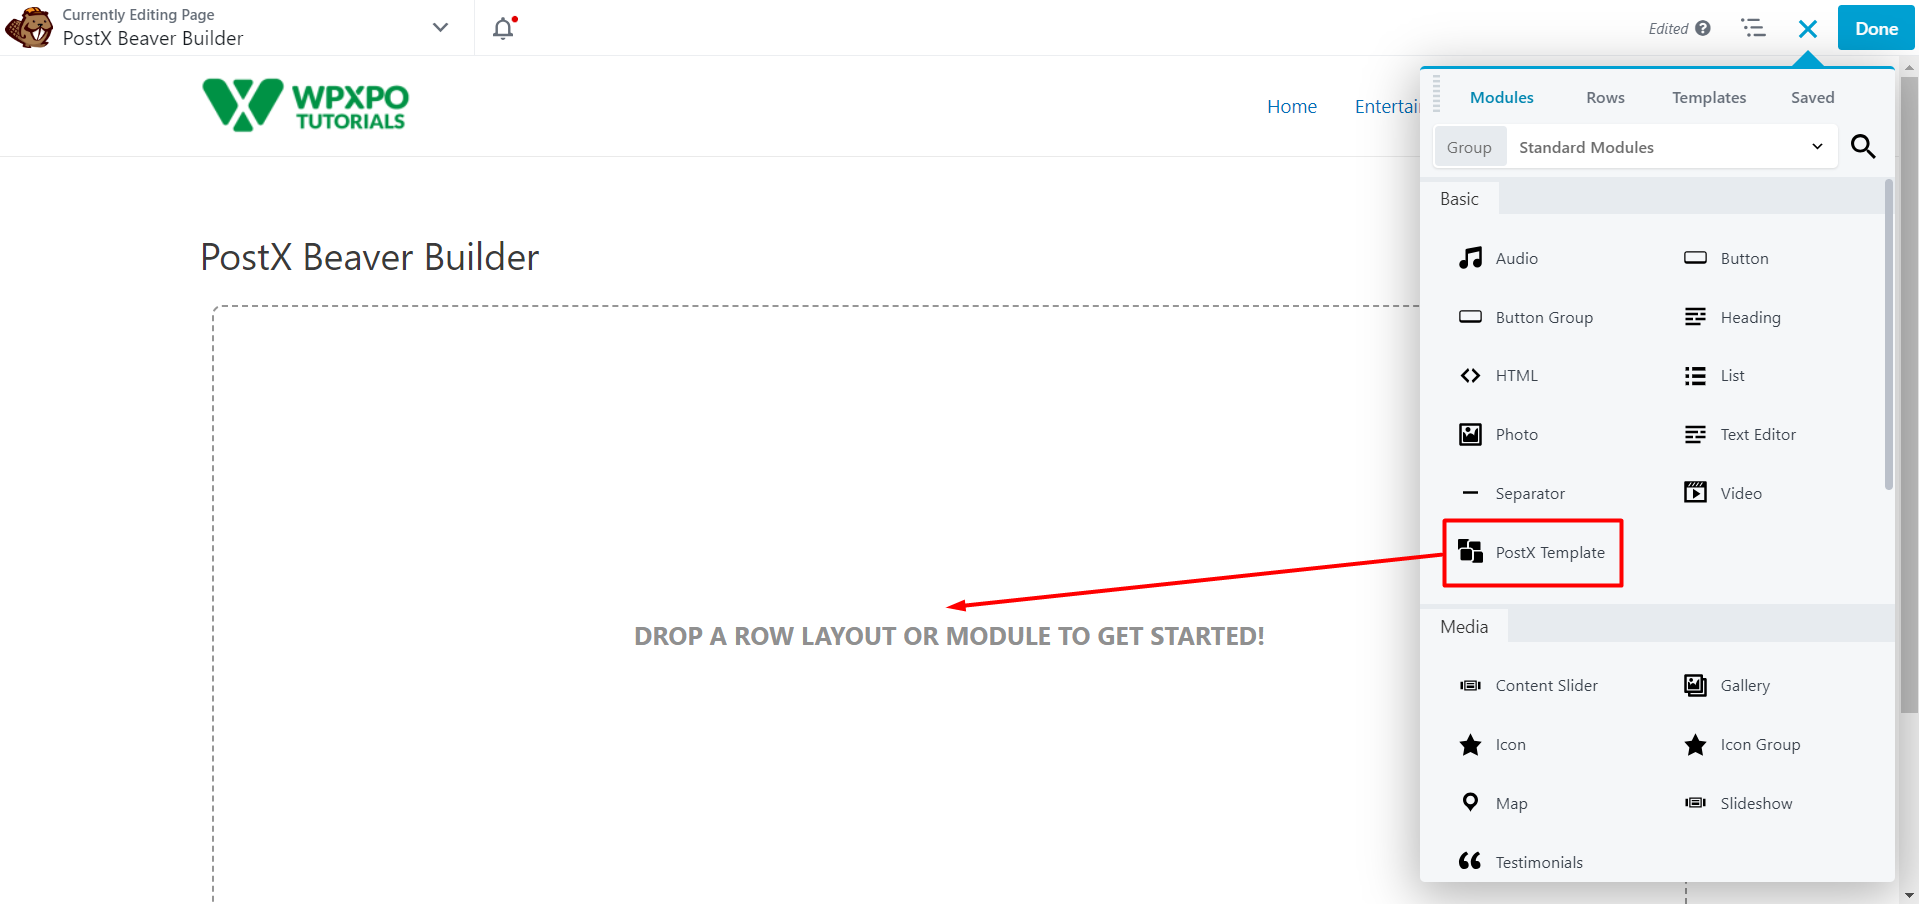
Once you are inside the Beaver Builder, you will see “PostX Templates” in the Basic section, or you can search PostX Templates in the search bar. Now you need to Drag and Drop the “PostX Template” in the builder. And Beaver Builder will let you select your templates.
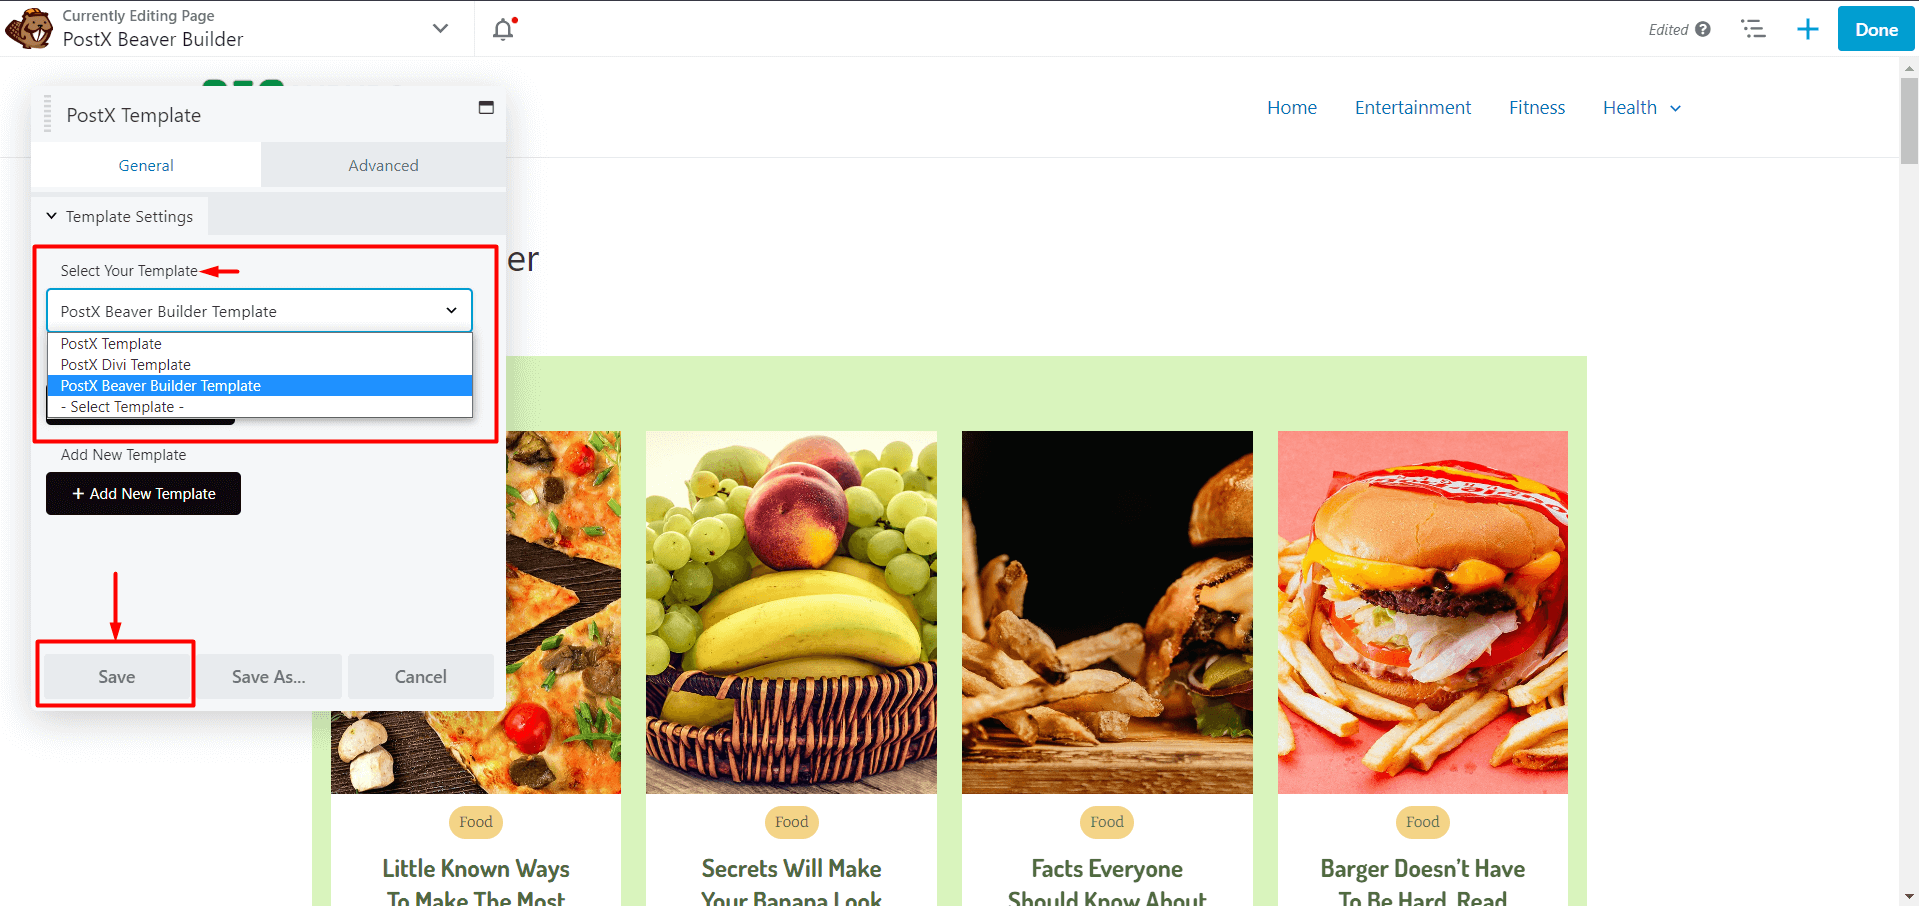
Now, from “Select Your Template,” choose the Template you want to use and Click the “Save” button.
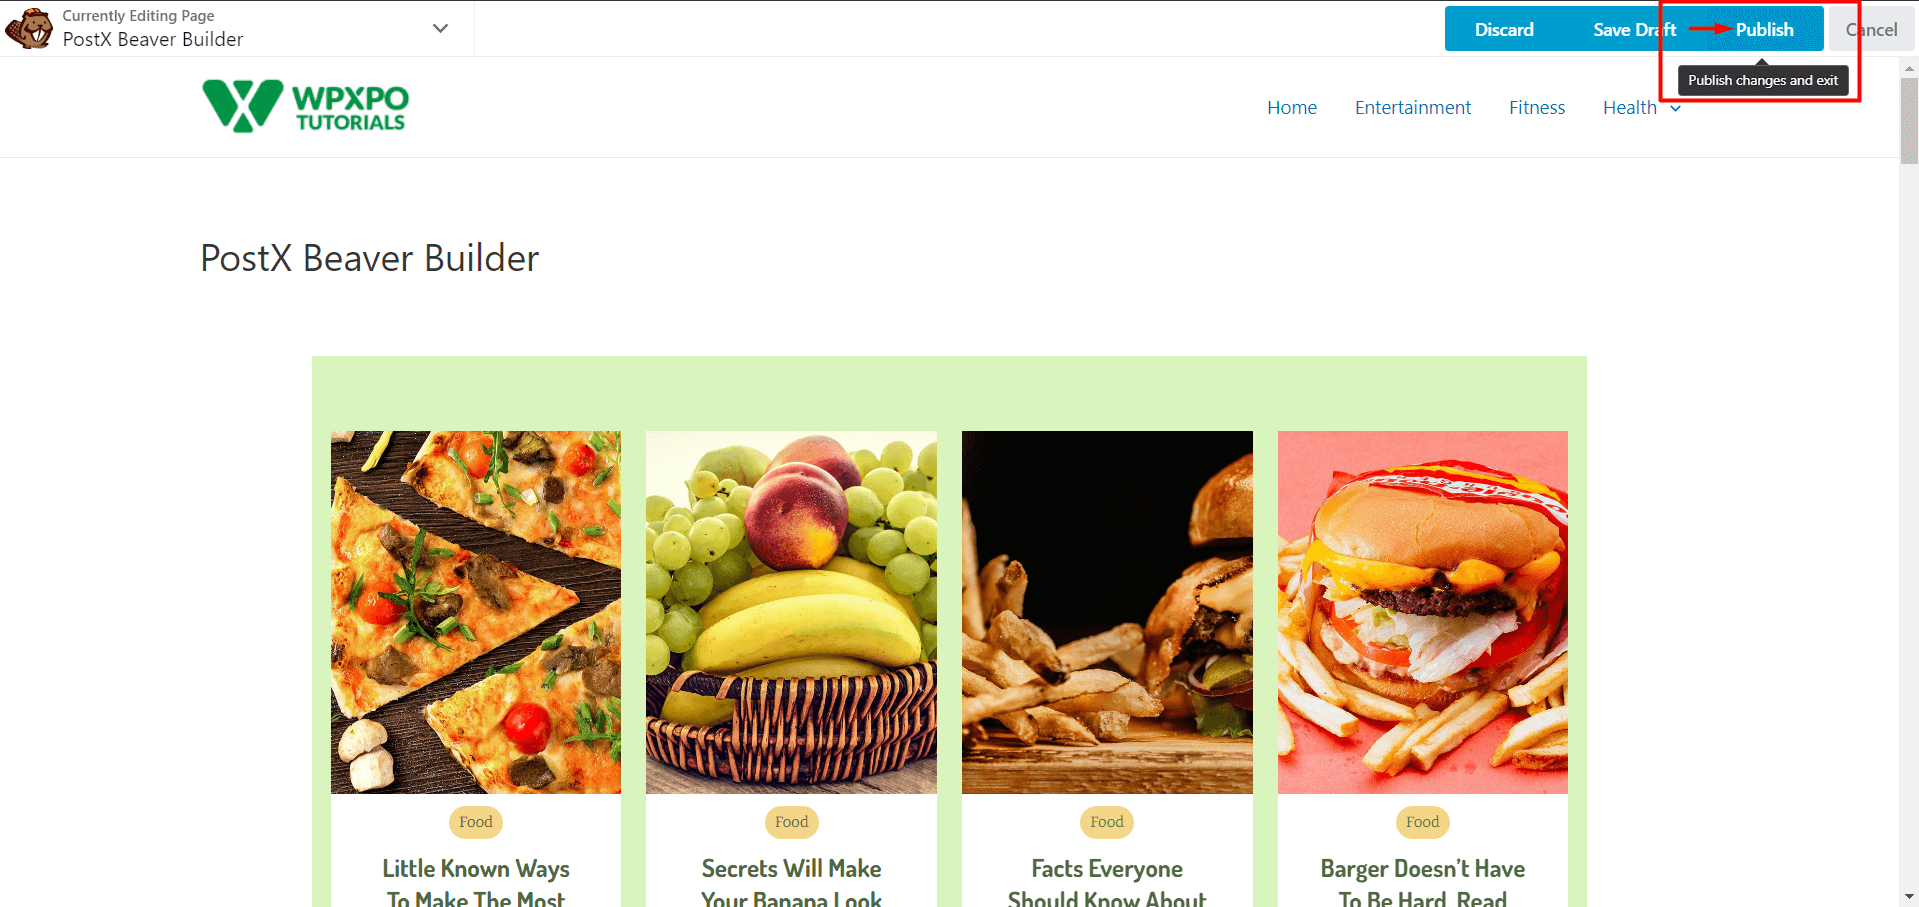
Now all that’s left is to publish the page. So, click “Done” and then “Publish”, and you’re done.
Step 5: Customization (Optional)
If you want to make any changes or update your template, you can do that with the PostX Saved template.
Go to the PostX Saved Templates, and click “Edit” on the saved template you need customization. Make necessary changes and click “Update.”
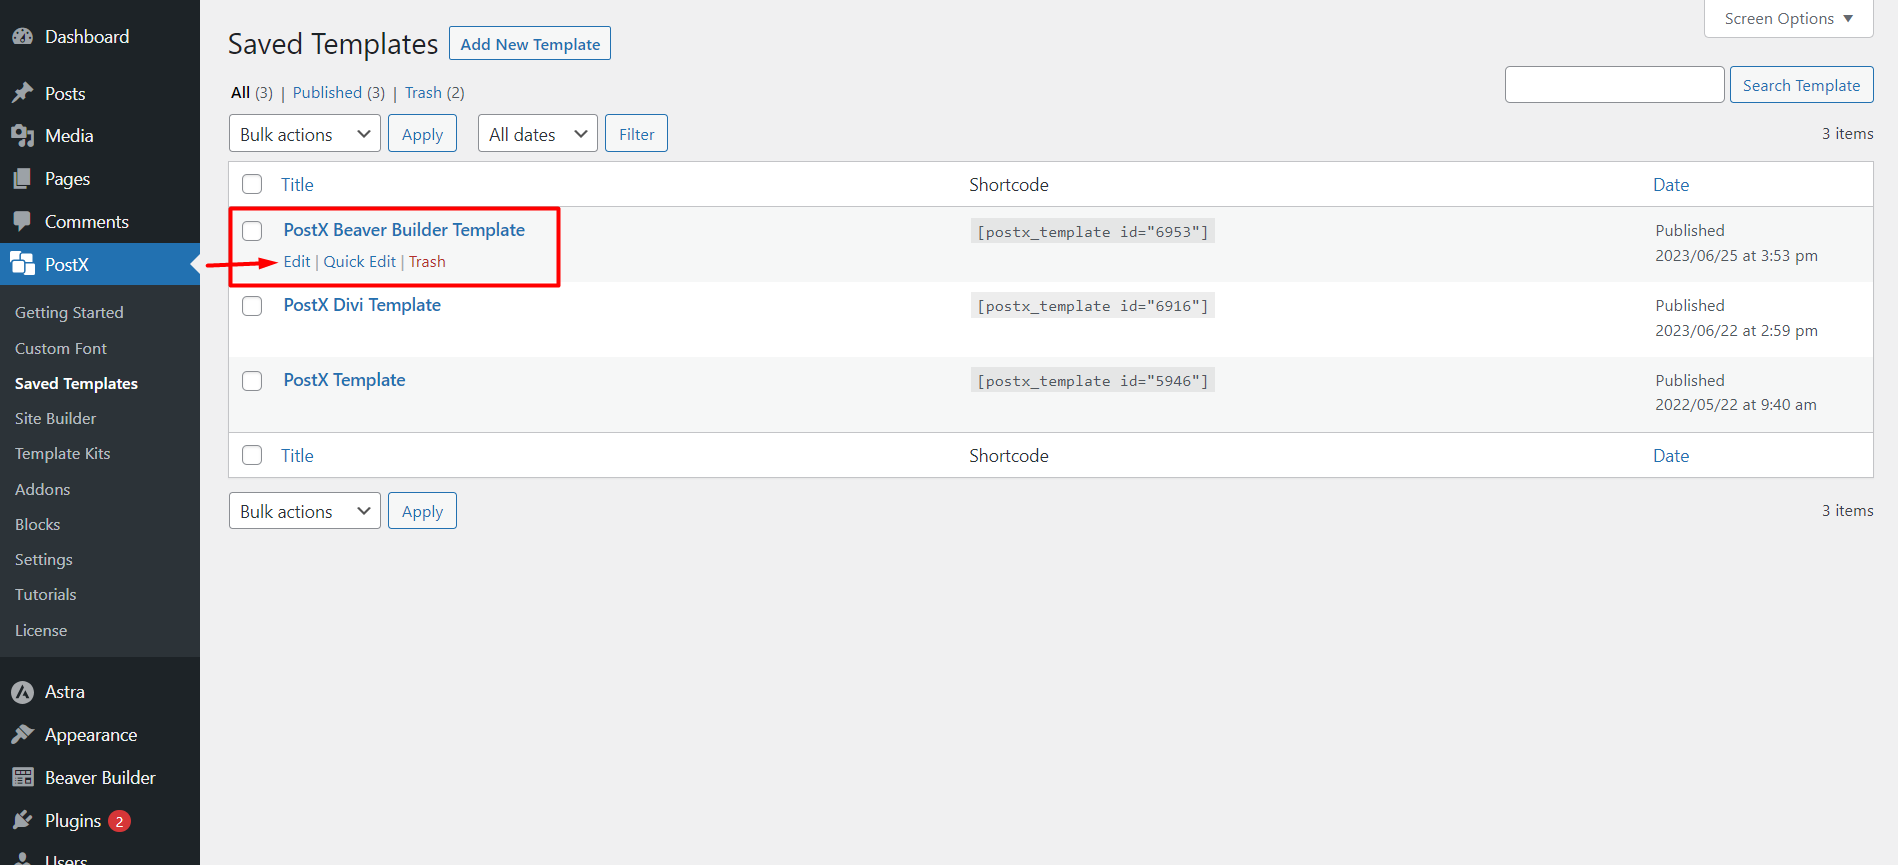
The changes will be automatically synced in the Beaver Builder, and you don’t have to go through every step again.
FAQ
Is Beaver Builder Compatible with Gutenberg?
The Beaver Builder plugin is fully compatible with the WordPress editor. You can move text and pictures between Beaver Builder and the WordPress editor in a limited way. But if you use PostX, you can use any PostX blocks and Gutenberg blocks in Beaver Builder.
How to use Gutenberg Blocks in Beaver Builder?
Follow these steps to use Gutenberg blocks in Beaver Builder:
- Install and activate PostX.
- Enable Saved Template and Beaver Integration Addon.
- Create a Saved Template with PostX.
- Use the Saved Template in Beaver Builder.
- Publish the page.
Is Beaver Builder Better than Gutenberg?
Both Beaver Builder and Gutenberg Builder have their own pros and cons. Gutenberg is free, easy to use, and faster, but it lacks in creating complex layouts. Beaver Builder is for complex layouts and more control over responsive layouts, but it comes with a price.
Resources You’ll Love
- PostX Dynamic Site Builder: Build your Site Within A Few Clicks
- How to Add Post Carousel in WordPress
- How to Display Subcategories on Category Pages in WordPress
- WordPress Blog Filter: How to Add Filter in WordPress Blog Page
- How To Create A Custom Home Page In WordPress: Answers To Your All Questions!
Conclusion
In conclusion, PostX and Beaver Builder integration brings together the best of both worlds. With PostX’s extensive collection of Gutenberg blocks and premade templates, you can now easily use Gutenberg blocks in Beaver Builder.
The combination of PostX and Beaver Builder allows you to unlock unlimited design possibilities and take advantage of the incredible customization options offered by Gutenberg Blocks. Whether creating complex layouts or incorporating unique features and custom fonts, PostX lets you easily create stunning websites.
Discover the perfect combination between PostX and Beaver Builder today and take your website layout to new heights.

