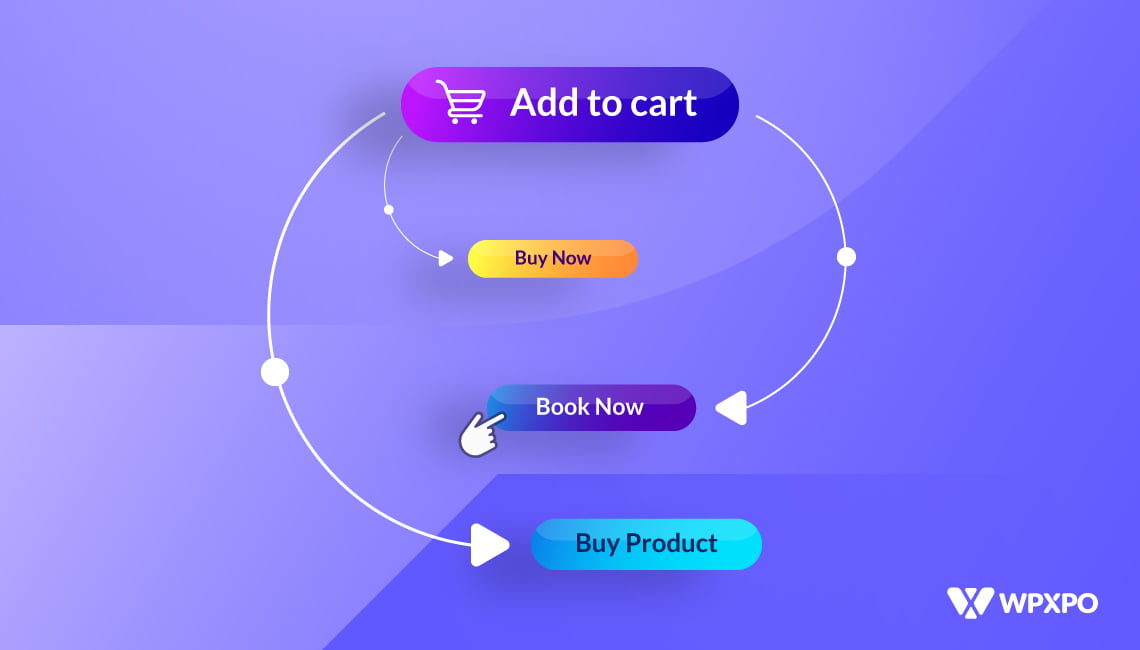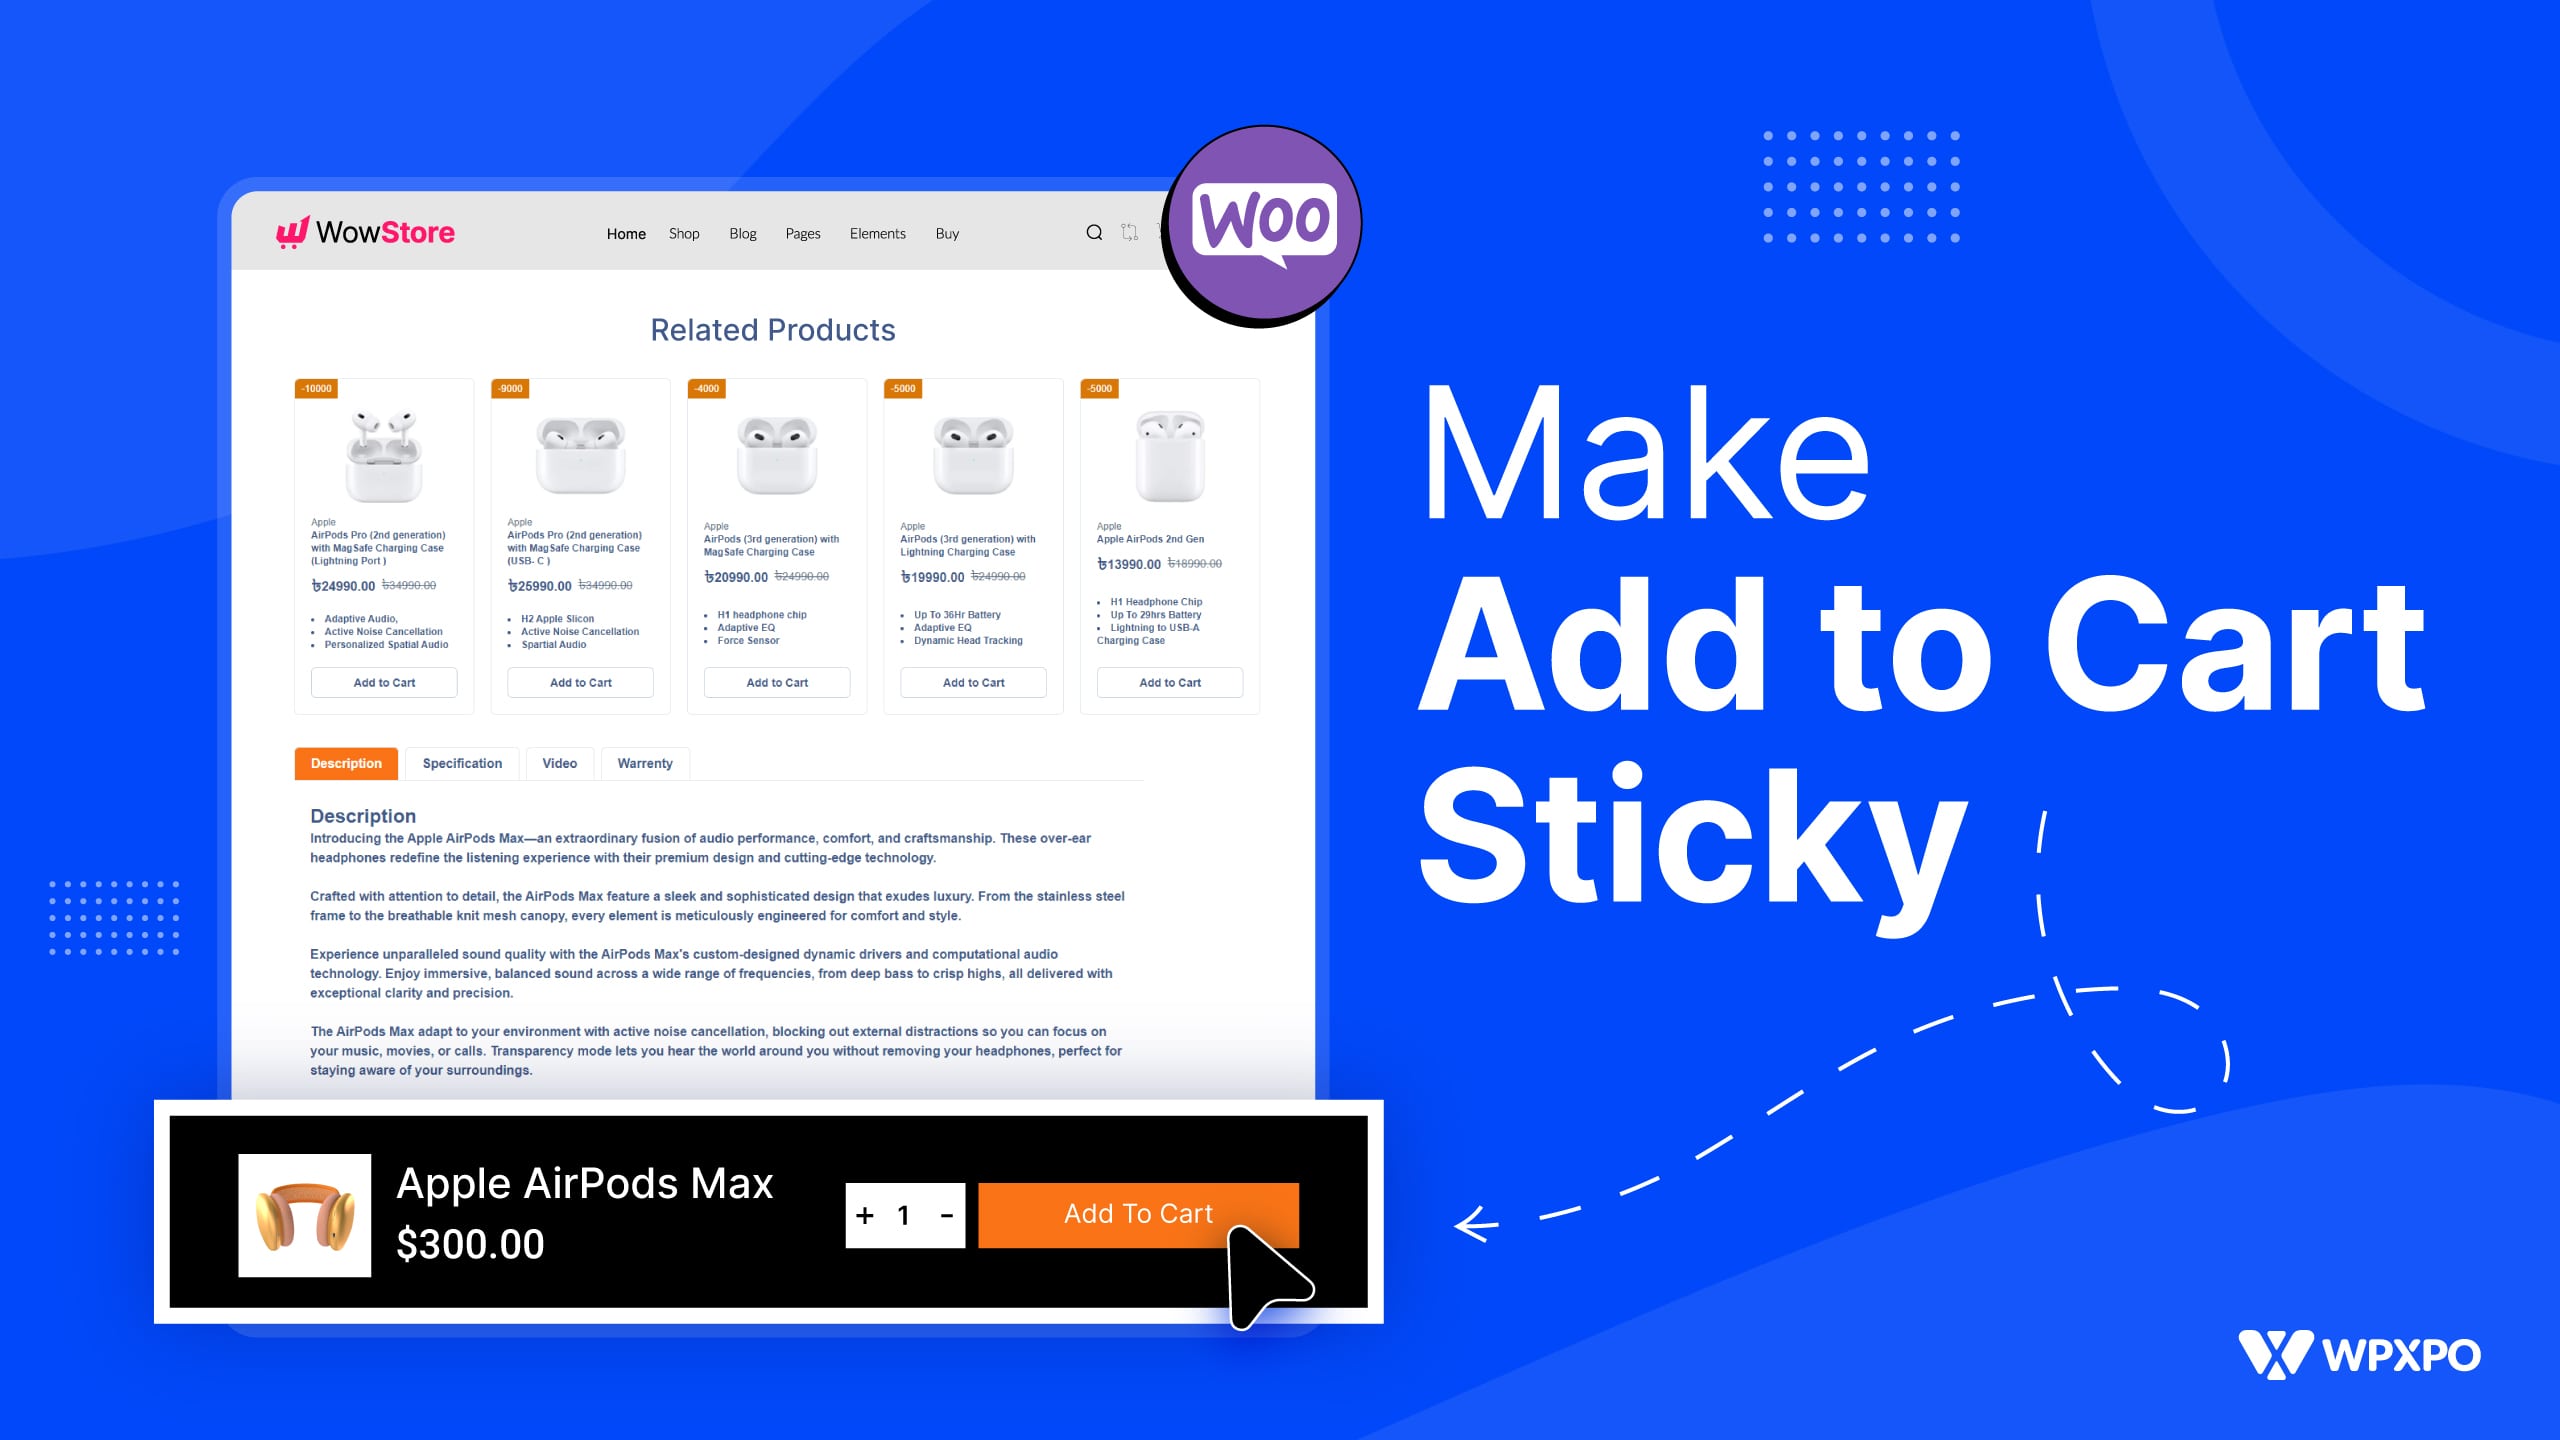
Did you know there’s a thing called a sticky add to cart button? Well, there is – and it’s quite useful.
Now the question is, how?
You see, when you make an add to cart sticky – an interesting thing happens. Since the user sees the “Add to Cart” prompt – even when he scrolls the page – it nudges the user to make a decision, possibly in favor of the WordPress WooCommerce store owner.
This introduces the opportunity to boost sales for the store.
So, you’re interested, right? Unfortunately, there’s an issue:
The sticky add to cart feature doesn’t come with the default WordPress WooCommerce plugin. Well, there is a solution to that.
Key Takeaways
The discussion highlights:
- The benefits of using sticky cart buttons
- How to enable the sticky add to cart feature with WowStore – the complete process
- Some important QnA in between that highlights important info
Benefits of Using an Add to Cart Button that’s Sticky!
There are some benefits to making your add to cart sticky. I’ve gathered some insightful examples for you:
Improved Conversion Rates
Modern studies have seen upwards of a 35% increase in conversion rates thanks to the sticky buttons – the study at Baymard Institute saw that buttons like these have a positive impact on user flow.
Reduced Cart Abandonment
Studies indicate that sticky cart buttons can reduce the cart abandonment rate by 15%. However, thorough A/B testing can yield better results.
Average Order Values Increased by 20%
Various case studies indicate that using sticky add to cart buttons can improve the average order values by 20% and more!
Better Click-through Rates (CTR)
Click-through rates improve by 20-25% because of the sticky buttons – A/B testing and independent surveys suggest that the number can go even higher. Also, the increase in Net Promoter Score suggests that this is a welcome addition!
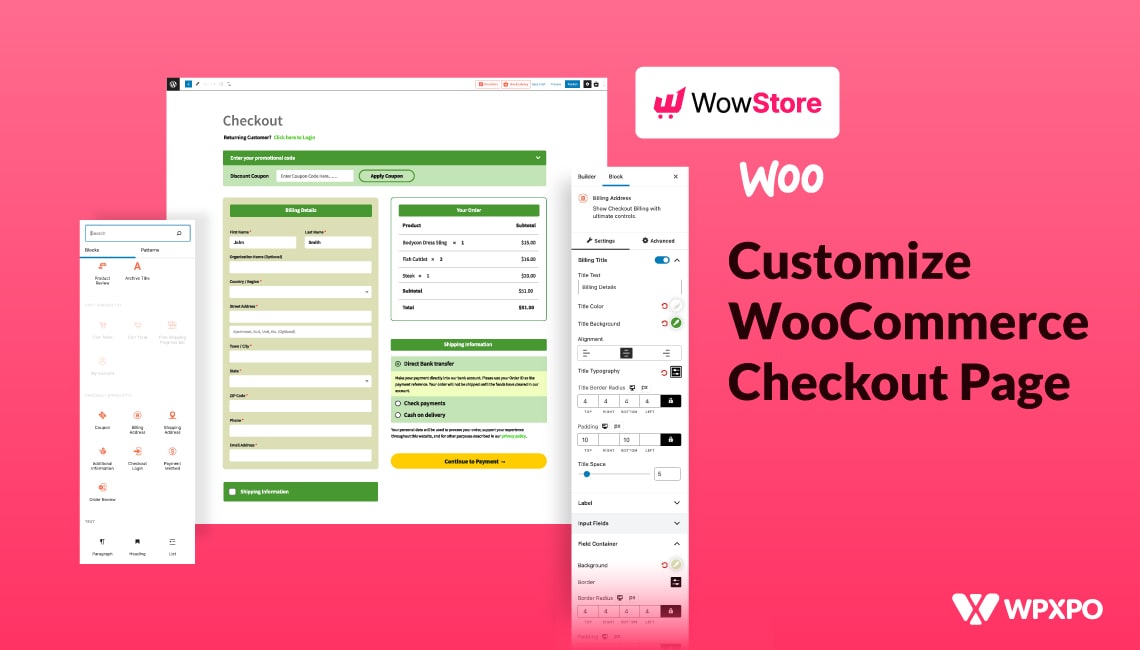
How to Add Sticky Add to Cart Button in WooCommerce?
A sticky add to cart in your WooCommerce store can work as a sales booster – it’s clear.
Since WooCommerce doesn’t have that by default, you need something more. An extension that can do more than just enable the sticky add to cart button on your store.
WowStore is the answer.
WowStore – A WooCommerce Solution for the Masses
If you’re thinking WowStore is just another store builder, then you’re mistaken.
WowStore is more than that – it’s a complete experience that helps create the perfect WooCommerce store. If you want to build an eCommerce store that screams your personality and brand, WowStore is the answer.
Don’t believe me? Try the demo:
Now, let’s get back to adding the sticky add to cart functionality to Your Store.
Some Things Before Getting Started…
You need a couple of things set up before you start setting up a sticky button for your WooCommerce store. You need:
- The default shop pages (ready on your site)
- Have your products ready to go
These two things are a must. Now, if you want to test the feature in a local website, you could do that.
In that case, you’ll need help to set up your WooCommerce store from scratch. I talked about in the discussion how to change the add to cart button text. You can check that out if you like.
But the essence of it is:
- Stage a WordPress website on your local host
- Install both WooCommerce and the WowStore plugin
- Create the default WooCommerce pages
- Import WooCommerce dummy products
- Enable the Sticky Add to Cart feature (discussed here)
Read more: Learn how to customize the WooCommerce add to cart button with WowStore
How to Use Sticky Add to Cart Button for Your WooCommerce Store?
To enable the sticky cart on your WordPress eCommerce store, you need to do the following:
Installing WooCommerce and WowStore
You need both WooCommerce and WowStore for this to work. You see, WowStore is built on top of WooCommerce.

In essence, it works like an extended version of WooCommerce – allowing users to add “extra” features on top of the features of WooCommerce.
Installation and activation of these plugins are super simple. You can check the documentation to see how it’s done. Or, there’s a great video you can watch to learn about the whole thing:
Enabling the Sticky Add to Cart Feature
Since we are using WowStore for this tutorial, you need to know how to enable this feature.

To do this, click on WowStore > Scroll down to “Checkout and Cart”> Enable the Sticky Add to Cart Addon.
Note: The process is the same for all other WowStore Addons.
The Preliminary Settings [Setting up a few things]
There are a few things you need to know here:
When to Use Sticky Add to Cart? For which products?
You can enable the sticky button for 4 types of products on WooCommerce – simple, variable, grouped, and external products. In a nutshell, let’s just explain what these different types of products are:
A simple product is a ‘single physical entity’ – it’s for users who only have single products on their sites. On the other hand, a virtual product is a non-physical entity, a subscription license for example.
Variable products are simply ‘different’ variations of the same product. For example, if you have t-shirts of different colors, you have control over their pricing, stock, and imaging. You can set individual properties for each individual variation.
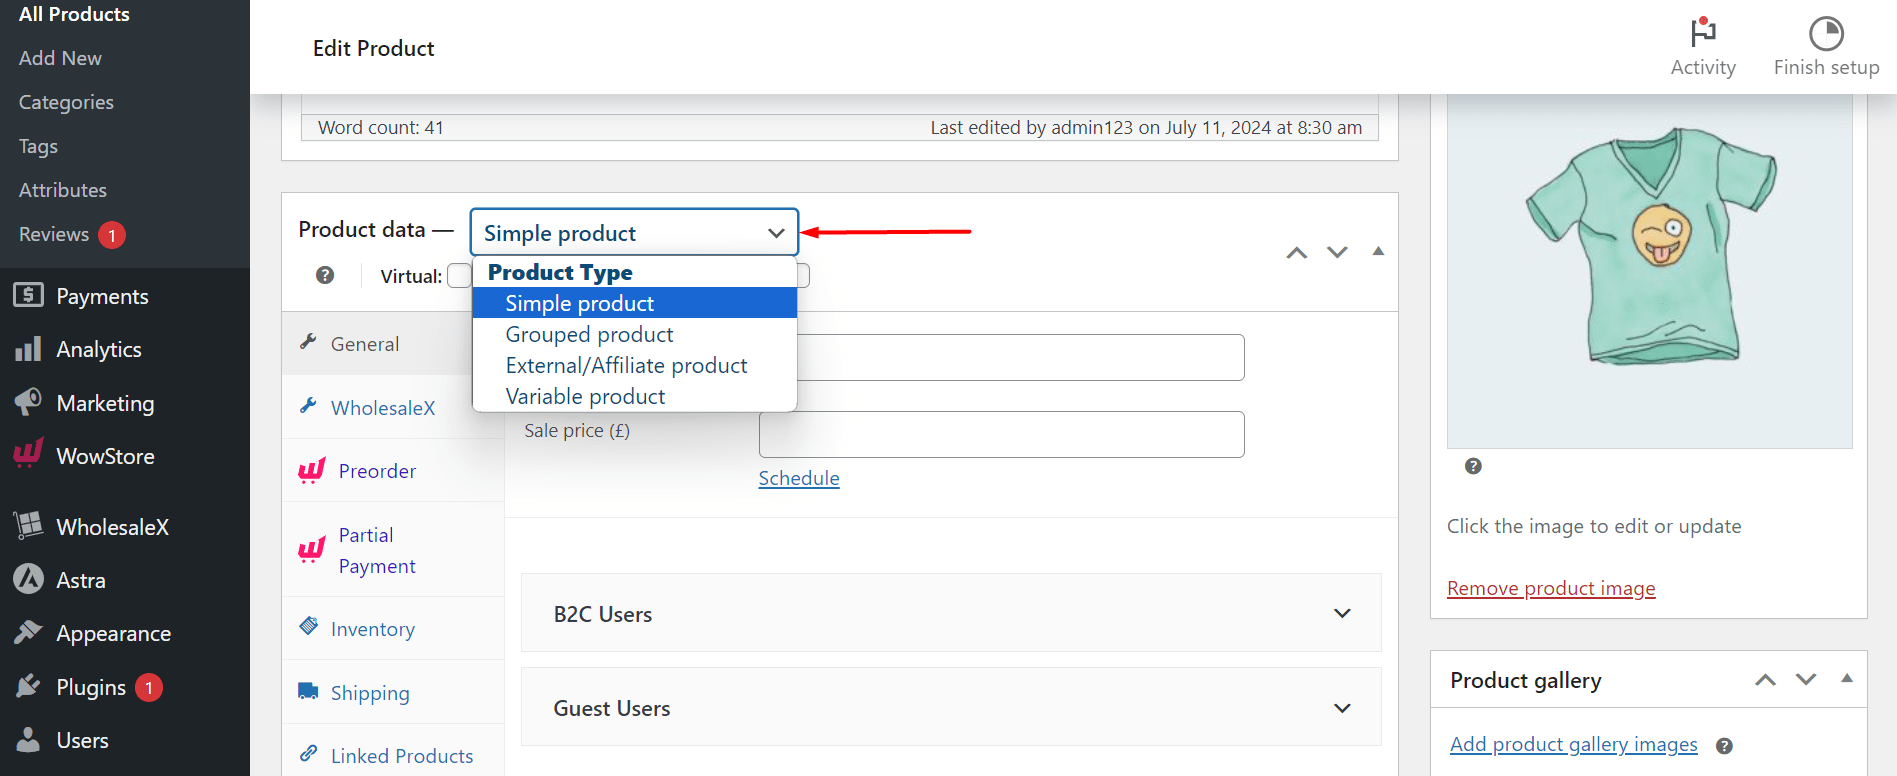
External products are the ones that you don’t own. However, you can use links to direct users to the original product page. These types of products are generally affiliate items.
And finally, you have grouped products – these are a collection of ‘similar’ items that have been grouped into a single item. So, you’re not just getting one product, you’re getting a number of similar products bunched into one.
Back to the discussion…
WowStore currently has these 4 options available for enabling a sticky add to cart. You can enable just one or all four options at once. All you need to do is check the box.
For this example, I chose to select ‘simple’ only.
Can you hide it on mobile?
Yes, there is the option to hide the sticky add to cart button on mobile. You just need to check that box if you want to.
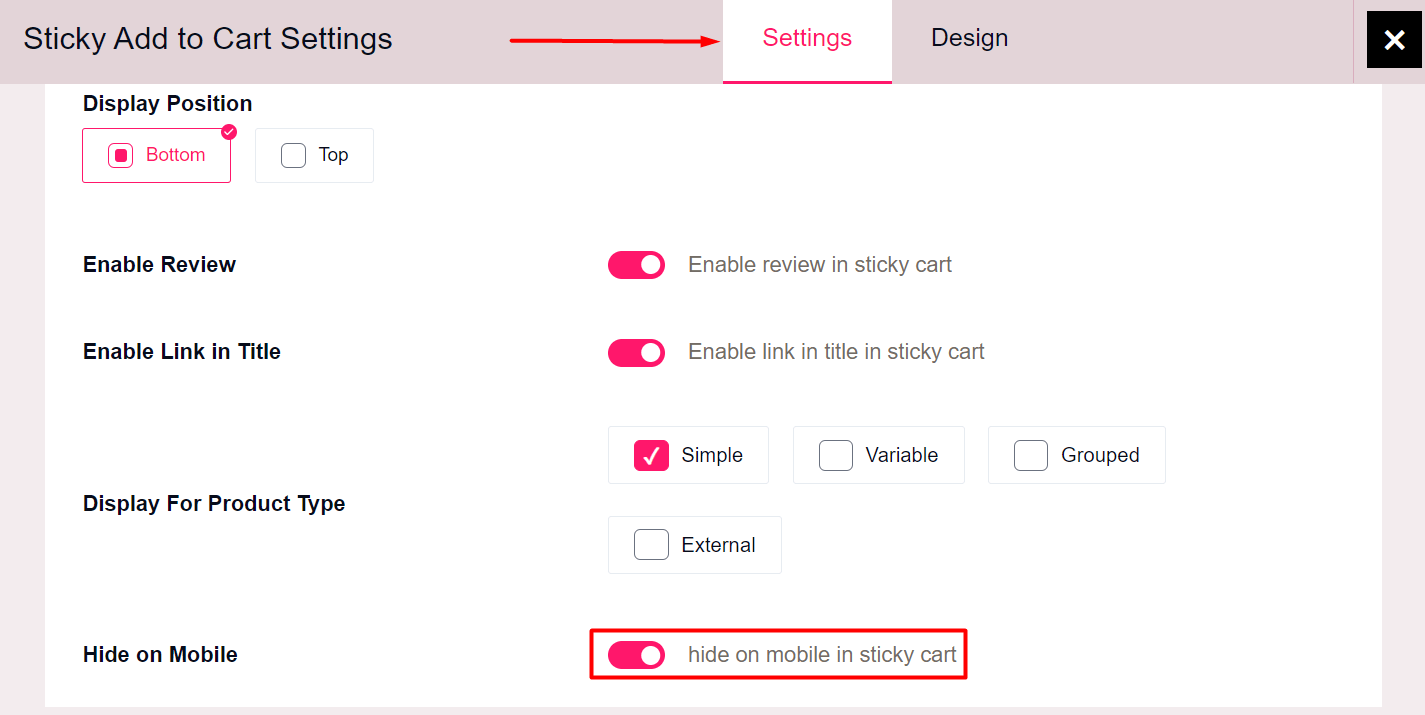
For this example, I choose to hide it on mobile. So, I will enable it.
What other settings do you need to change?
You have control over 3 other important settings:
- Where to position the button?
- Do you want to enable the product link?
- Do you want to show the product review in the sticky add to cart area?
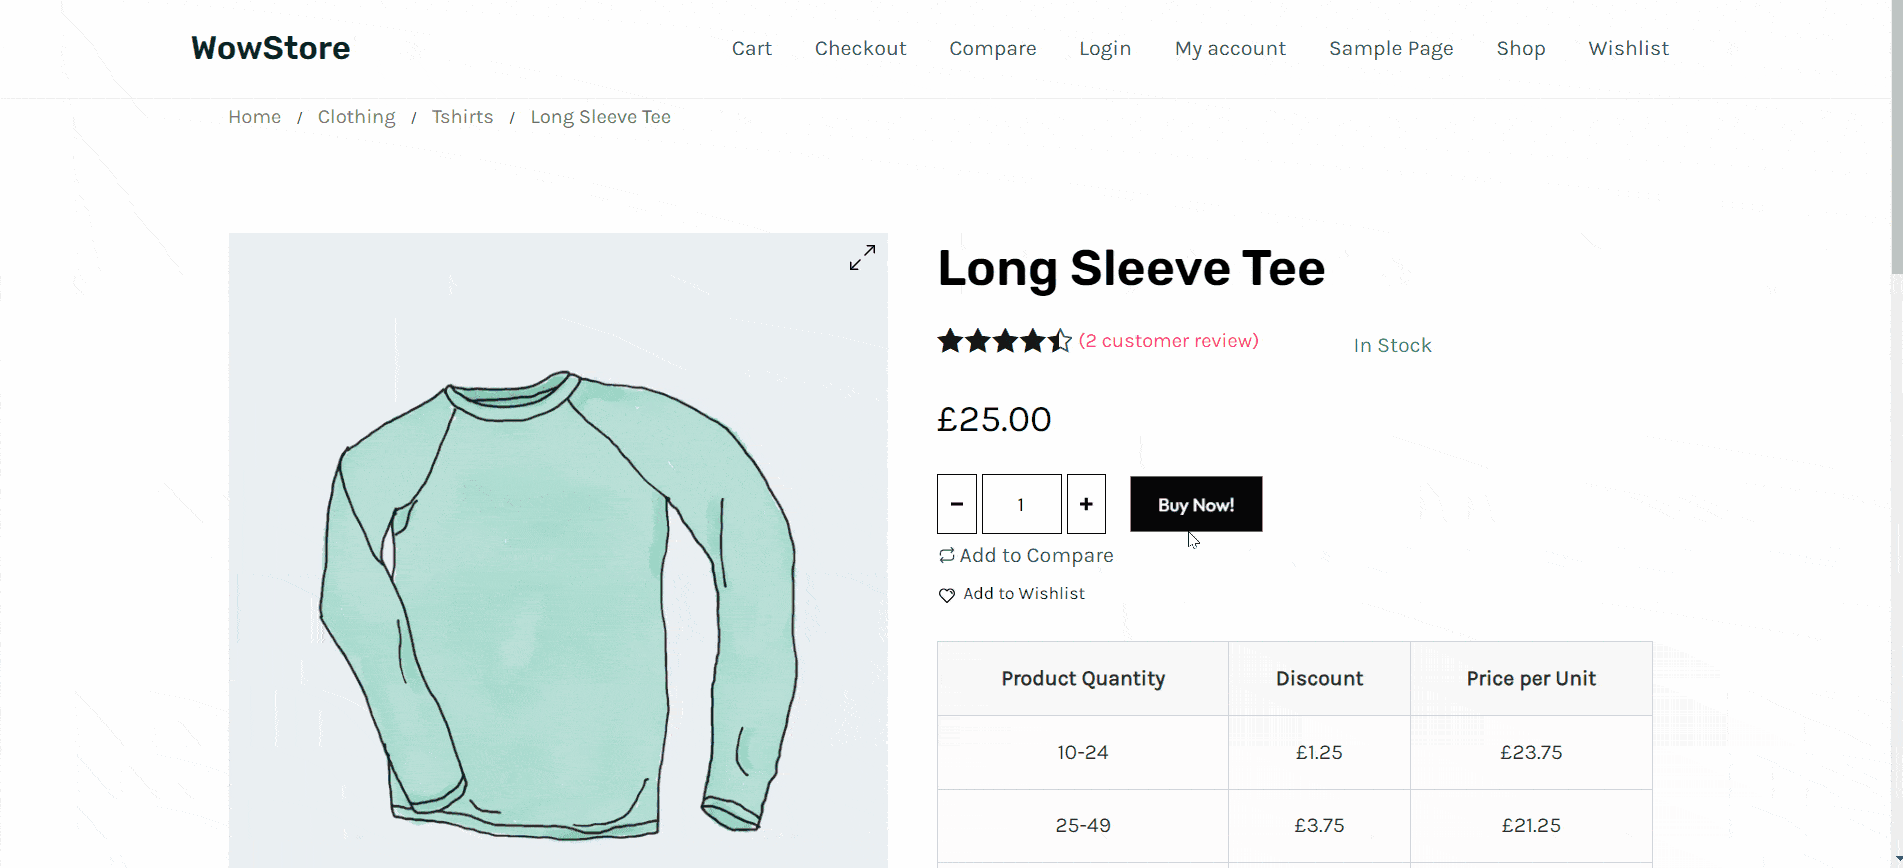
You can enable or disable these settings – it’s all based on your preference. For the sake of this demo, I will keep these ‘enabled’. As for the button positioning, you can set it to the top or the bottom position (on the single product page):
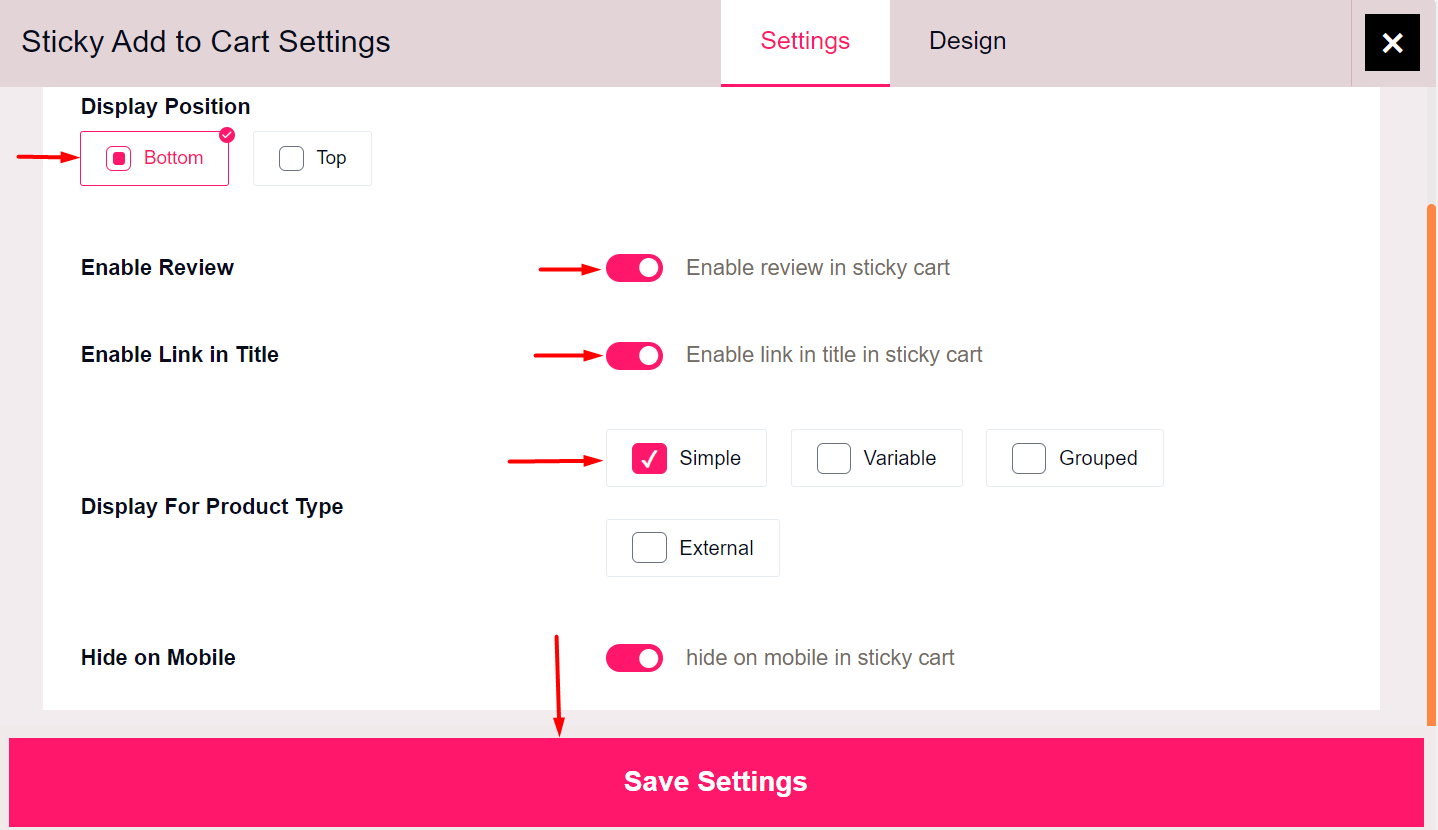
So, to summarize what I did: :
- I displayed the button at the “Bottom” position
- Chose ‘single product’ to show a sticky button only on single items
- Kept the sticky add-to-cart disabled for mobile devices
- Kept the product link option enabled
- Kept the product review option enabled
- Finally, I saved the changes
Designing the Sticky Add to Cart Button
Did I mention you could design the sticky button? If not, then here you go:
Here’s how I designed the sticky add to cart for this demo:
Now there are 3 different types of settings I can change – the first one is the “General Style” Settings. Here, I will keep all the settings as is. Just know that you can be very precise when designing the important aspects of the add-to-cart button.
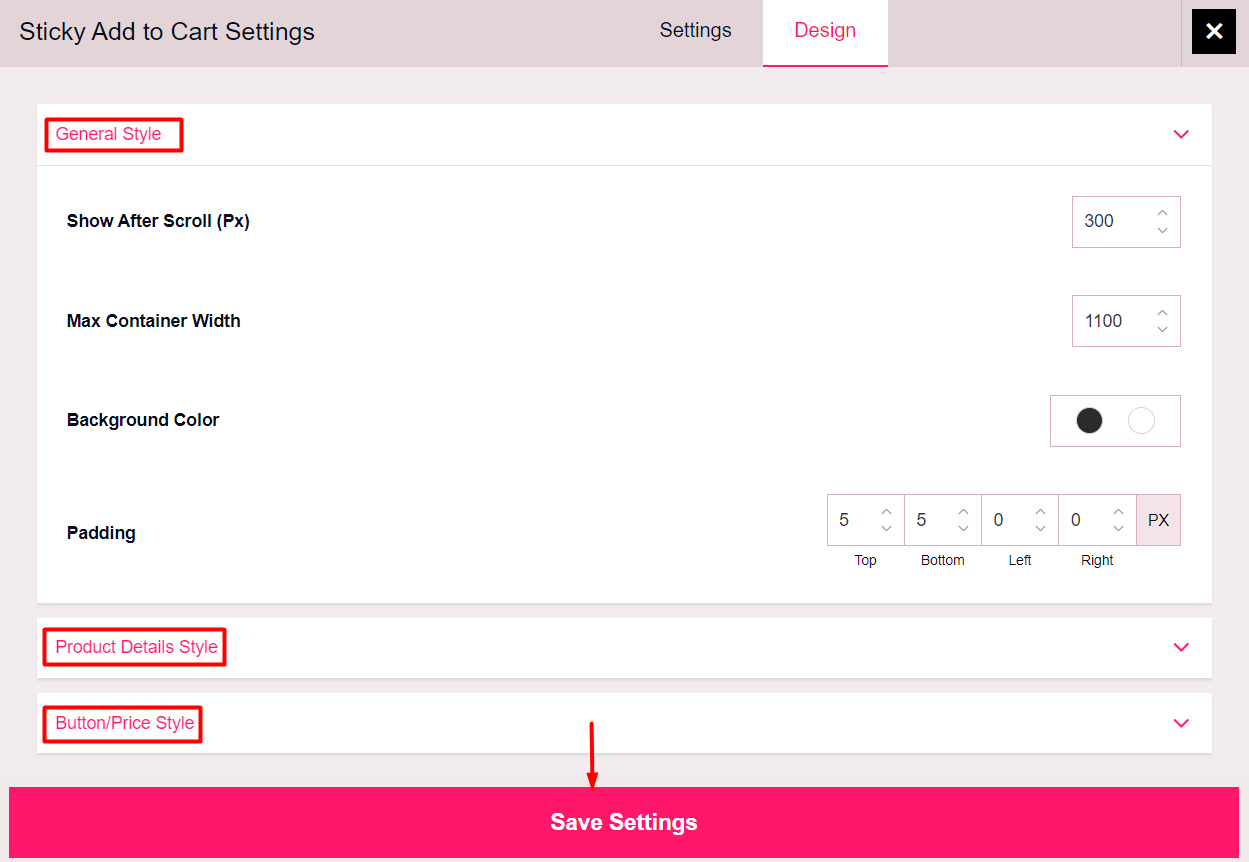
The other 2 settings are the “Product Details Style” and the “Button/Price Style.” The first one lets you change the design of the product details. And under the 2nd tab (“Button/Price Style”), you can change the add to cart button properties.
If you feel like you’re stuck, just go to the official WowStore documentation – it’ll help you understand everything.
To summarize:
- I didn’t change anything in the “General Settings” – kept all the settings as is
- Made the title typography bold
- Changed the button background to blue
- Saved the settings
It’s important to save everything before you leave. Otherwise, the changes will not take effect.
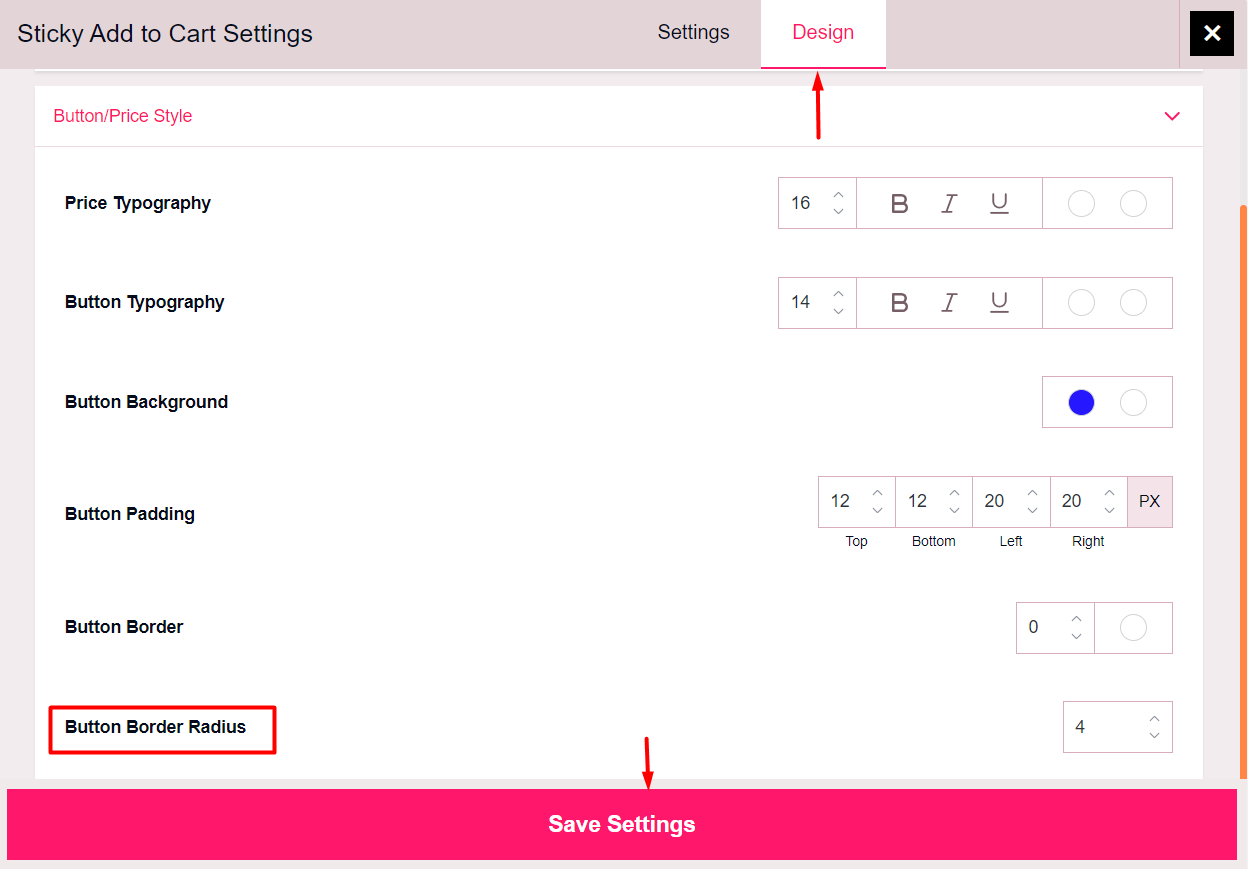
Here are some important things for you to know:
How to change sticky add to cart roundness:
Under the “Button/Price Style” settings, you’ll find the “Button Border Radius” property. You can change the sticky add to cart roundness using this property.
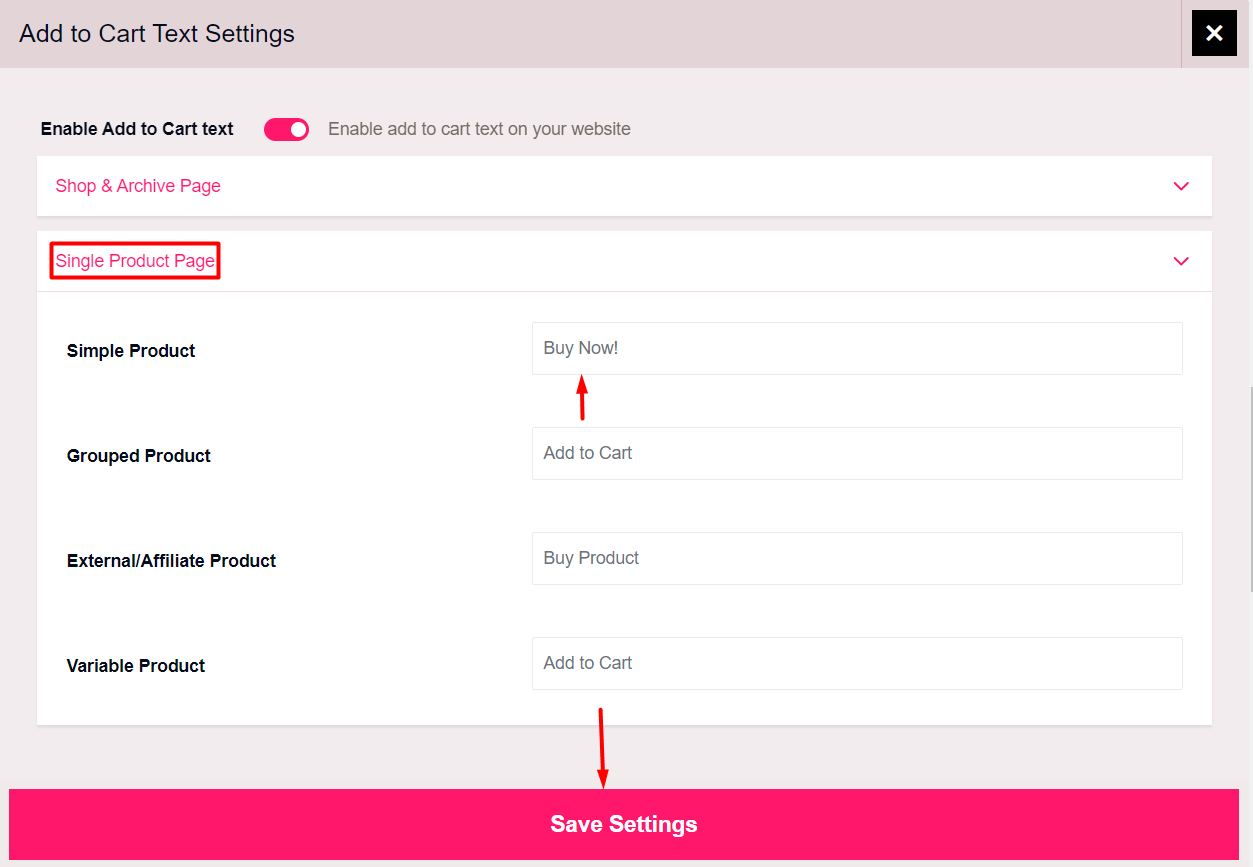
How to change the sticky add to cart button text:
To change the sticky Add to Cart Button text, you need to enable the “Add to Cart Text” Addon. From there, you can change the button text of the single product page (as we did for this example) and the shop and archive page.
Custom Code for Enabling Sticky Add to Cart
Before I give you the custom code, I want to share a few things:
Should I use a plugin or custom code to enable this feature?
If you’re a tech-savvy user, have some coding experience, and don’t want the extra plugin bulge, then sure. Go for it. However, plugins like WowStore offer a no-code solution that’s not too hard on your WordPress site. So, if you prefer an easy-to-use, no-code solution, then a plugin is your best bet (it can be anything other than WowStore if you prefer it).
Does WowStore support custom CSS?
Yes, if you wish to add custom functionality, then you can use custom CSS globally.
Here’s the custom code for manually enabling sticky add to cart:
First, you’ll need to add the custom PHP code to the functions.php file of the WordPress theme you’re using – this code will generate a sticky “Add to Cart” button on single product pages of your Woo Store:
function add_sticky_add_to_cart() {
    if ( is_product() ) {
        global $product;
        ?>
        <div class="sticky-add-to-cart">
            <div class="sticky-add-to-cart-inner">
                <a href="<?php echo esc_url( $product->add_to_cart_url() ); ?>" class="button alt add_to_cart_button ajax_add_to_cart" data-product_id="<?php echo esc_attr( $product->get_id() ); ?>" data-product_sku="<?php echo esc_attr( $product->get_sku() ); ?>" aria-label="<?php echo esc_attr( $product->add_to_cart_text() ); ?>"><?php echo esc_html( $product->add_to_cart_text() ); ?></a>
            </div>
        </div>
        <?php
    }
}
add_action( 'wp_footer', 'add_sticky_add_to_cart' );
For styling the button, use the following bit of code:
/* Sticky Add to Cart Styles */
.sticky-add-to-cart {
    position: fixed;
    bottom: 0;
    left: 0;
    width: 100%;
    background: #fff;
    box-shadow: 0 -2px 10px rgba(0, 0, 0, 0.1);
    z-index: 9999;
    padding: 15px;
    display: none; /* Hidden by default */
    align-items: center;
    justify-content: center;
}

.sticky-add-to-cart-inner {
    max-width: 1200px;
    margin: 0 auto;
    text-align: center;
}

.sticky-add-to-cart .button {
    background-color: #0071a1;
    color: #fff;
    padding: 10px 30px;
    border-radius: 5px;
    text-transform: uppercase;
    font-weight: bold;
    transition: background-color 0.3s ease;
}

.sticky-add-to-cart .button:hover {
    background-color: #005f8a;
}

body.single-product .sticky-add-to-cart {
    display: flex; /* Show on single product pages */
}
Make Your Add to Cart Button Sticky!
You know the benefits of making your add to cart button sticky. All you have to do now is use this guide to bring the change. You’re ready for it now, right?
If you’d like to see more content like this, make sure to sound off in the comments below.