When readers leave your site after reading just one article, you miss out on potential engagement and more page views.
As someone deeply working with WordPress, SEO, and growth marketing, I can tell you this will harm your search engine rankings and make it more challenging to cultivate a loyal audience.
Fortunately, you don’t need to worry. After solving this problem for myself and many others, I found the solution: adding ‘next’ and ‘previous’ post navigation at the end of each article.
I’ve tested both custom coding and plugins, and the PostX dynamic page builder plugin seems the most effective fix. But I’ll show you both ways so that you can choose the best for you. Let’s start!
What Are Next & Previous Post Links?
Next and previous post links are simple navigation tools that help readers move between blog posts or articles. Think of them like “forward” and “backward” buttons—they let you easily jump to newer or older content without going back to the homepage.
- Next Posts » → Takes you to a newer (more recent) article
- « Previous Post → Takes you to an older article.
These links usually appear at the bottom of a post, making it easy to keep reading. They’re great for:
✔️ Keeping visitors on your site longer.
✔️ Helping readers find related content.
✔️ Improving SEO by linking related posts.
Blogs, news sites, and tutorial websites often use them to create a smooth reading experience. Platforms like WordPress add them automatically with basic options, but you need to customize them to boost their effectiveness.
👉 How to Show the Next Previous Post in WordPress?
Now that we know about the Next Previous post, let’s find out how to show it in WordPress. There are three methods: using the theme editor, with the PostX dynamic page builder plugin, and writing custom code. Let’s go through each method.
Method 1: Using the Theme Editor
Some WordPress themes provide built-in options to enable and customize the Next/Previous Post navigation links. For example, the Blocksy theme offers this feature, but if your theme doesn’t support it, you’ll need to try alternative methods or switch to a compatible theme.
Here’s how to enable post navigation in Blocksy Theme:
- Go to Customizer → Post Types → Single Post → Post Elements.
- Locate and enable the “Post Navigation” element.
- Customize the available settings (e.g., label style, visibility, etc.).
The exact steps may vary slightly depending on your theme, but the process is generally straightforward. If your theme lacks this feature, proceed to the next method.
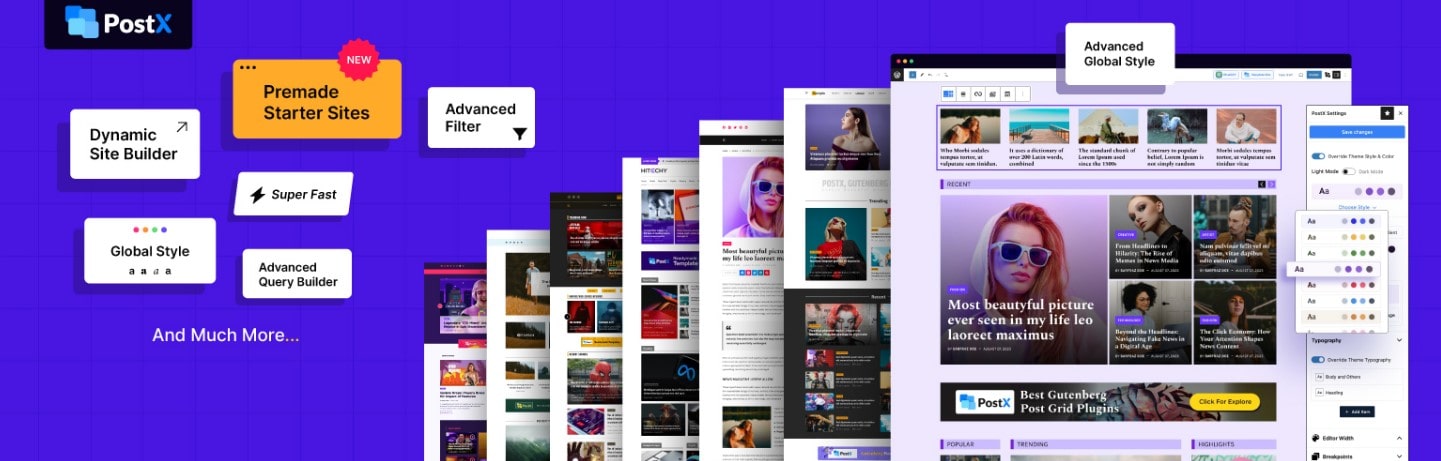
Method 2: PostX Plugin for Dynamic Post Navigation
If you want to show the next previous post link in WordPress without coding, you need a plugin. PostX gives a unique next/previous post block with a ton of customizations. This dynamic Site builder opens a huge quantity of options to create and improve your website.
So before anything else, you need to install and activate the PostX plugin. Then, follow the 3 simple steps I mentioned.
Step #1: Create A Custom Post Template
After installing PostX, you need to create a custom post template to utilize the power of the Next Previous post block.
Simply follow these steps to create a template:
- Go to PostX > Site Builder > Singular > Create Singular Template
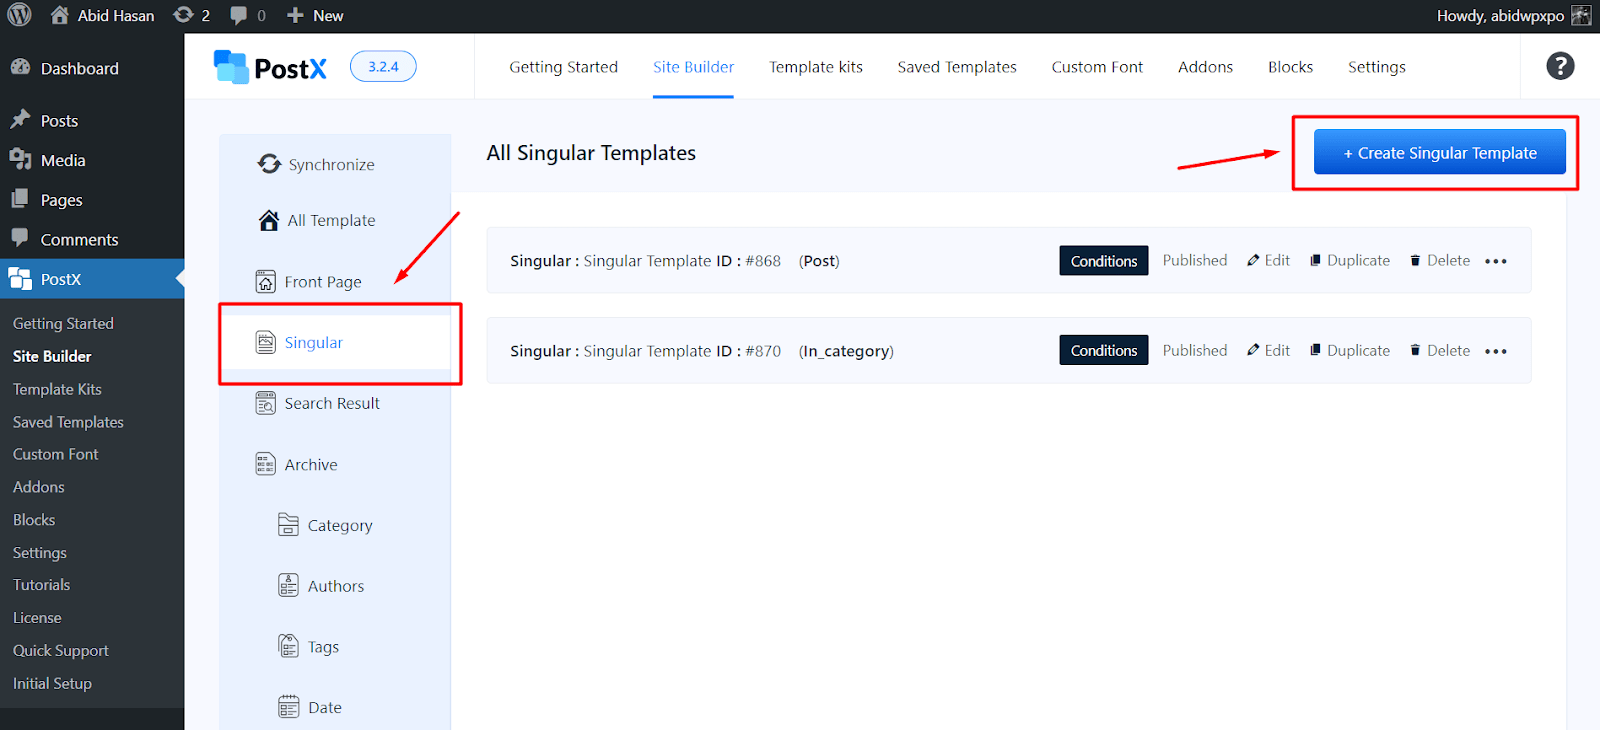
- You can create a new template from scratch or choose from the existing templates.
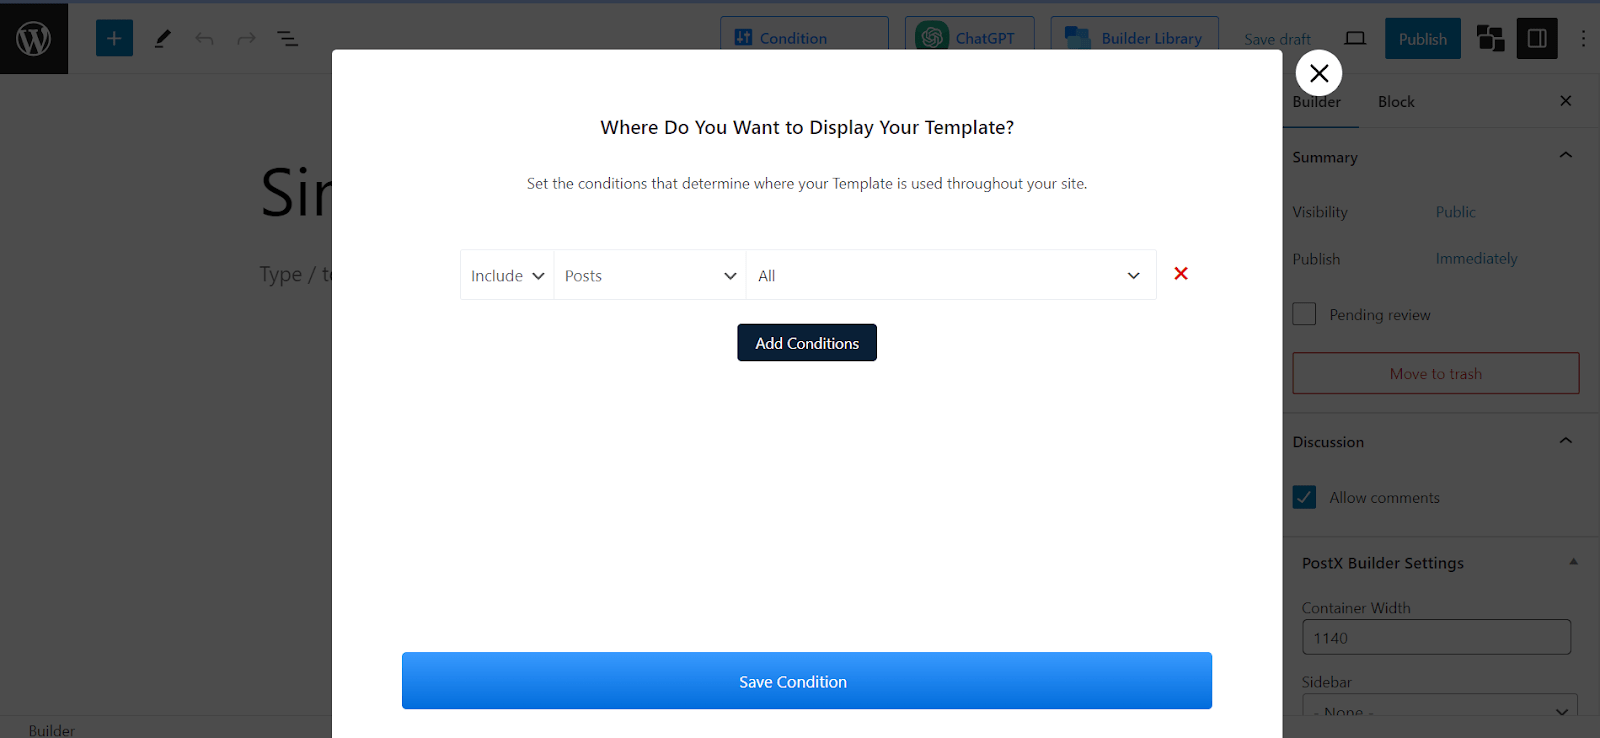
- This will open the Conditions section.
- Click Save as the template condition is set to all blog posts.
Step #2: Add Next Previous Post Block
Now in the builder, go to its edit view and click on the add block (the + sign on the left) button.
Now search for the “Post Next Previous” block to find the block and drag and drop to add it.
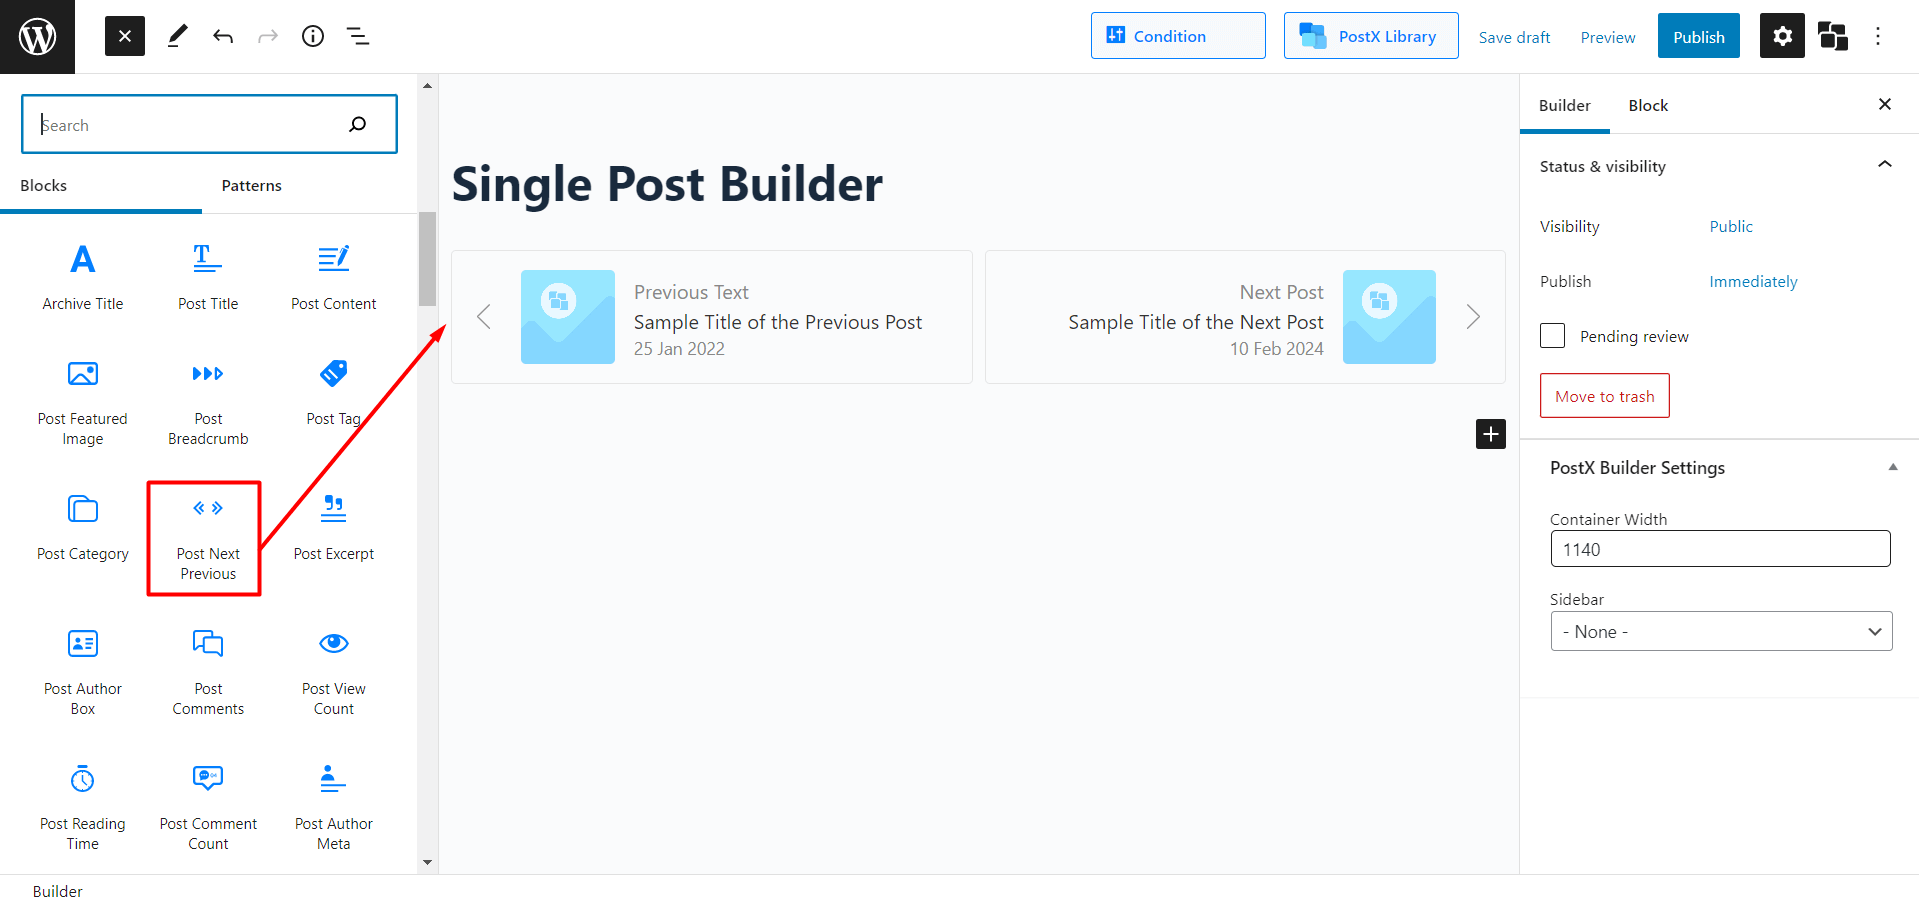
Now that we’ve properly implemented the Next Previous post, the next thing we need to do is modify its settings.
However, apart from this block, there are several other blocks that you can use to create amazing page templates.
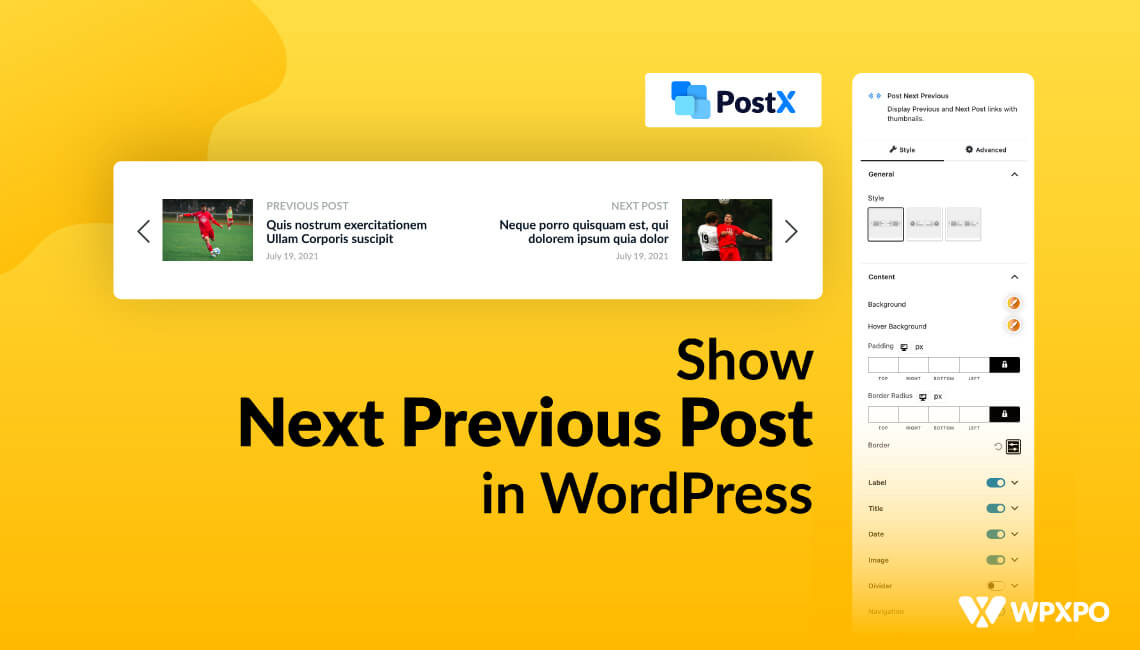
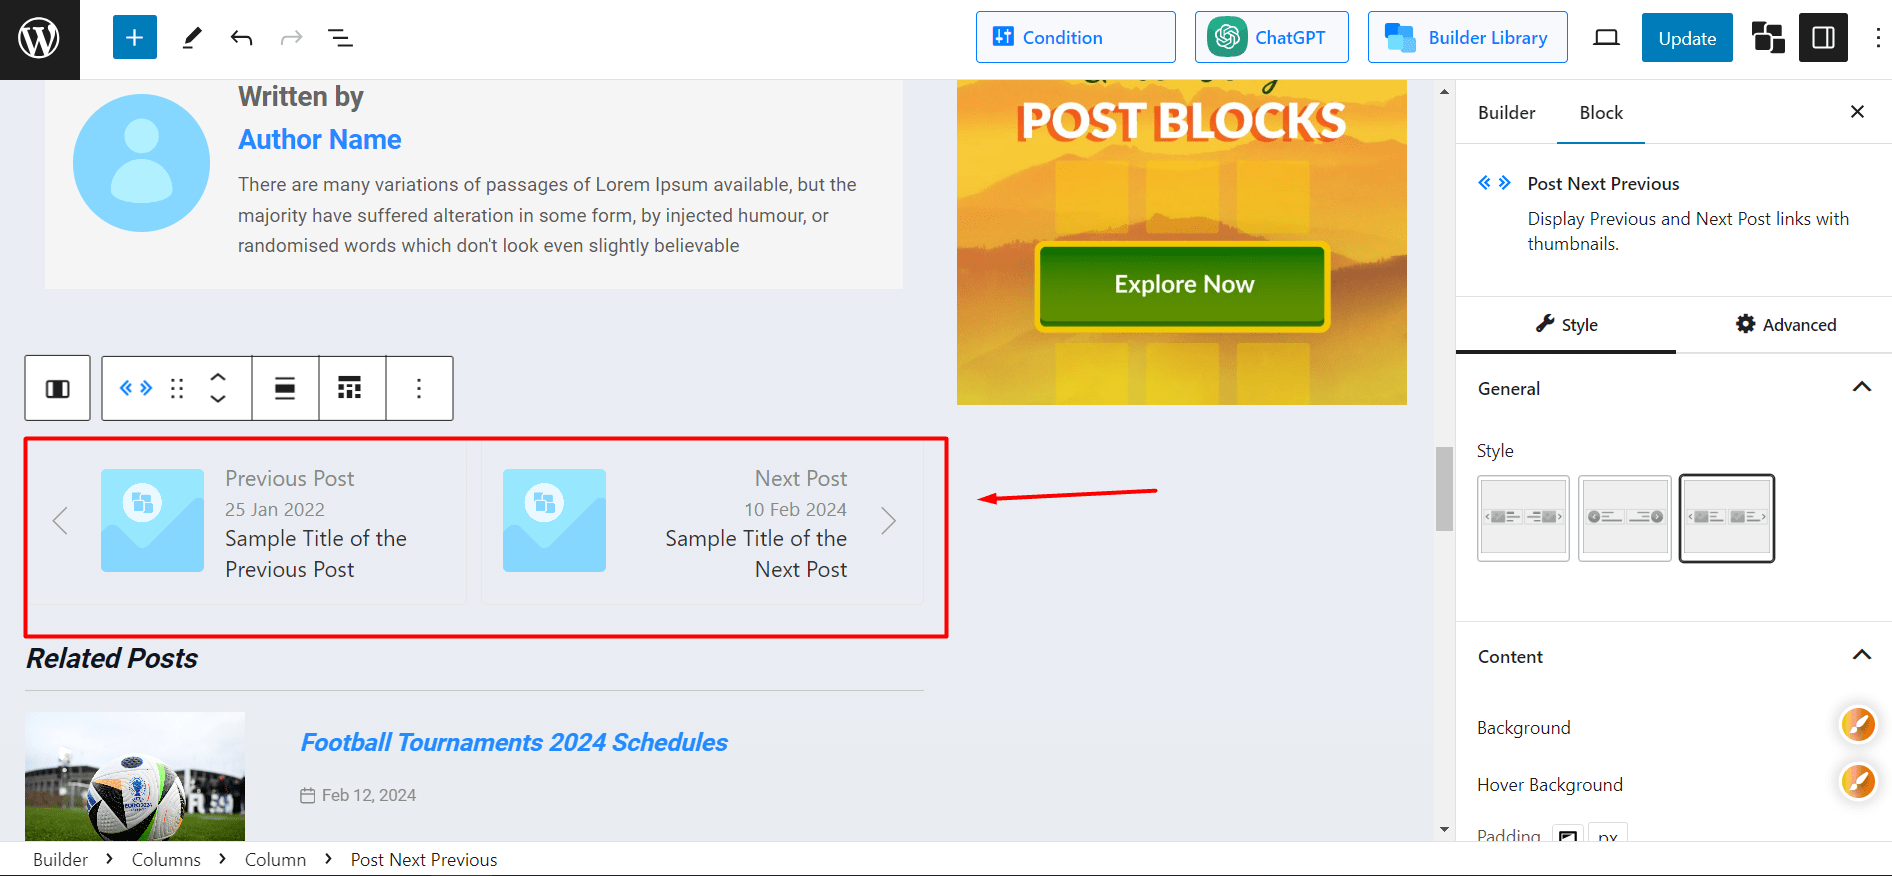
Step #3: Customize The Next Previous Post Block
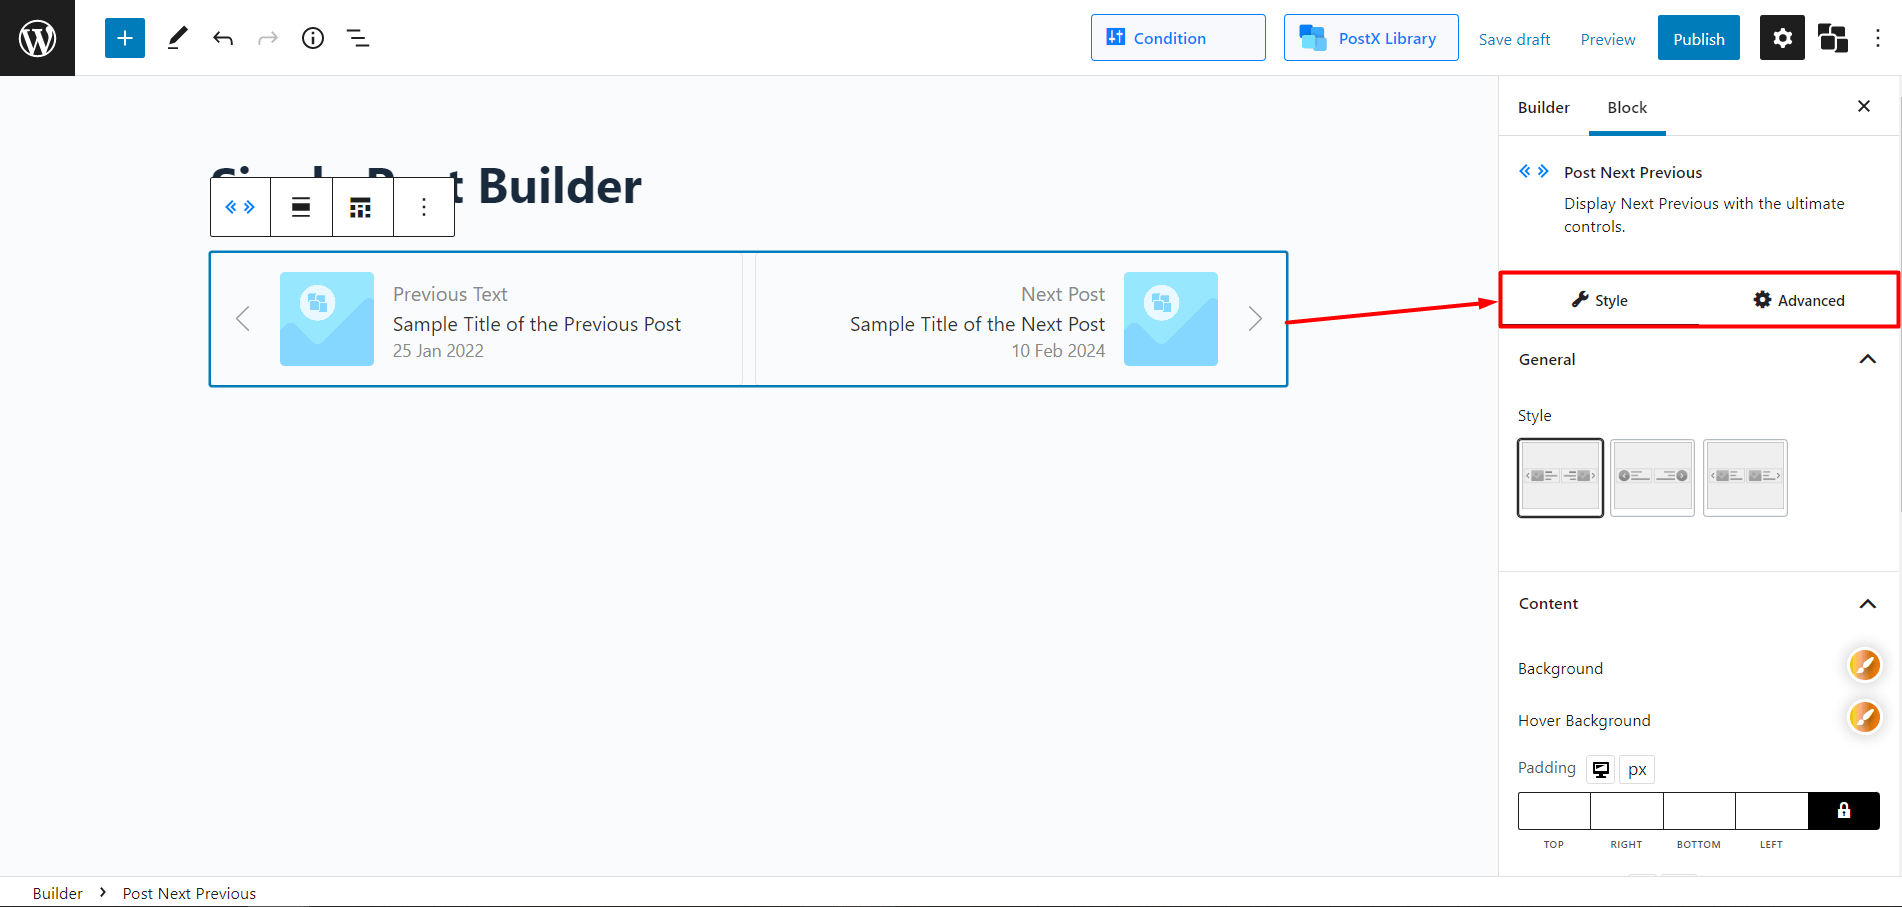
Now, let’s look at what PostX offers in the Post Next Previous block.
With three predetermined styles to pick from, you might think that’s all you get.
However, PostX allows you to modify settings such as background color, hover color, padding, border radius, and border.
In addition, you can modify settings such as label, title, date, image, divider, and navigation to give the next previous block a truly unique look.
Method 3: Writing Custom Code
This approach utilizes functions.php to append clean, styled navigation links at the end of each blog post. While implementation requires some technical knowledge, the steps below provide the simplest way to achieve this.
Step #1: Access Your Theme’s functions.php File
- Go to
Appearance > Theme EditorWordPress. - Select
functions.phpfrom the list on the right. - Add the following code at the bottom (before
?>if it exists):
Note: The code provided in this guide was generated with the help of AI and has been tested successfully in my setup. Your experience may vary depending on your theme and configuration.
/**
 * Add Next/Previous Post Links After Content
 */
function custom_post_navigation($content) {
    if (is_single()) { // Only apply to single posts
        $prev_post = get_previous_post();
        $next_post = get_next_post();

        $navigation = '<div class="post-navigation" style="display: flex; justify-content: space-between; margin: 40px 0; padding: 20px 0; border-top: 1px solid #e0e0e0; border-bottom: 1px solid #e0e0e0;">';

        // Previous Post Link
        if ($prev_post) {
            $navigation .= '<div class="nav-previous" style="flex: 1;">';
            $navigation .= '<a href="' . get_permalink($prev_post->ID) . '" style="text-decoration: none; color: #333; font-weight: 500;">';
            $navigation .= '← Previous: ' . get_the_title($prev_post->ID);
            $navigation .= '</a>';
            $navigation .= '</div>';
        }

        // Next Post Link
        if ($next_post) {
            $navigation .= '<div class="nav-next" style="flex: 1; text-align: right;">';
            $navigation .= '<a href="' . get_permalink($next_post->ID) . '" style="text-decoration: none; color: #333; font-weight: 500;">';
            $navigation .= 'Next: ' . get_the_title($next_post->ID) . ' →';
            $navigation .= '</a>';
            $navigation .= '</div>';
        }

        $navigation .= '</div>';
        $content .= $navigation;
    }
    return $content;
}
add_filter('the_content', 'custom_post_navigation');
The navigation links will now appear at the end of every post.
Step #2: Change Text & Arrows
Modify the Previous: and Next: text inside the code:
'← Previous: ' . get_the_title($prev_post->ID)  // Change to "← Older Post" or similar
'Next: ' . get_the_title($next_post->ID) . ' →'  // Change to "Newer Post →"
Adjust Styling
Edit the inline style attributes:
Border & Spacing:
style="display: flex; justify-content: space-between; margin: 40px 0; padding: 20px 0; border-top: 1px solid #e0e0e0; border-bottom: 1px solid #e0e0e0;"Link Colors & Font:
style="text-decoration: none; color: #333; font-weight: 500;"Hover Effects (Add to Theme CSS):
.post-navigation a:hover {
    color: #0066cc !important;
    text-decoration: underline !important;
}
Step #3: Limit to Same Category (Optional)
If you want navigation to stay within the same category, modify the get_previous_post() and get_next_post() lines:
$prev_post = get_previous_post(true); // true = same category
$next_post = get_next_post(true);
Step #4: Add Thumbnails (Advanced)
To include post thumbnails, insert this before the link:
$navigation .= get_the_post_thumbnail($prev_post->ID, 'thumbnail', ['style' => 'width: 60px; height: auto; margin-right: 10px;']);That’s it!
🖼️ How to Add Next Previous Post With Thumbnail
Including a post thumbnail enhances the visual appeal of your next/previous post navigation. PostX makes this easy: you can add, enable/disable, and customize thumbnails. Here’s how to display next/previous posts with thumbnails using PostX:
- Install the PostX plugin and create a custom post template (as done previously).
- Add the “Post Next Previous” block to your template.
- The post thumbnail is automatically enabled in this block.
- Use the block’s settings to adjust the thumbnail appearance.
You have three distinct style structures available for your thumbnails. These include the classic square and the modern circular shape. Beyond these, the image tab settings provide precise control over the thumbnail’s look.
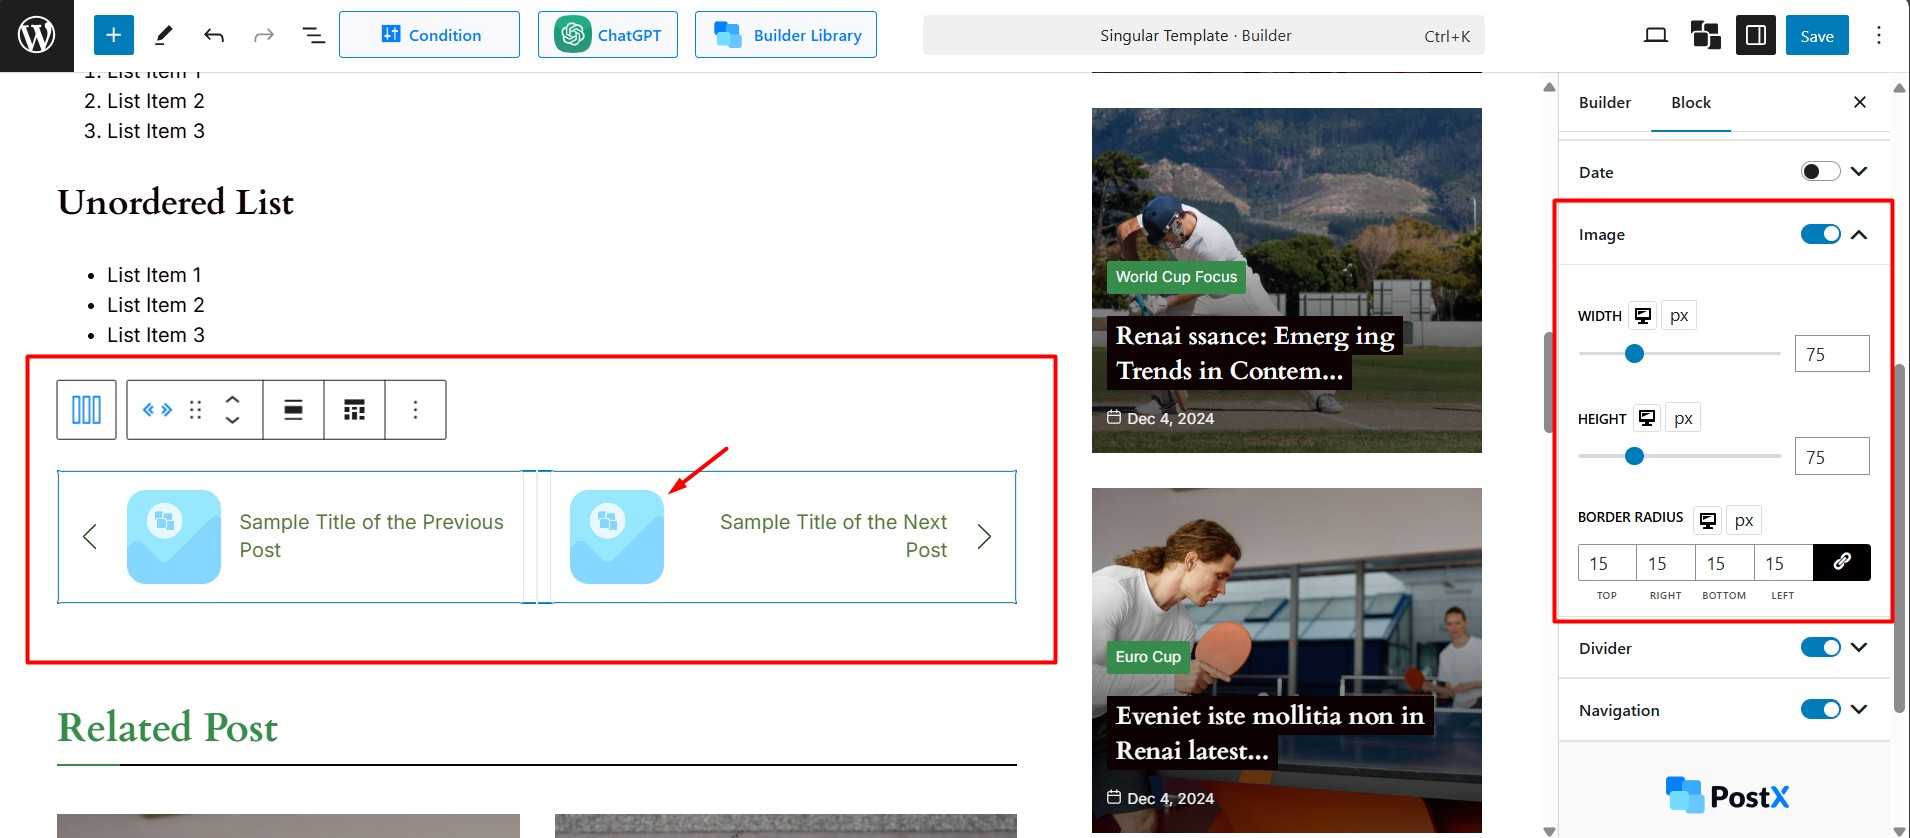
You can set custom height and width values to resize and apply rounded corners using the border-radius setting for an added visual touch. Let’s jump into the next section to see examples.
🗑️ How Do I Remove the Next And Previous Posts in WordPress?
If you want to remove the default next/previous post navigation in WordPress, here are two effective approaches you can implement yourself.
Option 1: Remove Them Completely (Permanent)
For a permanent solution (best for developers):
- First, create a child theme (so updates won’t erase your changes)
- Find this file in your theme: single.php or content-single.php
- Look for code containing:
Note: The code provided in this guide was generated with the help of AI and has been tested successfully in my setup. Your experience may vary depending on your theme and configuration.
the_post_navigation() or similar functions like next_post_link()- Either delete these lines completely or add
//before to comment them out
For Example: // the_post_navigation() – This disables the navigation
Option 2: Hide Them with CSS (Easiest Way)
This makes the links invisible without deleting anything:
- Go to Appearance → Customize in your WordPress dashboard.
- Click Additional CSS.
- Paste this code:
nav.navigation.post-navigation {
    display: none;
}- Click Publish
That’s it! The links will disappear immediately
✨ Examples for WordPress Next Previous Post Links
There are several ways to display “next” and “previous” post links on your blog. Here are three common examples to illustrate the visual variations and customization possibilities:
Standard Two-Sided Navigation (Thumbnail, Arrow & Label)
This common approach displays the previous and next posts on either side, often including a thumbnail, the post title, a “Previous” or “Next” label (highlighted in red), and navigation arrows. Feel free to add or remove elements to suit your design.

Left-Aligned Navigation (Thumbnail & Arrow)
Another frequent style that aligns the navigation elements to the left. This example shows thumbnails, titles, and arrows, but you can easily include labels as well.

Modern Circular Navigation (Thumbnail & Label)
This design presents post thumbnails in a circular format, offering a more modern aesthetic. Labels are included here, and you can also add navigation arrows if desired.

With tools like PostX, you have the flexibility to create various combinations, including displaying these links without thumbnails or titles or even adding post dates alongside the titles.
👍 Why I Recommend Next/Previous Post Links for Every WordPress Blog
Adding next/previous post navigation in WordPress has proven valuable – both for my sites and visitors, while also helping with my SEO. There are certainly more benefits I could list, but these are the ones that consistently make a difference.
✅ Enhanced Navigation and Experience
They create a smoother journey through your content. Instead of forcing readers to click back to your homepage or category pages, they can effortlessly flow from one post to the next – just like turning pages in a book!
✅ Increased Pageviews
Your page views will thank you! When readers have an easy path to more of your content, they’re much more likely to stick around and explore what else you have to offer. It’s like creating little breadcrumb trails throughout your site that keep visitors engaged
✅ Reduced Bounce Rate
With navigation links, you’re giving readers a reason to stick around longer. Instead of hitting the back button, they’ll spot your inviting “Next Post” link and think “Ooh, what’s this about?” Before they know it, they’ve read three more posts and fallen in love with your content!
✅ Better SEO Performance
Search engines are basically digital detectives, constantly looking for well-organized websites. These links create additional pathways for search engines to discover all your content. This improved structure can give your SEO a friendly boost.
✅ Content Discovery
Your new readers probably don’t know about that amazing article you wrote six months ago. Navigation links create perfect pathways to your older content and give the spotlight they deserve. It’s like having a friendly tour showing visitors all your older gems!
So, what are you waiting for?
🔗 Add Next / Previous Post Links Now!
Now that you’ve learned how to add Next and Previous post links in WordPress and how easy it is to customize them, it’s time to put that knowledge into action! I’ve shown multiple ways to implement this feature:
✔️ Theme options (if your theme supports it)
✔️ Custom code (If you are technically sound)
✔️ PostX plugin (the simplest, most reliable solution – exactly what I used!)
The freedom is yours!
So, take a few minutes installing and setting up PostX, and you’ll give your readers a seamless way to navigate your valuable content.
If you have any questions or need further assistance, drop them in the comments below – I’d love to assist!
🧠 FAQs about WordPress Next and Previous Post Link in WordPress
You might have other questions in addition to what we’ve covered. Here are some common queries about adding the next and previous post links to WordPress.
Can I backdate a post on WordPress?
Absolutely. While editing a post, in the “Publish” section, click on the date and set it to a past date. Once updated, the post will appear in chronological order based on the new date.
Can I change the date on a post on WordPress?
Yes, to change a post’s date:
– Navigate to Posts → All Posts in your WordPress dashboard.
– Hover over the desired post and click “Edit.”
– In the editor, locate the “Publish” section. Click on the date to modify it, then update the post.
Changing the date can affect the post’s position in chronological listings.
How do I change the order of posts in WordPress?
By default, WordPress displays posts in reverse chronological order. To customize this order using the PostX Page Builder plugin:
– Install and activate PostX: Ensure the plugin is installed and activated on your WordPress site.
– Use the Query Builder: Navigate to the PostX blocks and add a post grid or list block to your page.
– Configure post order: Within the block settings, access the Query Builder. Here, you can sort posts by various criteria such as date, title, or custom order, and choose ascending or descending order.
This method allows for flexible and dynamic post-ordering without altering publish dates or using additional plugins.
What is post navigation in WordPress?
Post navigation refers to links that allow users to move between posts, typically labeled as “Previous Post” and “Next Post.” These links enhance user engagement by guiding readers through your content.
The PostX plugin offers customizable post-navigation blocks that you can add to your layouts, providing control over the appearance and placement of navigation elements.