Ever wondered how to let customers upload files directly from your WooCommerce product pages? Of course you did. It is one of the essential elements of a store if you sell personalized items.
So, how do you implement the feature?
To allow customers to upload files on the product page, you need to follow these simple steps:
- Install and activate a product options plugin like WowAddons
- Choose the products where file uploads are allowed
- Customize text, pricing, size limit, and file limit as you want
- Apply conditional rules for more control
In this guide, I’ll walk you through each of these steps in more detail. So, you can get started setting up the feature effortlessly.

What is The File Upload Addon For WooCommerce?
The File Upload Addon is an extra product option added to the product or checkout pages that lets your customers upload files for product customization. These files can be:
- Images for custom prints
- PDFs for information
- Documents for review
- Any other type of user-generated content
Adding a file upload field on the WooCommerce pages helps you reduce unnecessary back-and-forth communication and lets customers provide everything you need upfront for completing an order.
And with plugins like WowAddons, you don’t need to work with a single line of code to make it happen.
Here are some real-life use cases:
Custom T-Shirt Store
For a custom t-shirt store, it is a must-have to implement a way to allow customers to share their custom designs. The easy and effortless way to do this is by adding an upload field directly on the WooCommerce product page.
Customers can easily upload their own designs, logos, or photos. No need for extra communication through email or other platforms.
Personalized Gift Shop
Do you have a personalized gift shop? Then an upload field is a must-add. Customers can easily share what image, logo, or text they want to be printed on the gift items they are purchasing.
Print & Marketing Services
If you are in the printing and marketing industry, you always need customers to share specific instructions and designs for their orders. These can be design files, PDFs, or other kinds of files. With a custom upload field, this process becomes a lot easier.
Photo Retouching or Design Services
If you offer digital services like photo editing, document formatting, or resume redesigns, this upload add-on lets your client share the raw file when placing their order.
In short, the file upload add-on makes the process of selling personalized products hassle-free for you. It makes WooCommerce businesses more flexible, especially for stores that rely on user-generated content.
Why Should You Allow Customers to Upload Files on the Product Page?
So you know what the upload field is about and its use cases. Let’s get acquainted with what benefits it offers for your WooCommerce store.
🖼️ It’s a Must-Have for Personalized Products
To sell a personalized product – like t-shirts with custom designs or water mugs with special messages, a product upload add-on is a necessity.
This is an efficient way to allow customers to share their custom requirements. It not only saves you and your customers’ time, but it is also an error-free method.
That means fewer abandoned carts and happier customers.
“Upload your photo here” is way better than “We’ll email you later to get your photo.”
🛒 It Makes the Buying Process Smooth and Simple
People love fast and easy purchase processes. I know this because I often avoid ordering from websites that come with many roadblocks like clunky interfaces, lengthy checkout, and so on.
If customers can complete everything on one page – choose their product, add a custom file, and check out – it feels like magic.
So, offering the option to upload files on the product page makes the buying journey much smoother.
✅ It Increases Trust and Professionalism
Giving customers the option to upload files as part of their order makes your site look more modern and professional. It shows you’ve thought about their needs and built a smooth experience.
This leads to quicker purchase decisions and better customer retention.
Methods of Adding A File Upload Field In Product Pages
You can add a file upload field to the product page in two methods. Each has its pros and cons, but I will let you know which method works the best.
1. Writing Custom Code (Only Recommended for Experts)
You have the option to write custom code using WooCommerce hooks and PHP functions to add a file upload field to your product pages. However, this approach:
- Requires coding knowledge
- Isn’t convenient and beginner-friendly
- Needs regular maintenance to stay compatible with WooCommerce updates
If you’re not a developer or don’t want to risk breaking your site, there’s a better way.
2. Using a File Upload Plugin Like WowAddons (Best for Everyone)
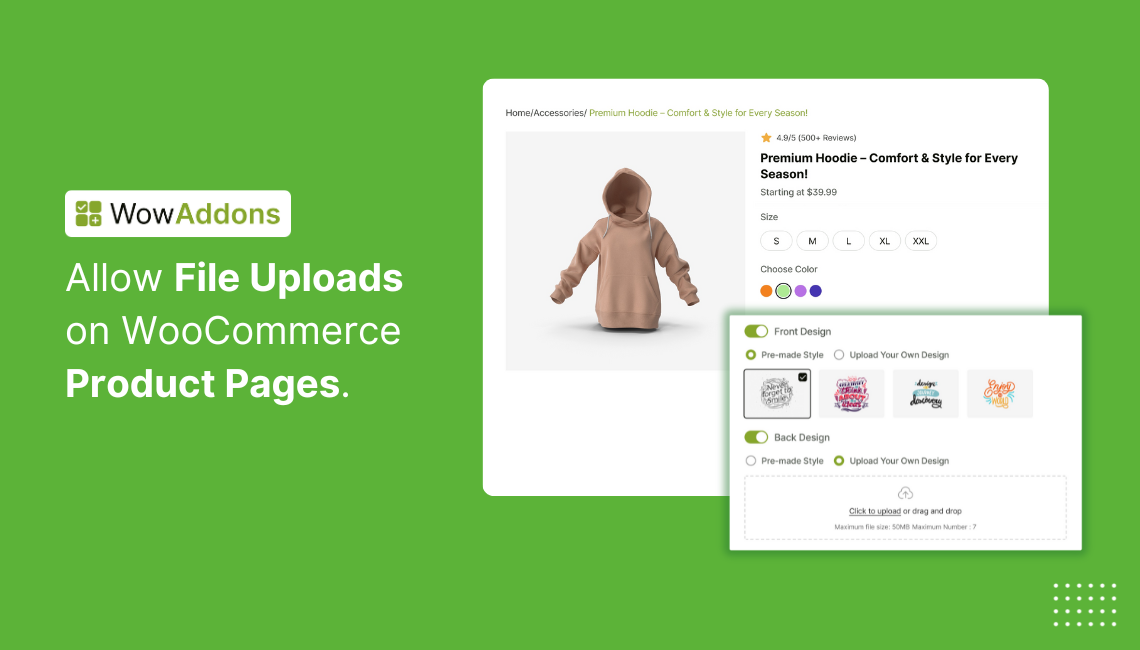
WowAddons is a product options plugin that allows you to drag and drop file upload fields directly into your product pages. No manual setup or coding is required. It is convenient and very user-friendly, so you can add custom fields to product pages as you want.
I personally recommend this method because it does all the heavy lifting for you. You can easily set dynamic add-on pricing for multiple products at once. So you don’t have to set everything from scratch for each product.
Adding File Upload Fields in WooCommerce Product Pages: Step-by-Step Guide
I have already mentioned the benefit of using a product add-ons plugin to add upload fields to product pages. Compared to manual coding, it is more intuitive and offers amazing customization features.
For adding the file upload field, I will use the WowAddons plugin. It is a complete solution to offer personalization features for your store’s products.
Step 1: Install & Activate the WowAddons Plugin
First, you need to install and activate the WowAddons plugin. The installation process is similar to any other plugin. From your WordPress dashboard, simply look for WowAddons in the “Add New” plugins section.
After that, click on Install and Activate. And you are done with the installation process and ready to add custom product fields.
Step 2: Select the Target Products
After installing the plugin, visit its dashboard and click on “Create Addons”. You will be directed to a new page where you can add and customize product add-ons.
First, you will see a dropdown from which you can choose the products where the upload field should be displayed.
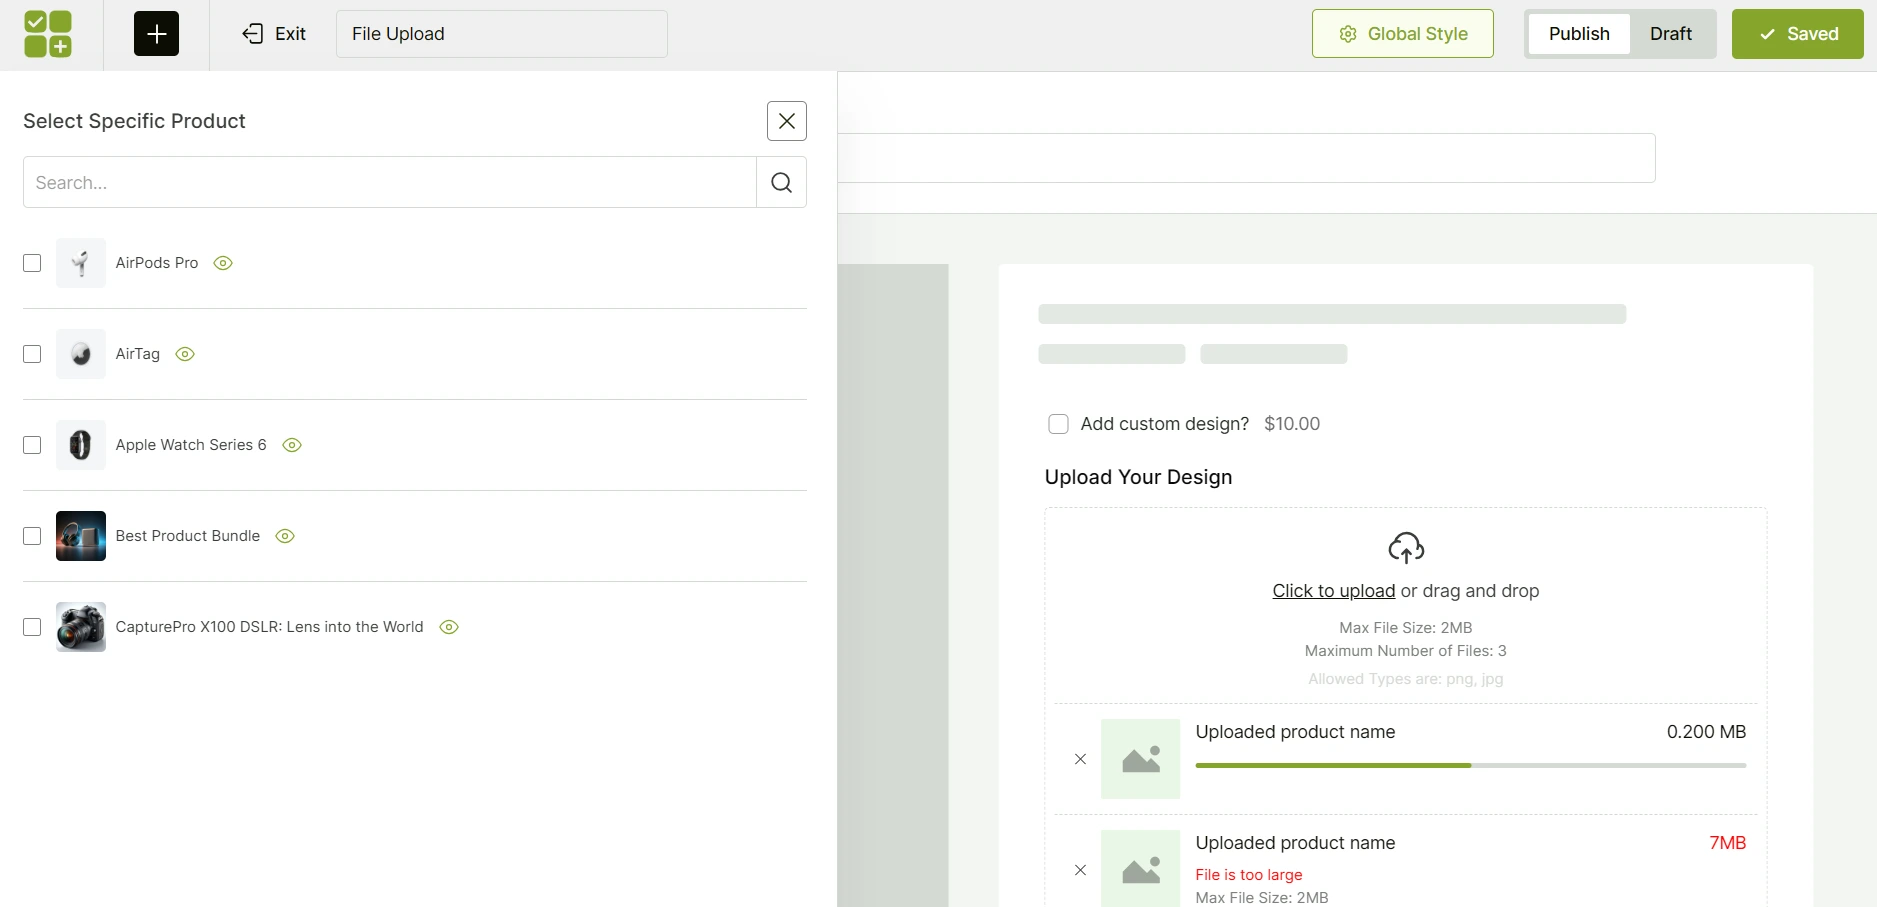
You can apply the upload field to a single product or multiple products in bulk using WowAddons’ intuitive interface. Alternatively, you can just assign the field to all products in your store.
This gives you more control, allowing file uploads for specific products like custom T-shirts or gift cards.
Step 3: Add the Upload Add-on to the Product Page
After setting the target products, click on the “+” icon on this page. It will show you a list of available product add-ons you can add. One of them is the Upload field. Select it and it will be added to the right side of this page.

Now, you can set this field as Required and Hide Title easily with one click.
Step 4: Add Text and Pricing for the Add-On
You should label the Upload Field properly. For example, custom labels like “Upload Your Design” or “Add Logo Here” make it clear for your customers.
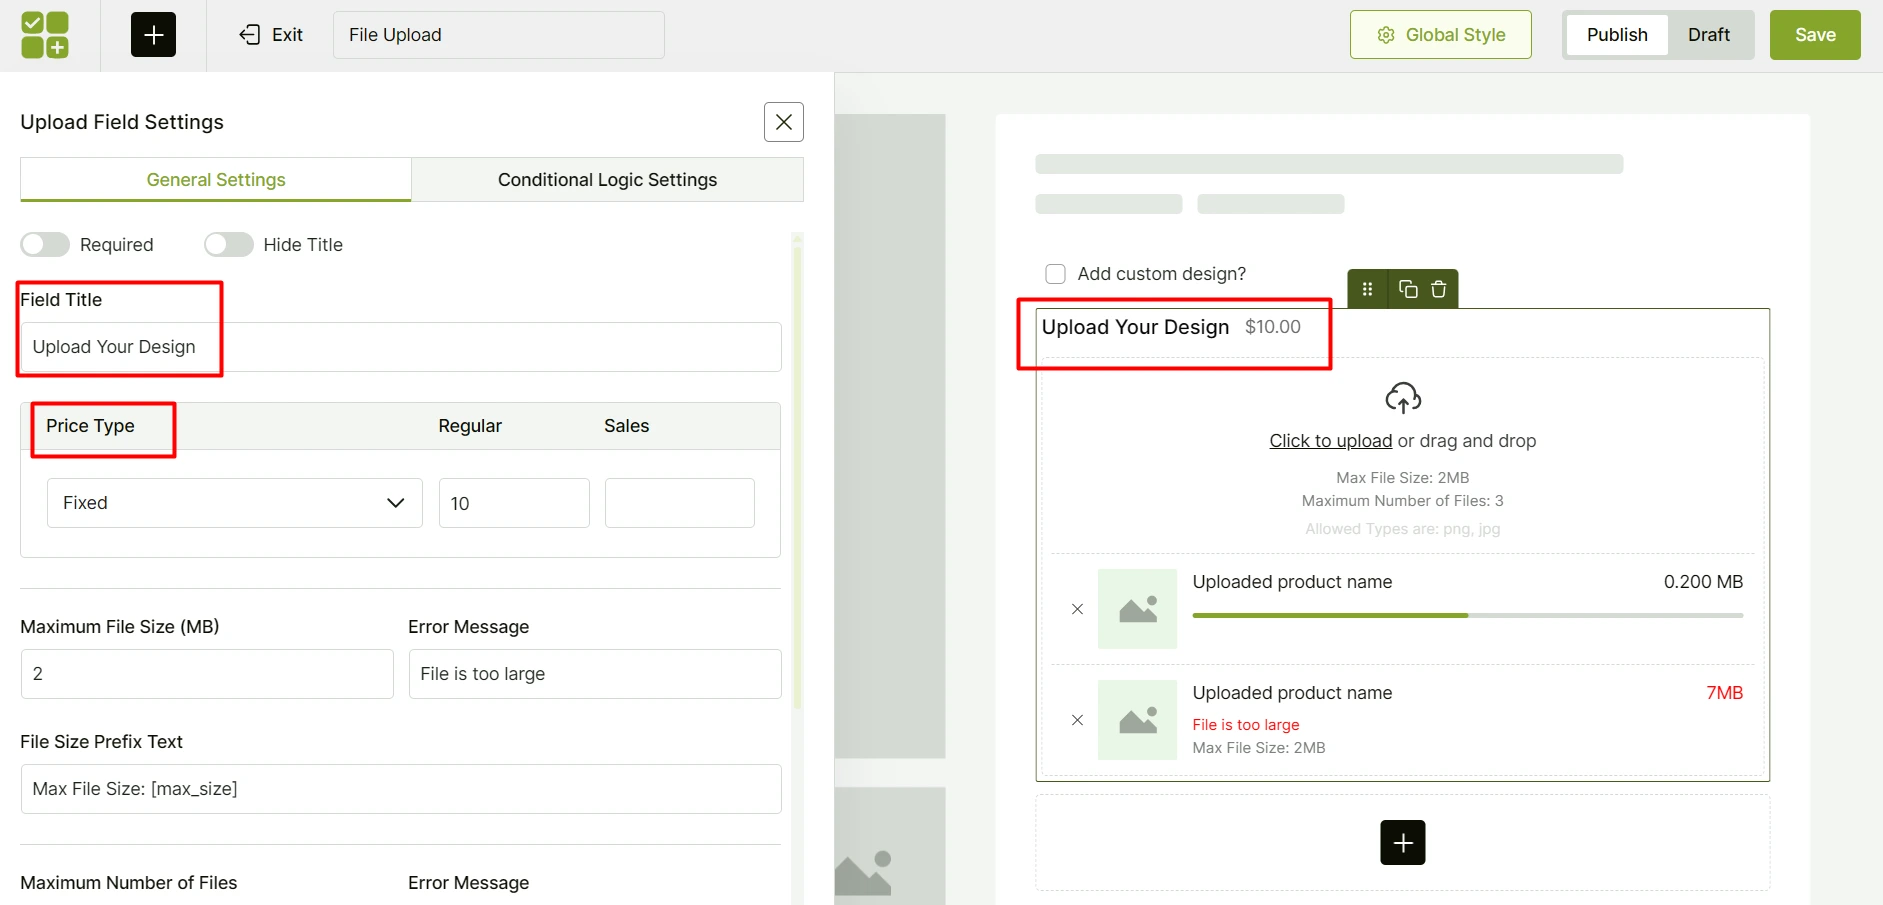
Want to charge extra for custom uploads? You can easily do that too with WowAddons. Under the Price Type setting, select Fixed, Percentage, or No Cost. The pricing will be automatically added and adjusted while the customer checks out the product.
Step 5: Set Type, Size, and Number of Files Limit
To keep your server happy, you should set a max file size limit (like 5MB or 10MB) and define how many files a customer can upload. This will help reduce unprecedented spam from anyone and will help avoid storage bloat.
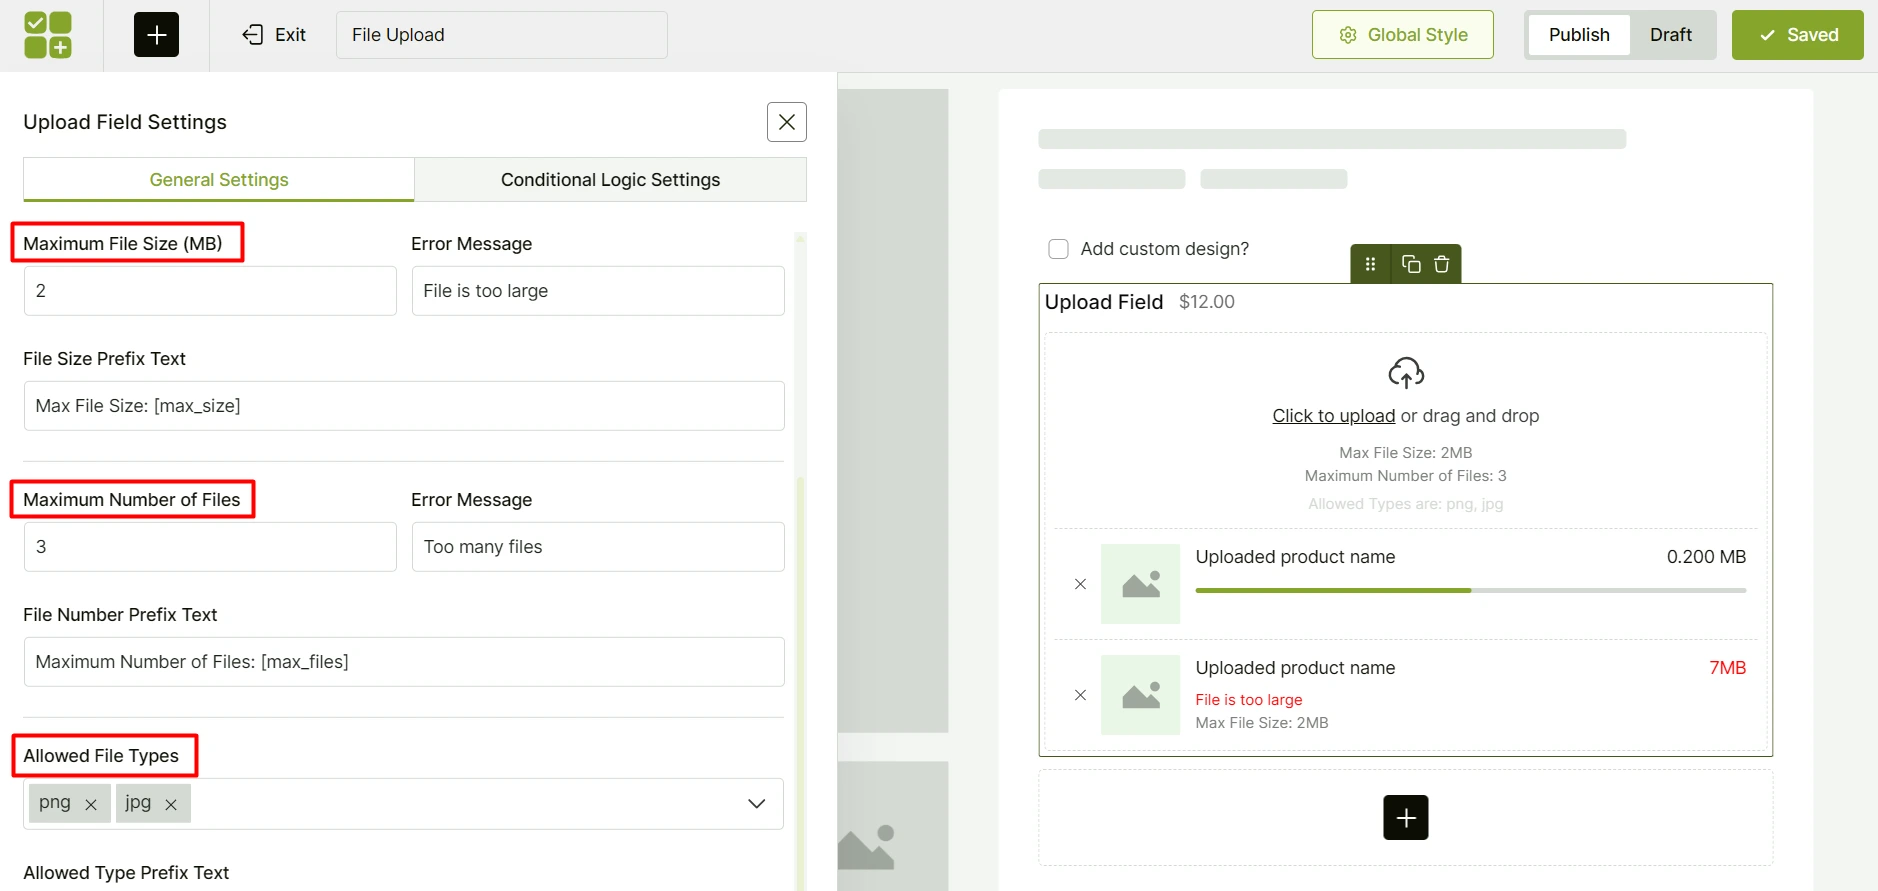
You can also allow specific file types (e.g., only JPEG or PDF) to make sure customers upload the correct format.
Step 6: Apply Conditional Logic
You can go ahead and publish this add-on as is. However, you can take it one step further by implementing conditional logic with it.
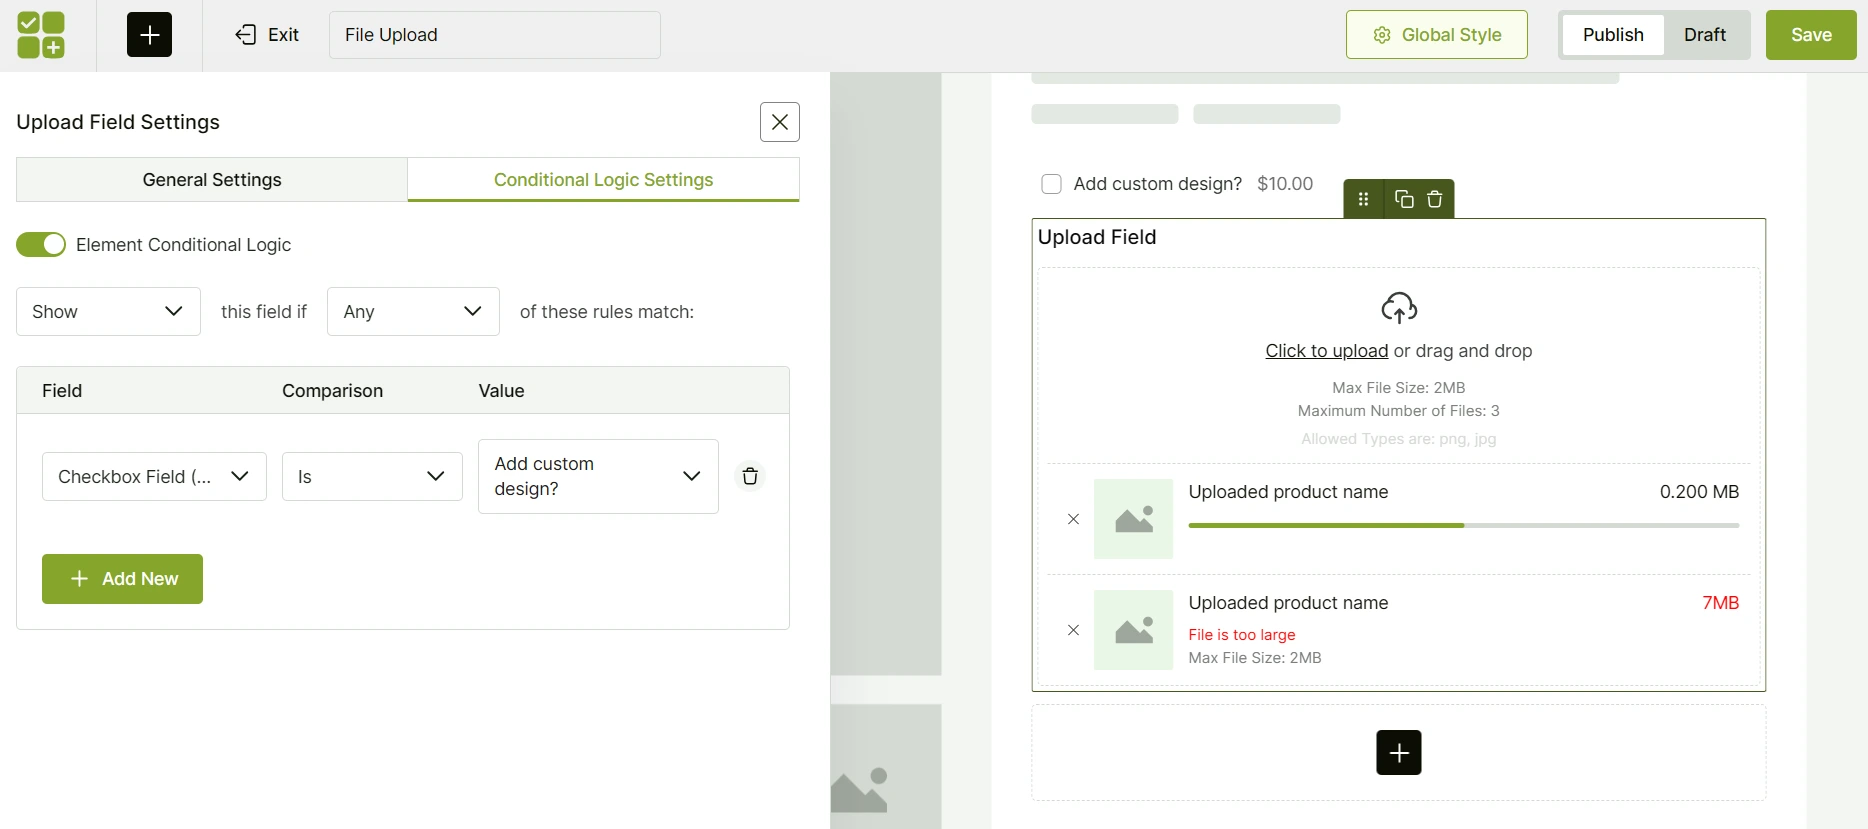
Using this feature, you can show the upload field based on different conditions. You can link another custom field with it to control when exactly the upload field will be displayed.
For example, if you have a custom t-shirt store, you can add a Checkbox field like “Add custom design?”. If customers click on the checkbox, only then the Upload Field will show up.
To set this up, click on the Conditional Logic Settings tab. From here, enable the Element Conditional Logic. Under the Field dropdown, select the field – in this case, it will be the Checkbox Field.
Also, select the condition from the Comparison dropdown and then choose the value. In this instance, I will select “Is” as the comparison condition and “Add custom design?” as the value.
Based on your conditions, the upload field’s behavior will change.
Frequently Asked Questions
Can I allow customers to upload multiple files at once?
Yes, you can allow customers to upload multiple files at once using a product options plugin like WowAddons. You can limit how many files customers can upload. Based on the limit, customers can choose multiple items.
What types of files can customers upload?
You can customize the allowed file types based on your needs – JPEG, PNG, PDF, DOCX, and more. To control the allowed file types, you can use a product addons plugin like WowAddons. This ensures customers only upload files that are relevant and usable.
Can I add file upload fields only to specific products?
Yes, you can control the file upload field to be visible only for specific products. WowAddons lets you control where each upload field appears. You can assign it to a single product, products from a category, or even all products in your store.