Do you want to enhance user experience on your WordPress site and make it easier for visitors to find the content they’re interested in? Adding post filters is the perfect solution.
Let your users instantly narrow down their search for posts by categories, tags, author, custom taxonomy, dates, and other criteria, all with a few simple clicks.
But how do you offer post filters for your users? The steps are quite simple.
To add post filters in WordPress:
- Install & Activate the PostX plugin
- Enable the Advanced Post Filter feature on your selected page
- Add your preferred post filters
- Customize the filter’s look to your liking
After tinkering with the filter settings, update the page or publish it. Now, your users should be able to filter posts as they like.
But these steps are only the gist of a comprehensive process. In the next sections, I will discuss the entire procedure of adding and customizing post filters in WordPress in greater detail. So, stay tuned!
Key Takeaways
- Adding a WordPress post filter enhances user experience by allowing visitors to easily find relevant content.
- The PostX plugin is a versatile tool for implementing advanced post filters on WordPress sites.
- With the Advanced Post Filter of PostX, you can allow users to search by categories, tags, authors, dates, and custom taxonomy.
- Customizing the appearance of post filters helps integrate them seamlessly with your site’s design.
What Is Post Filter & Why Should You Let Visitors Use It?

Before moving on to the steps of adding post filters, let’s get familiar with what post filter in WordPress means and why you should allow your visitors to use these filters in the first place.
Post filter is a functionality that allows users in your WordPress site to sort and display posts based on various criteria such as categories, tags, authors, custom taxonomy and more. It enhances the user experience by making it easier to find specific content.
Now, there are several benefits you, as a site owner, can have when you allow users to filter posts when browsing your website.
Here are the main advantages of adding post filters in WordPress:
- Efficient Search: Post filters allow users to quickly narrow down search results. So, they can easily find the right content without wasting time on irrelevant content. This is especially helpful for sites that produce a lot of content.
- Enhanced Browsing Experience: Filters allow users to find blog posts that match their interests. This enhances their browsing experience and leads to higher user satisfaction.
- Reduced Bounce Rates: As filters help users find what they’re looking for quickly, it reduces frustration and the likelihood of users leaving the site. This can help mitigate bounce rates and increase time spent on the site.
So, as a site owner looking to grow on the internet, adding post filters can positively impact how users interact with your content.
In the next section, you will learn details about the Advanced Post Filter of PostX and why it is an amazing choice for adding post filters in WordPress.
PostX Advanced Post Filter: Ajax-Powered Filtering for WordPress
The Advanced Post Filter is a powerful feature from PostX designed to enhance user experience on your WordPress site. It allows your visitors to quickly find specific content based on various criteria such as categories, tags, authors, custom taxonomies, and more.
Here are the unique features of the Advanced Post Filter:
Key Features:
- Filter by Categories and Tags: Allow users to easily filter posts by categories and tags, making content discovery quick and efficient.
- Custom Taxonomies: Support for custom taxonomies enables you to create personalized filters specific to your content types, such as locations for travel blogs or genres for review sites.
- Author and Date Filters: Users can filter posts by author or date, helping them find content from their favorite writers or specific time periods.
- AJAX-Based Filtering: Filtering posts by Ajax allows users to see filtered results instantly without the need to reload the page which greatly enhances the browsing experience.
- Customizable Appearance: Customize the look and feel of filters to match your site’s design. Adjust colors, typography, and filter styles easily.
Whether you run a blog, a news portal, a personal portfolio website, or any other website, the Advanced Post Filter can be very beneficial in ensuring efficient content discovery and boosting the overall site experience.
In the next section, you will learn about the step-by-step process of adding essential post filters for your blog, leveraging the power of this advanced filter.
Before moving on, if you would like to watch a tutorial, here is a video guide on the entire process:
Add Post Filters in WordPress: Detailed Steps
In the default WordPress setup, users can only search for posts using the search bar.
That’s why adding a WordPress post filtering option becomes crucial to let visitors quickly find their desired posts using categories, tags, taxonomy, and more.
Now, the easiest way to add a post filter in WordPress is to use a plugin like PostX.
In case you didn’t know-
PostX is the leading Gutenberg news plugin that lets anyone create complete websites without spending hours or having coding knowledge.
And now it is even more powerful with the addition of its newest feature: Advanced Post Filter.
So, without further ado, let’s find out how to add post filter in WordPress with the help of PostX.
1. Install & Activate the PostX Plugin
To enjoy the Advanced Post Filter feature, first, you must add the PostX plugin to your WordPress site.
Simply visit your site’s admin dashboard and navigate to the Plugins section. Search for “PostX” and click on Install Now. After activating the plugin, you are now ready to use the advanced post filter block on your site.
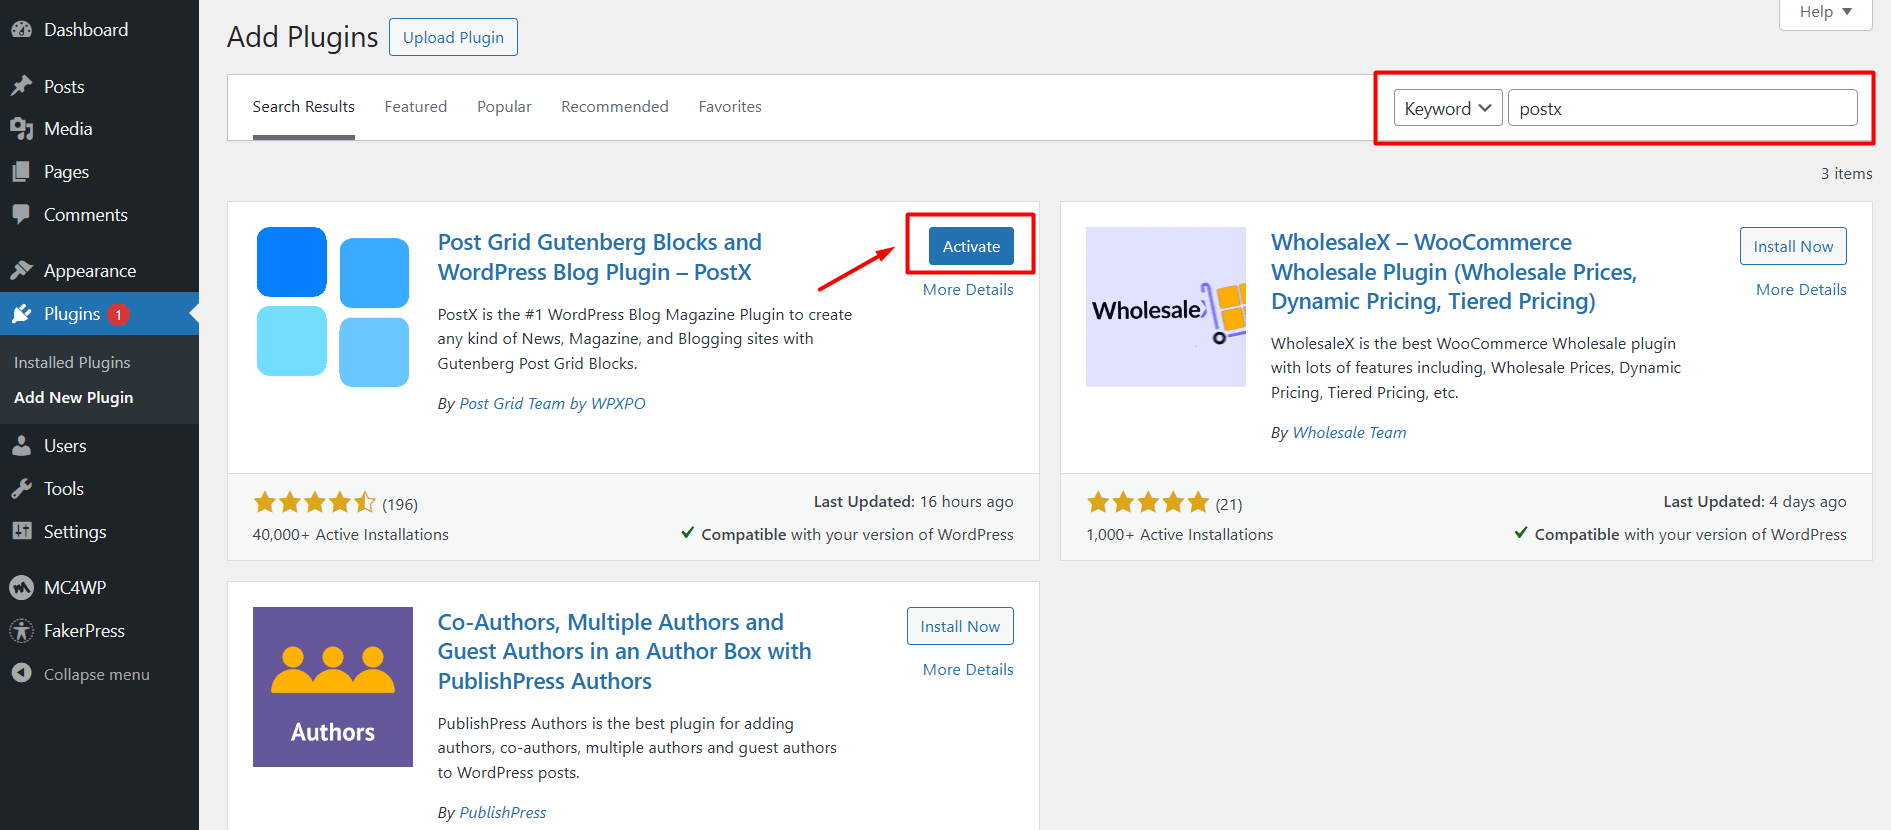
Note: If you need further information, you can check out the detailed installation process of PostX.
2. Enable Advanced Post Filter on Your Selected Pages
Next, you have to enable the Advanced Post Filter option on the pages you want to allow users to filter posts. To do this, follow these steps:
- First, create a new WordPress page or click on “Edit” on an existing page
- From the editor view, add a new Post List, Post Module, or Post Grid block from PostX
- If you already have an existing Post block on this page, simply select the block
- Now under the General tab for the selected Post block, enable the Advanced Filter option
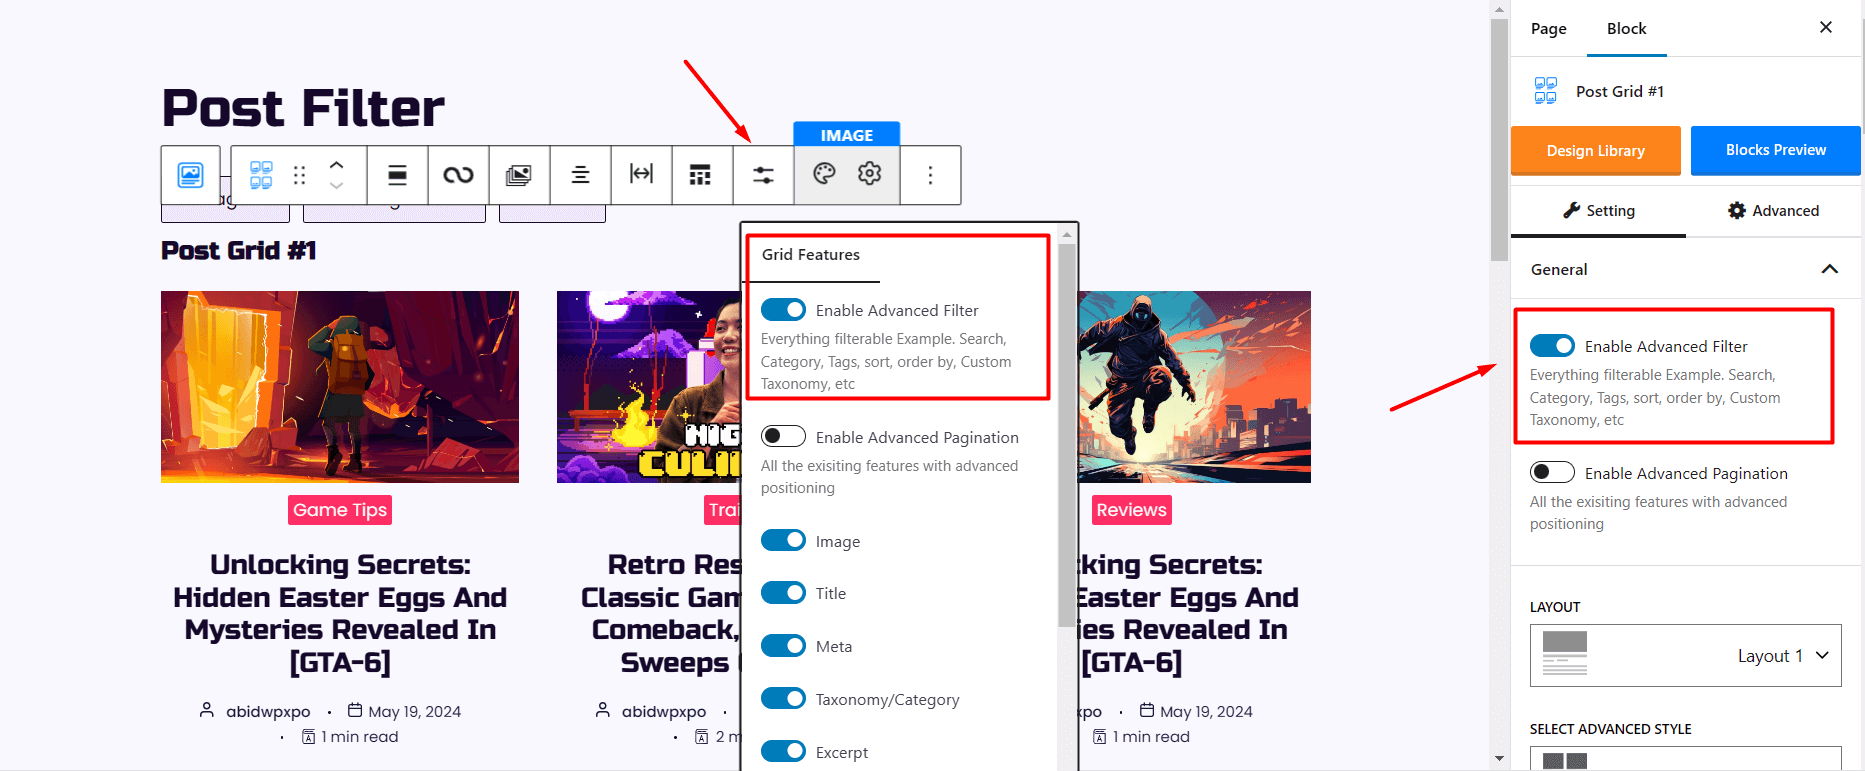
Note: PostX now comes with a very user-friendly Floating Settings Toolbar for each block. It allows you to easily access and modify available settings without scrolling options in the right sidebar.
So, enabling the Advanced Post Filter can be done from this floating toolbar as well. Under the Grid Features icon, you will find the option to enable the filter.
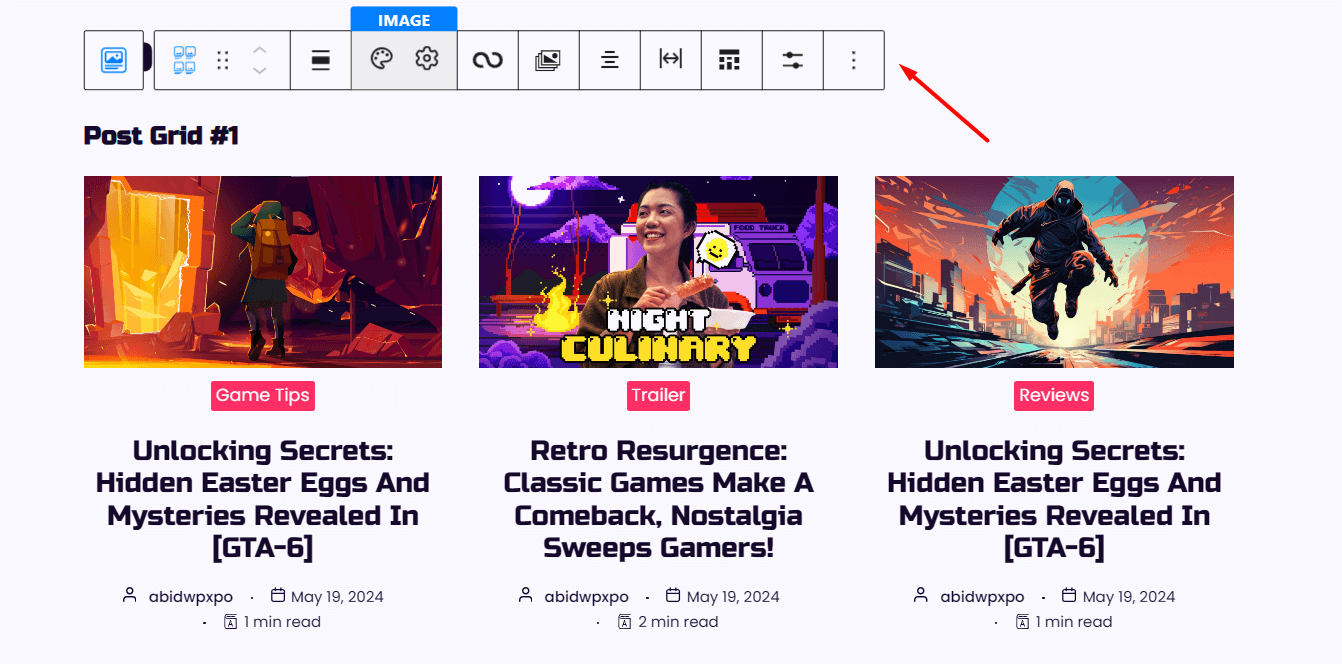
Now Save or Publish the page and your users should see a nice filter block when they visit this page.
3. Add The Essential Filters for Your Users
You have successfully enabled post filtering on your pages, but which filters do you want your users to take advantage of? You can select that too using PostX’s Advanced Post Filter.
To add your preferred post filters, follow these steps:
- Select the Advanced Post Filter block on the page
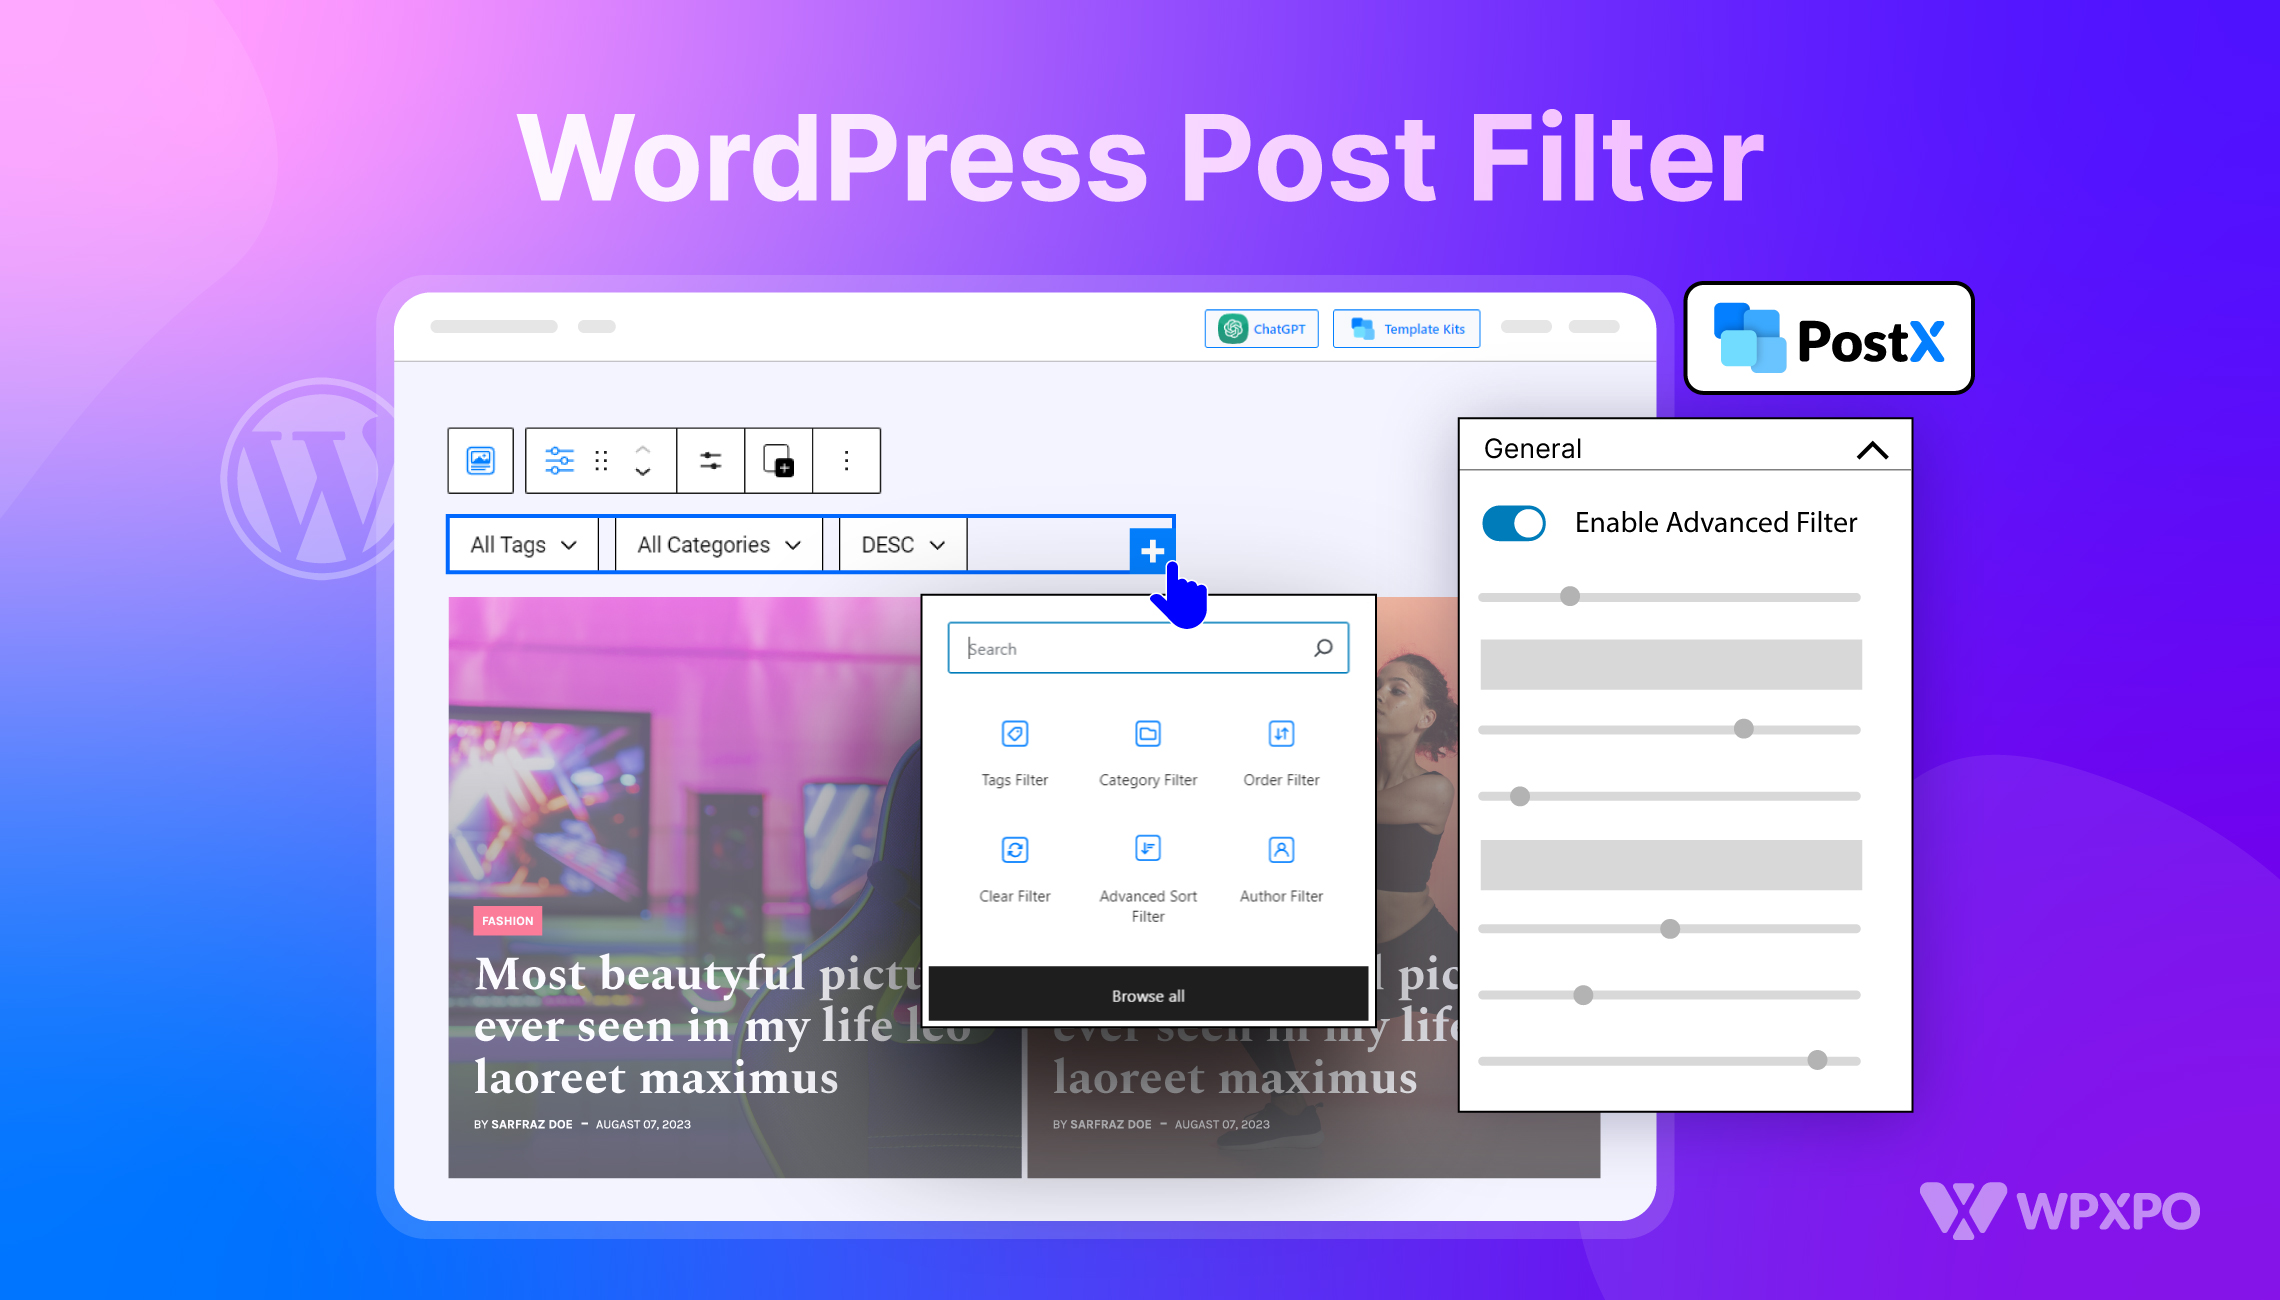
- Click on the Add Filters (+) icon to see the list of available filters on the left side
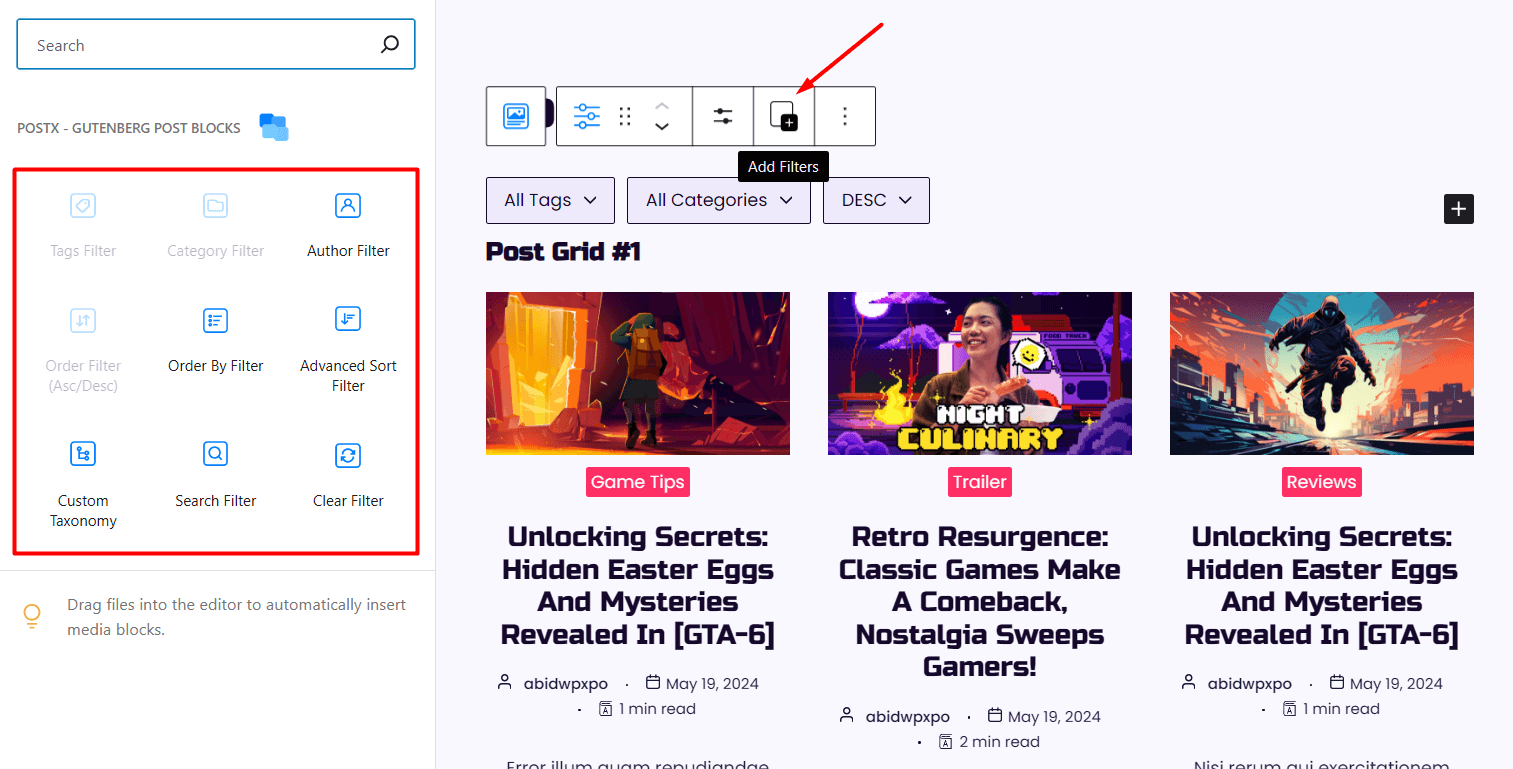
- Now choose the filters you want to show on the page
With PostX, you can add post filters such as Tags Filter, Category Filter, Author Filter, Order Filter, Order By Filter, Advanced Sort Filter, Custom Taxonomy, and more.
Depending on your selections, users will enjoy a variety of filters to find their desired posts.
4. Customize The Look of the Filters
You can further customize each filter to suit your preferences.
To do that, simply:
- Click on your selected filter from the Advanced Post Filter block
- On the right side, you will see the filter Settings such as alignment, filter style, and so on
- Also from the Styles tab, you can choose color, typography, and other settings
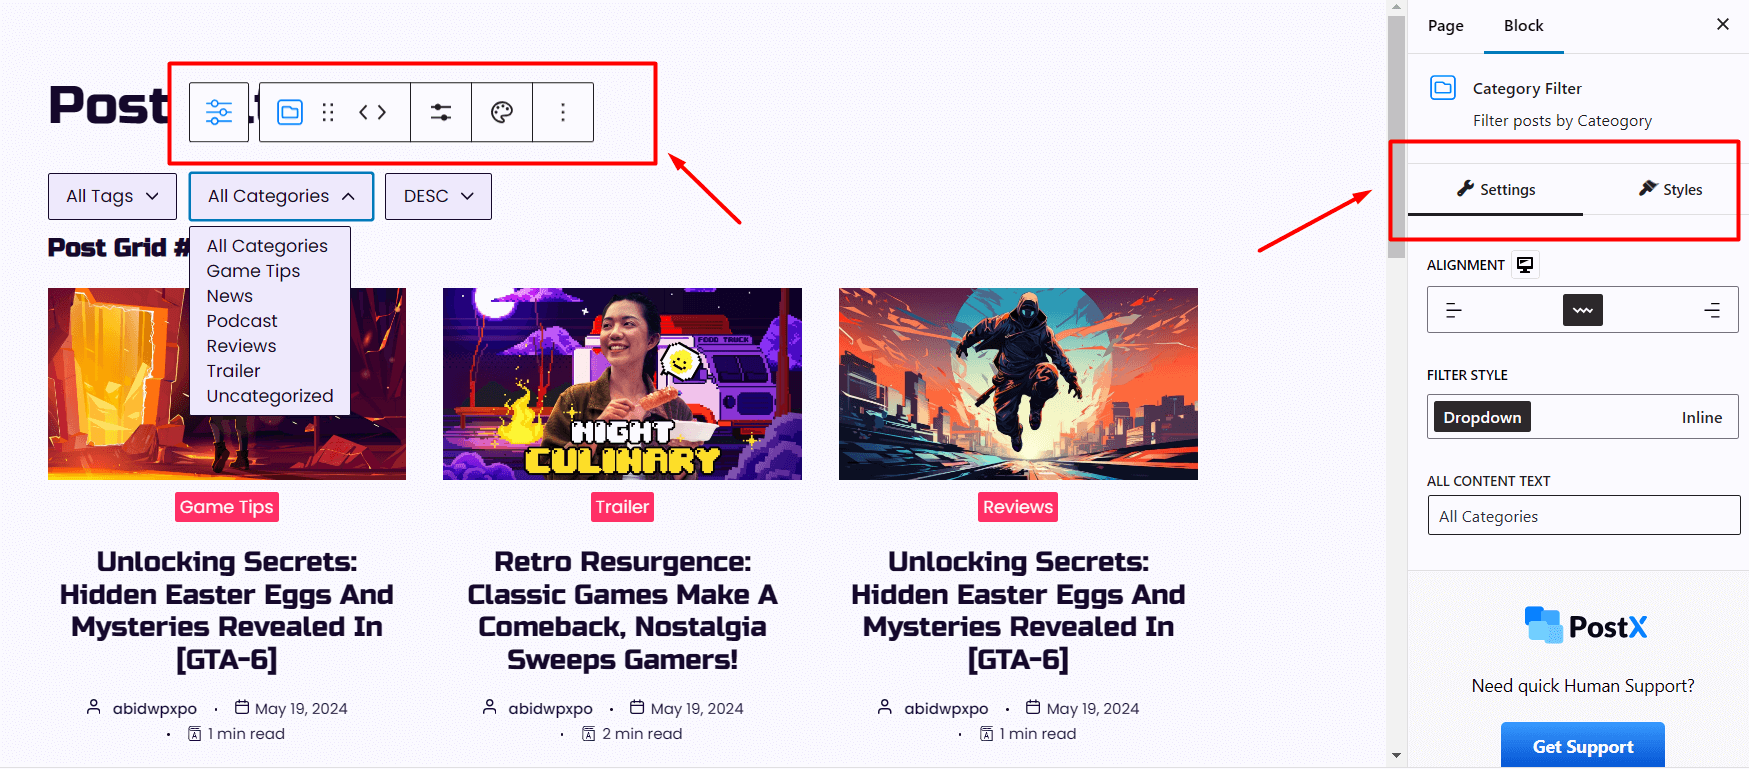
In addition to the sidebar, you can also find these settings on the floating setting bar when you select a specific filter.
5 Types of Post Filters You Must Add to Your WordPress Site
There are several post filters you can add to your WordPress site to enhance the browsing experience of users. However, here are the most important ones you should consider adding to your blog:
Filter Posts By Category in WordPress
Category filters let users view posts from a specific category. For instance, a blog may have categories like "Technology," "Health," and "Travel." So, if users select the category Technology, they will only see posts within that category.
Using PostX, you can easily filter posts by category with these steps:
- Add the Advanced Post Filter block on your selected page
- Select the block and click on the Add Filters (+) icon from the setting toolbar
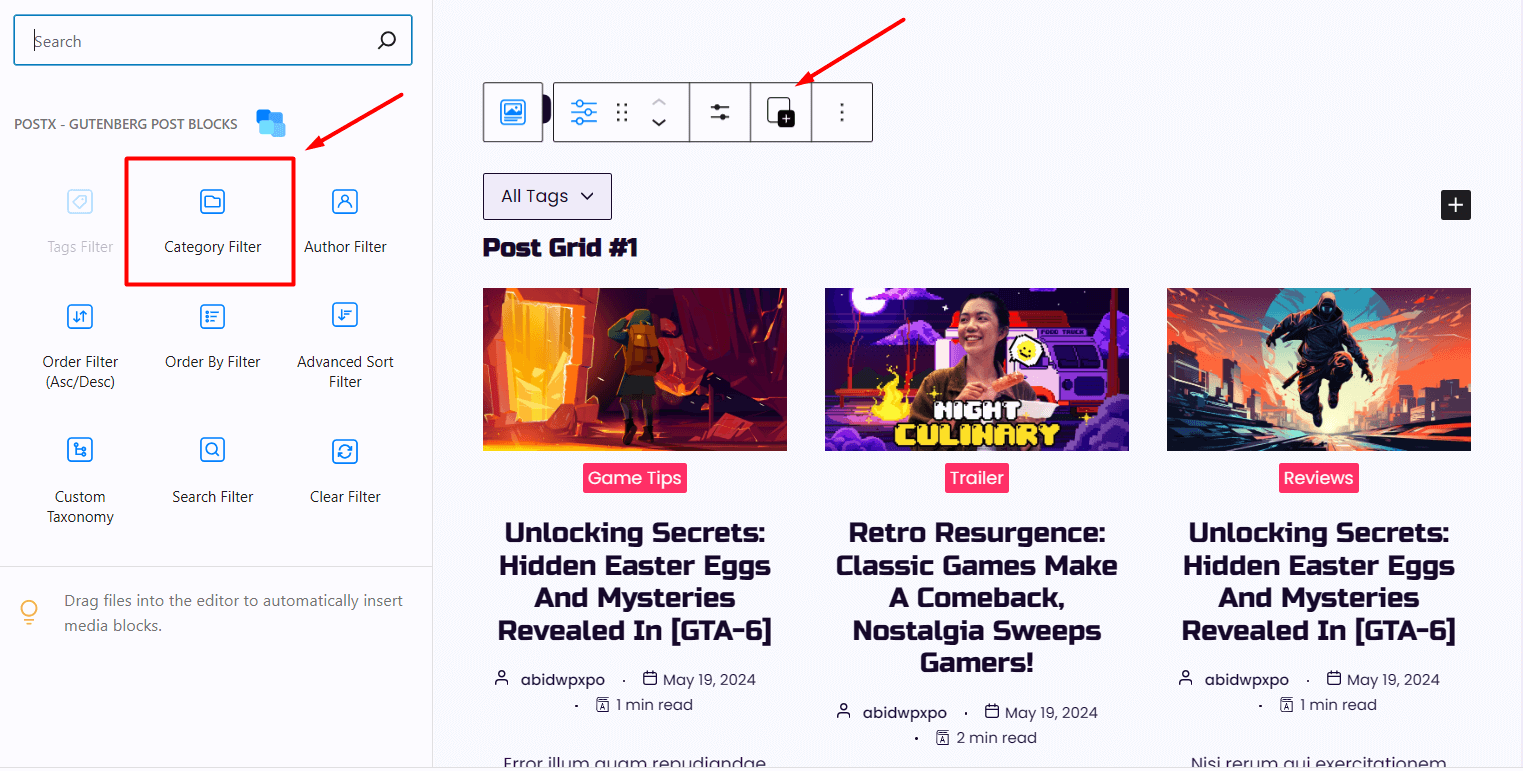
- Choose the Category Filter from the filters list
- Save the page and publish it
And done! Now your users should be able to filter pages based on a specific category.
Is It Possible to Filter Posts by Multiple Categories?
Yes, it is possible to filter posts by multiple categories using the plugin PostX.
To achieve this, follow these simple steps:
- Add the Category Filter using the Advanced Post Filter feature of PostX to your selected pages
- Click on the Category Filter block and from the Filter Style setting choose the Inline option
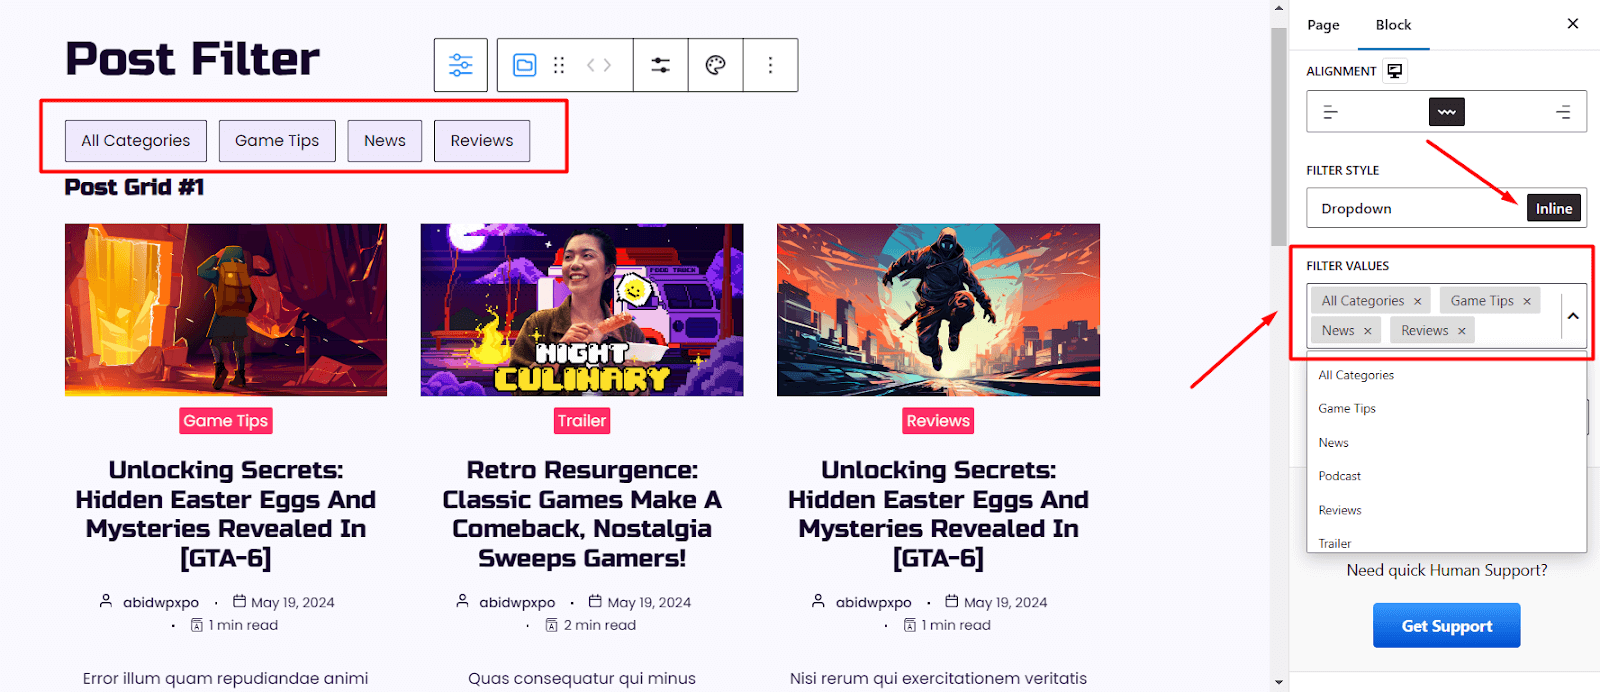
- From the Filter Values dropdown, choose your preferred categories
Update or Publish the page to see the changes in effect. Your users should now be able to filter posts by multiple categories.
And that’s how easy it is to implement post filtering by more than one category with the help of PostX.
Filter Posts By Tags in WordPress
Tag filters help users find similar content through specific keywords so that they can find the posts they are interested in. Each post can have multiple tags if they represent more than one interest.
Tags are more specific than categories. By clicking on a tag, users are able to find posts sharing a certain type of interest. So, it is particularly helpful when users need to narrow down their search to very selective topics.
Just like category filters, PostX makes adding tag filters intuitive:
- Click on the Add Filters (+) icon from the Advanced Post Filter block
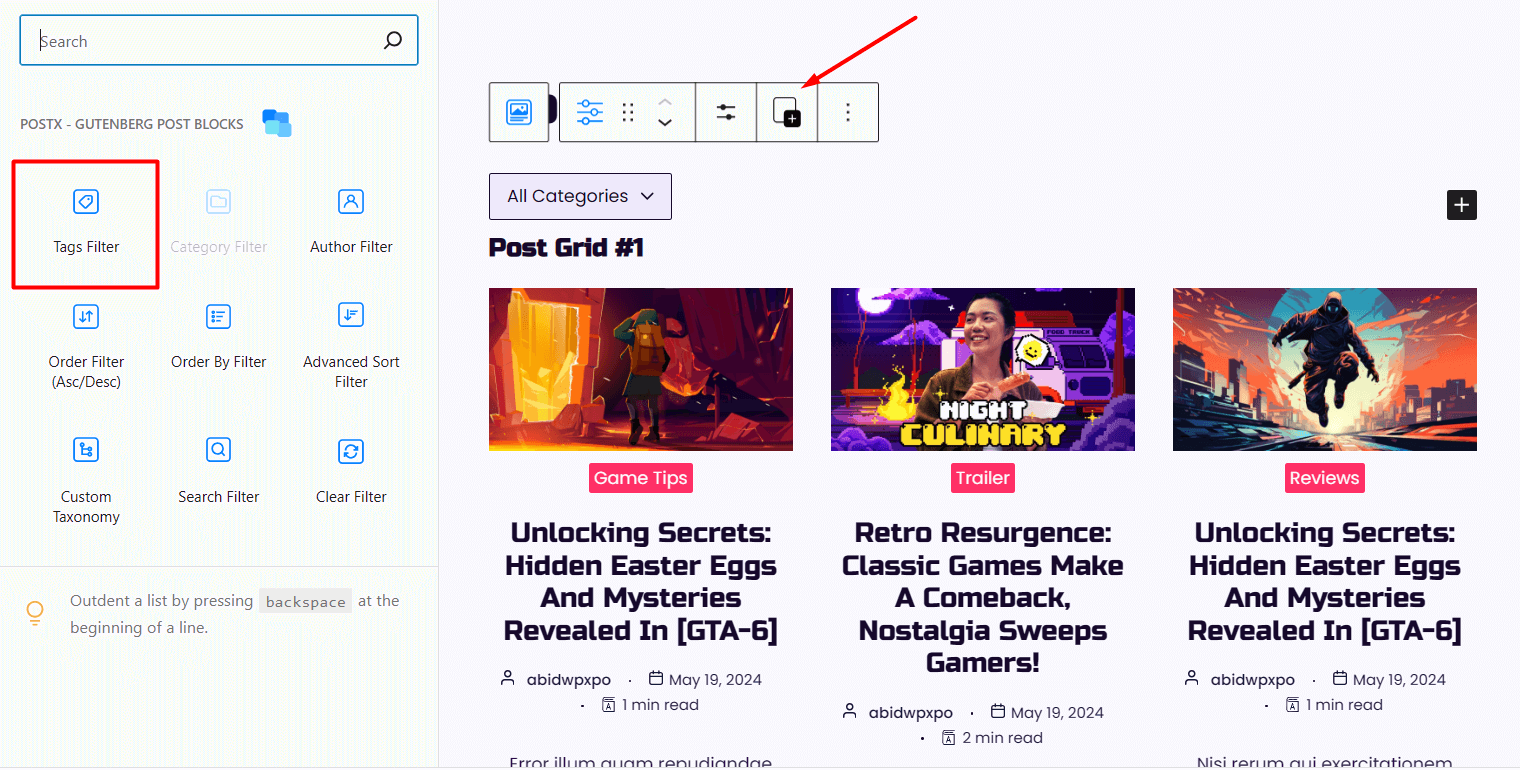
- Now choose the Tag Filter from the list of filters available
- Publish or Update the page to see the changes in action
Voila! Your visitors can now start using tag filters when they are exploring blog posts.
Is It Possible to Filter Posts by Multiple Tags?
Yes, it is possible to filter posts by multiple tags using the PostX plugin.
The steps are quite easy to follow:
- Enable the Advanced Post Filter feature of PostX on your selected pages and add the Tag Filter
- Choose the Inline option from the Filter Style setting
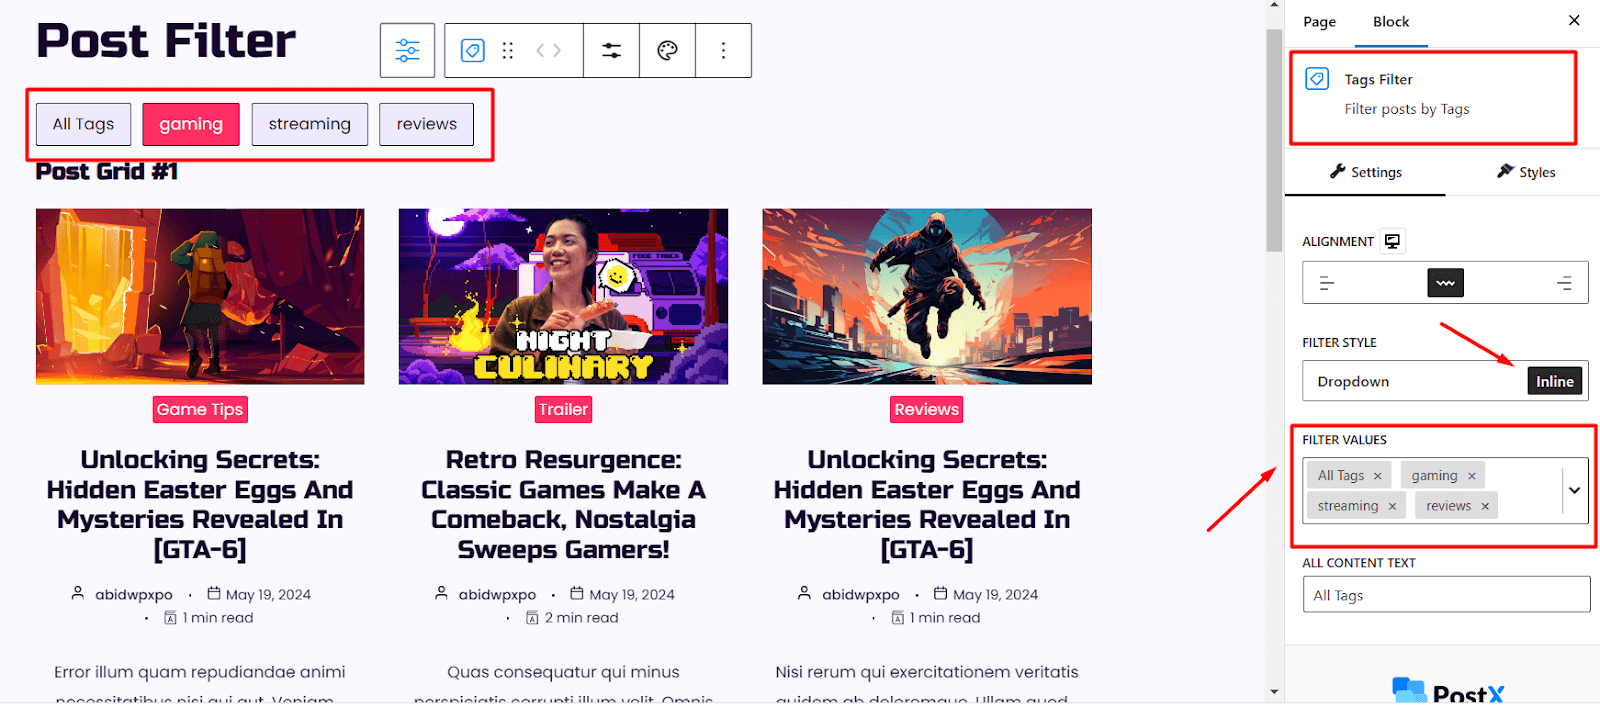
- Select your preferred tags from the Filter Values dropdown
Update or Publish the page and you have successfully added the functionality to filter posts by multiple tags.
Filter Posts By Attribute in WordPress
Filtering posts by different attributes such as Title, Created Date, and Date Modified is another great way to let your readers find relevant posts.
PostX supports filtering by all of these attributes and more.
Let’s say you want to allow users to filter posts by date. You can easily add that functionality by following these steps:
- From the editor view of a page, select the Advanced Post Filter block and add the filter called Order By Filter
- To control the Ascending and Descending order, also add the filter named “Order Filter (Asc/Desc)”
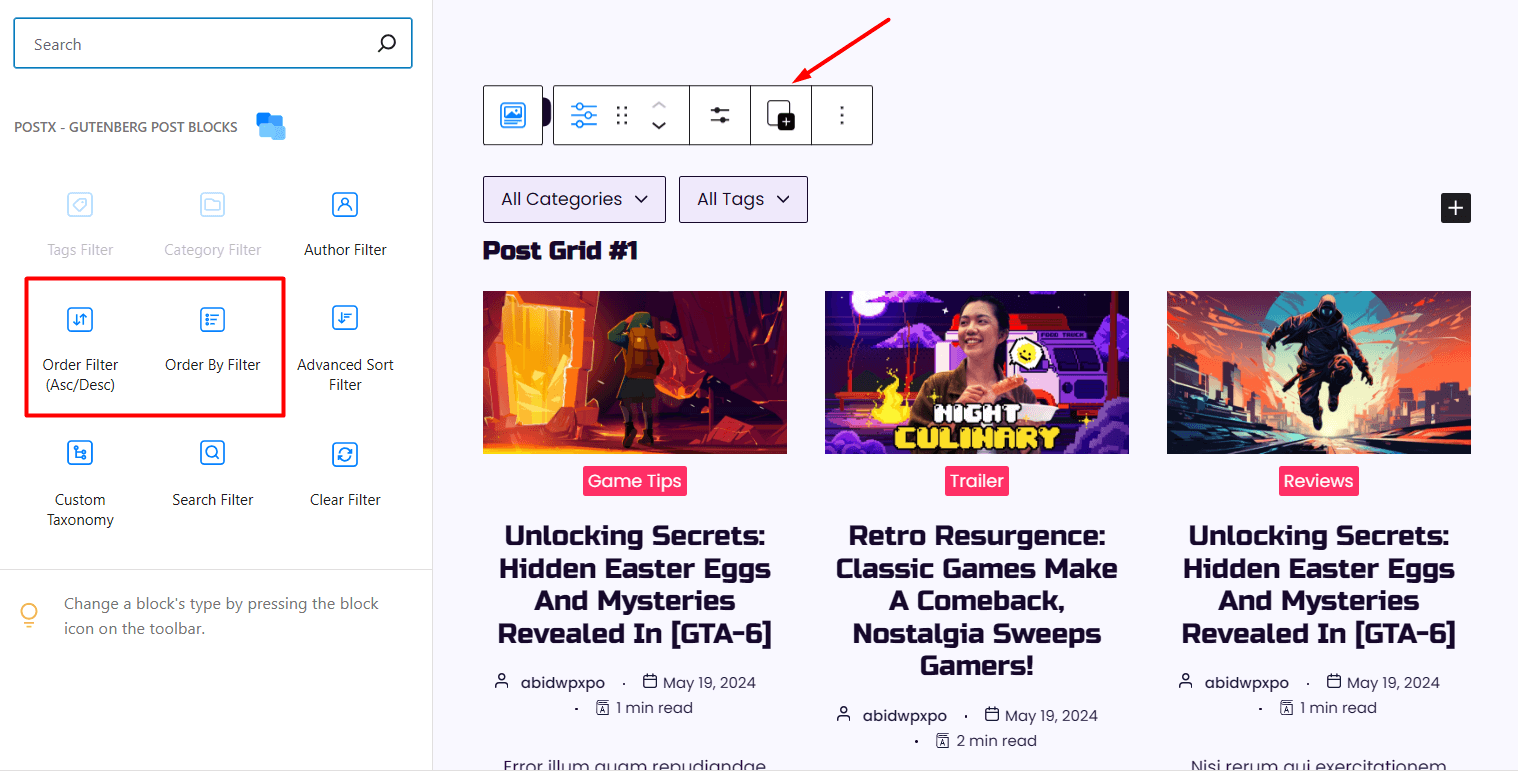
When you are done with the settings, Update or Publish the page.
Note: The Order By Filter is a powerful option that supports filtering based on many essential attributes. One of those attributes is the Created Date.
So, following the above steps will ensure your users can easily filter posts by date.
Users can also filter posts by some other attributes such as Date Modified, Title, Menu Order, Random, and Number of Comments.
Filter Posts By Author in WordPress
One of the main reasons you add post filters to your WordPress site is to provide greater freedom to your users in terms of what kind of content they want to see.
If your blog has many authors, users may want to see posts from a specific author. In such cases, adding an author filter is a must-have.
Fortunately, PostX also offers this filter for your users. The steps to filter posts by the author are quite identical to the process for the other filters discussed in the previous sections.
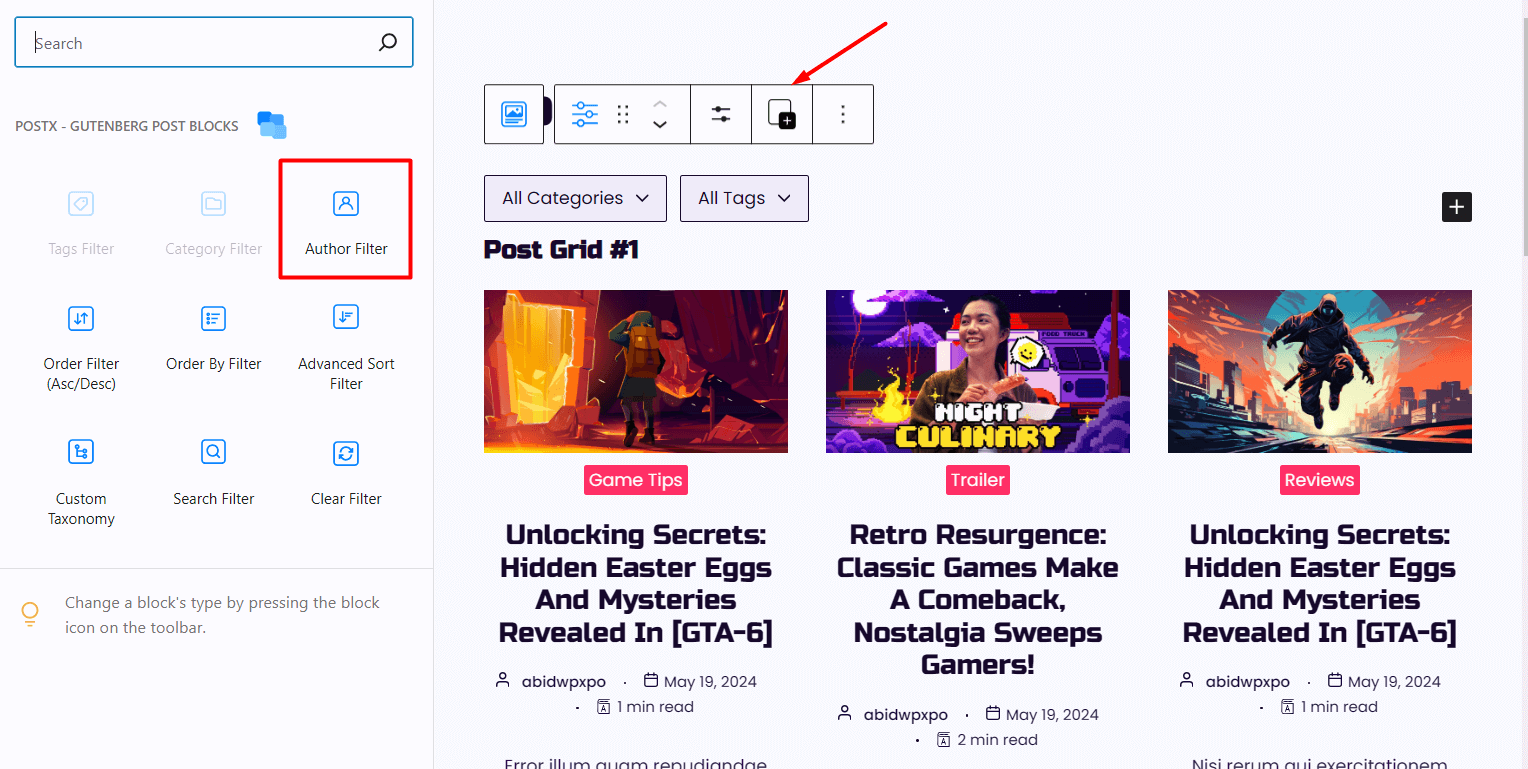
Simply add the Advanced Post Filter block on a page and click on the Add Filters icon. And you will see the Author Filter option.
Add the filter to let your readers filter posts by a specific author.
Filter Posts By Custom Taxonomy in WordPress
In the default WordPress setup, you have two taxonomies: categories and tags. These default options can become limiting when you have multiple varieties of content on your website.
For instance, if you have a travel blog, you can set ‘Destination’ as a custom taxonomy. Your visitors can then easily find posts related to specific destinations. Based on your content, these destinations might include Europe, Asia, North America, South America, Africa, etc.
So, in such situations, you need to create custom taxonomies for Your WordPress site. And yes, you will need a plugin that supports post filtering for them.
I think you have guessed already. Yes, the Advanced Post Filter block of PostX also supports filtering with a custom taxonomy.
Provided you have set up the custom taxonomies, here are the steps to add the filter for it:
- After adding the Advanced Post Filter on a page, hover on its floating setting bar
- From here, click on the Add Filters (+) icon
- Click on the Custom Taxonomy icon to add it to the list of available filters for users
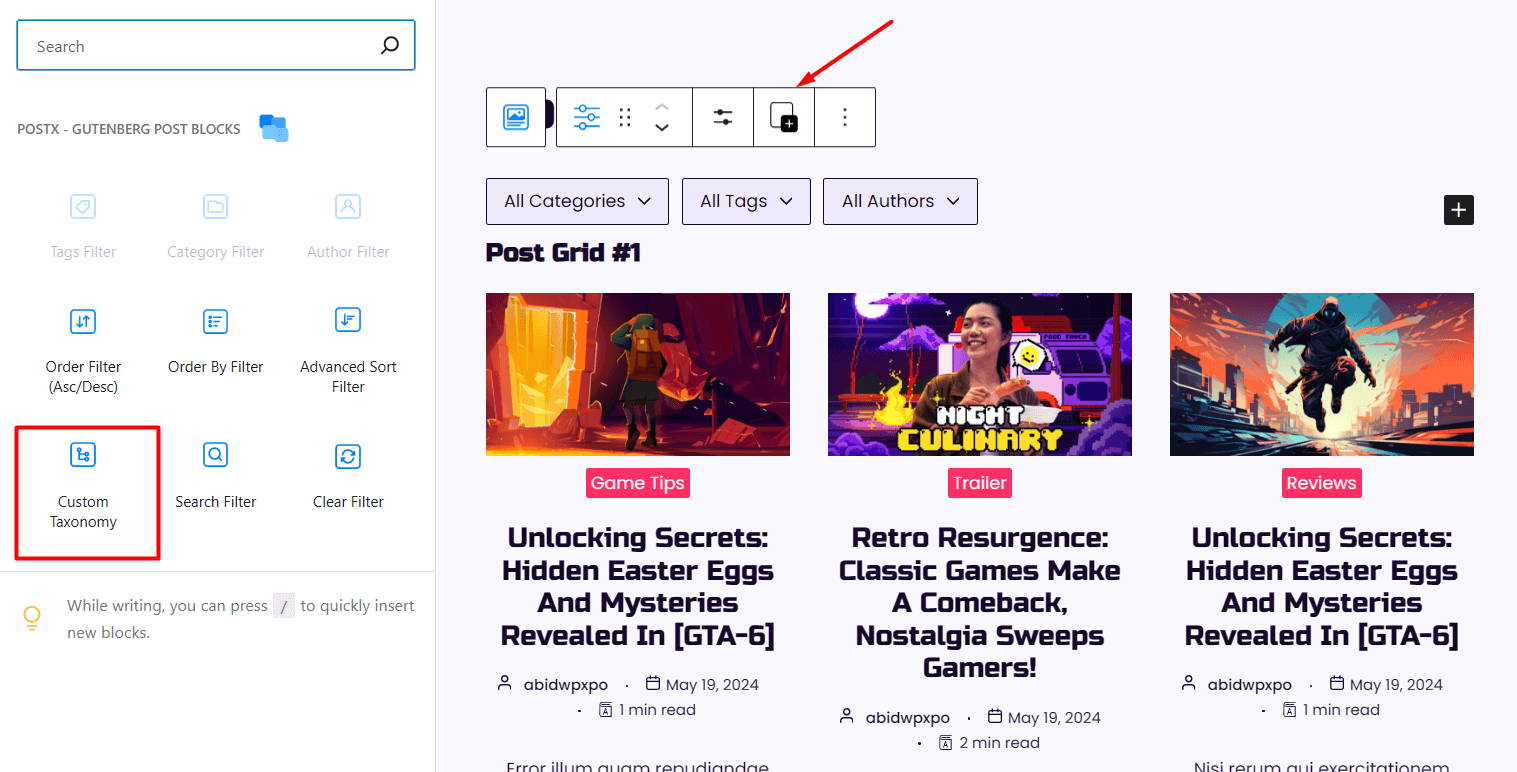
And just like that, you can successfully add all the essential filters required for your WordPress site.
As you have noticed, adding and customizing filters only takes a few clicks when you use the powerful plugin PostX. Now, letting your users find and navigate posts should no longer be a complicated process.
I bet you are already interested in PostX. Why not check out all the other exciting features of the plugin?
FAQs
How Can I Add Post Filters to My WordPress Site?
You can add post filters to your WordPress site using plugins. Popular plugins like PostX provide extensive filtering options and are compatible with most themes. With the Advanced Post Filter feature from PostX, you can create and customize all the necessary filters for your website.
What is AJAX Filtering in WordPress?
AJAX filtering in WordPress refers to the use of Asynchronous JavaScript and XML (AJAX) to dynamically filter content on a webpage without requiring a full page reload. This method enhances the user experience by making post filtering smoother and faster. For example, PostX offers an advanced post filter feature that uses AJAX to provide real-time filtering of posts based on various criteria like categories, tags, and custom taxonomies.
Can I Customize The Appearance of My Filters?
Yes, most popular plugins like PostX offer customization options. You can adjust the color, typography, spacing, and layout easily in just a few clicks.
Can I Use The Advanced Post Filter With Other Post-Related Plugins?
PostX is designed to work well with most plugins. However, conflicts can occur. If you experience issues, try disabling other post-related plugins one by one to identify any conflicts.
Troubleshooting Common Issues
I installed and activated the PostX plugin, but I don’t see the Advanced Post Filter block in the editor. What should I do?
Double-check that the PostX plugin is activated. Go to your WordPress dashboard, navigate to “Plugins,” and check if PostX is listed as active.
If it’s active and you still don’t see the block, try clearing your browser cache or refreshing the page. If the problem persists, deactivate and reactivate the plugin.
The filters are not displaying on my page after I have enabled them. What could be the issue?
Double-check that you have saved and published the changes to your page. Ensure that the Advanced Post Filter block is properly configured with the filters you want to display. Also, verify that you have edited the correct page where you want the filters to appear.
The post filters seem to slow down my site. How can I optimize performance?
By default, PostX is built with optimized code. If you still see performance issues, ensure that you are using a good caching plugin to improve overall site performance.
If your site has a large number of posts, consider using a dedicated hosting plan that can handle higher traffic and resource usage.
The filter block doesn’t appear visually appealing with my current theme. How can I match it to my site’s design?
You can customize the appearance of the filter block using the style options provided by PostX. Adjust colors, typography, and layout to better match your theme.
For more advanced customization, you can add custom CSS. If you need further assistance, consult your theme’s documentation or seek help from a developer.
Conclusion
Ready to enhance your users’ experience with advanced post filtering? Follow this guide and transform your WordPress site today.
If you still have any confusion regarding how to add post filters in WordPress, feel free to refer to this article again.
As always, feel free to reach out in the comments below if you have any questions or need further assistance!





Francesco
October 15, 2024I have a question and a suggestion for the advanced filtering system on PostX
Would be great if it could be possibile to filter posts by a precise date. Right now I can’t filter for all post dated august 27th 2024.
Plus, in the filtering dropdown is not possibile to select which filters I would like to keep and which I don’t. This is only doable in the inline mode.
Plus, add search box in the advanced filter dropdowns.
Right now I can only open a scrollable window but if I have many fields I can’t search in the author filter by typing it
Abid Hasan
October 16, 2024Hi, thanks for the comment. We appreciate the suggestions. Our team is already working on the option to choose specific filters in the dropdown.
For the other two features, I have notified my team. They will certainly look into it 🙂