You know checkboxes are essential for your WooCommerce store, but you’re still struggling to implement them correctly, aren’t you?
That’s exactly why I created this guide. Because let’s face it – WooCommerce doesn’t provide an option to add a checkbox by default.
But don’t worry, there are several ways to do it. However, not all of them are foolproof or user-friendly. I’ve tested every method available, from plugins to custom code solutions, and I’m about to share the approaches that actually work in 2025, that’s WowAddons.
Here’s the best part: you don’t need to be a coding expert or anything to follow along. I’ve broken everything down into easy, actionable steps that anyone can follow. So, let’s transform your WooCommerce product pages by adding checkboxes today!
Some Creative Ways to Use Checkboxes on Your Product Page
Checkboxes aren’t just for terms and conditions anymore, you can use them smartly. Here are some real ways you can add checkboxes to your product pages.
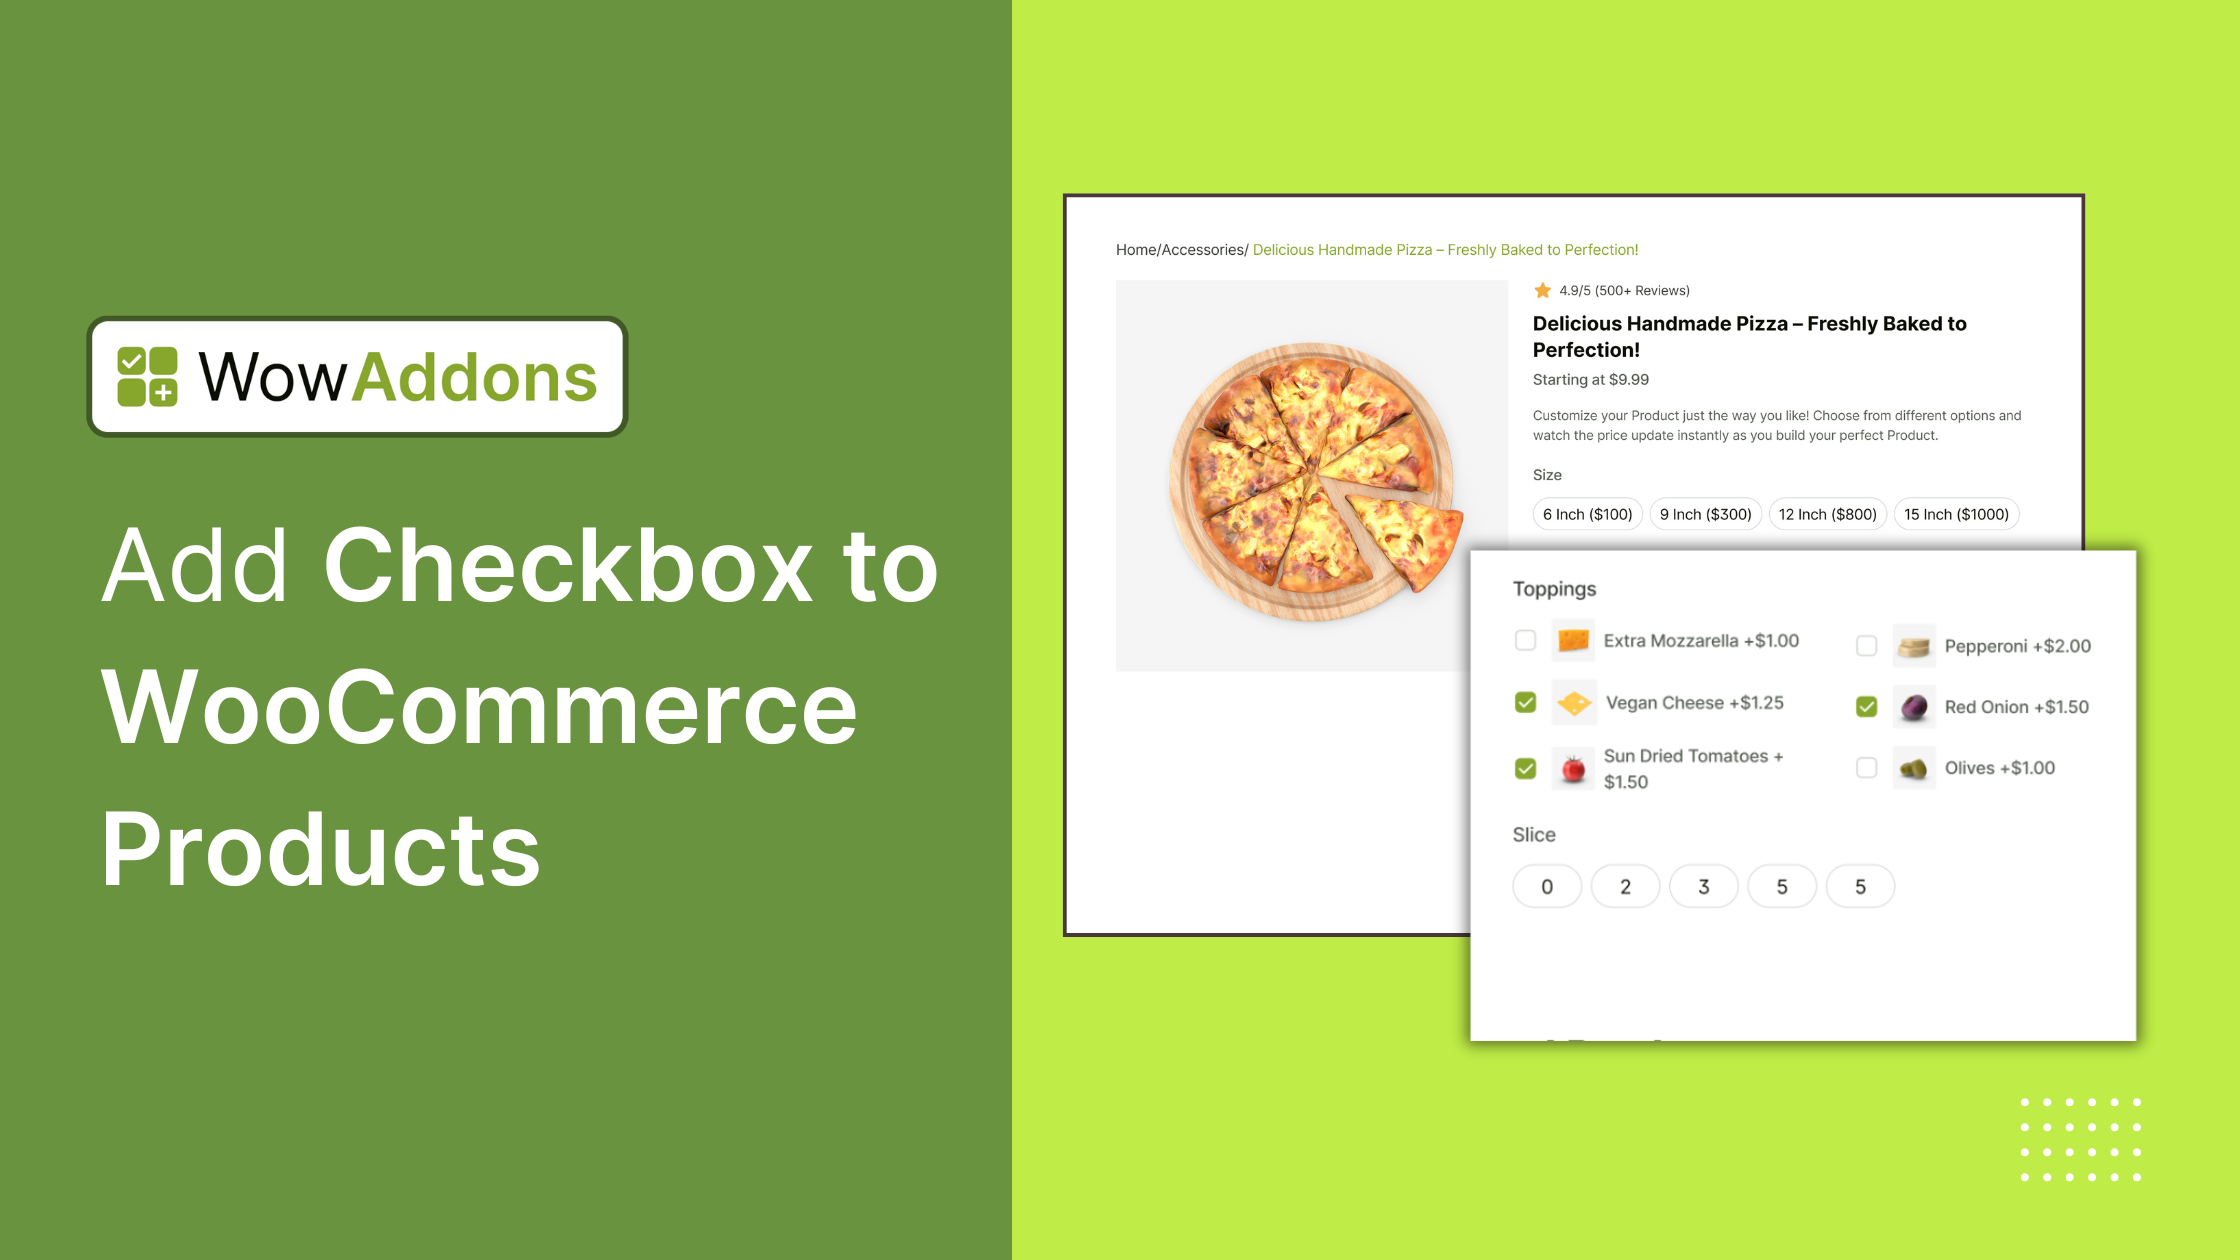
- Eco-Friendly Packaging: For customers who care about the environment, this little checkbox can make a big difference and show that your brand cares, too. Example: “Use eco-friendly packaging (+$1).”
- Add a Personalized Touch: Customization feels special, and customers are often happy to pay a little more for something unique. Example: “Engrave my name or message (+$10).”
- Use Extra Verifications Where Needed: Whether you’re selling delicate collectibles or products meant for adults, a simple checkbox keeps things clear and protects you and the customer. Example: “I confirm I’m over 18 and understand how to handle this item safely.”
- Get SMS Updates: People love getting real-time updates without digging through email. It’s a win-win! Example: “Send me text updates about my order.”
How to Add Checkboxes to a Product in WooCommerce
First off, WooCommerce doesn’t have a built-in product addons feature, so you can’t add checkboxes by default. However, you can easily add this with the right plugin. The challenge is finding the best one among all the options out there.
Let me make it easy for you: I highly recommend WowAddons. It’s one of the best WooCommerce product addons/options plugins because it’s easy to use and packed with great features.
Here are six major features to take your WooCommerce store’s customization to the next level:
✅ Product Addons Builder: Customize your products with endless options.
✅ Dynamic Price Adjustments: Prices update automatically based on selections.
✅ Image and Color Swatches: Display vibrant product choices.
✅ Smart Product Assignments: Assign addons to specific products or categories.
✅ Image and File Uploads: Let customers upload images or files easily.
Now let’s dive in and see how to add a checkbox!
Step #1: Install and Activate WowAddons
The process begins by installing and activating WowAddons through the plugin installation library in WordPress.
To do this, go to Plugins > Add New, then search for WowAddons in the search bar. Once you find it, click Install and then activate it.
Step #2: Create an Option for the Product
Once you’re in your WordPress menu, you’ll notice a new item labeled WowAddons. Go ahead and click on it, then hit “Create Addon” from the top bar.
You’ll be taken to the addon builder page. Start by giving your addon a name.
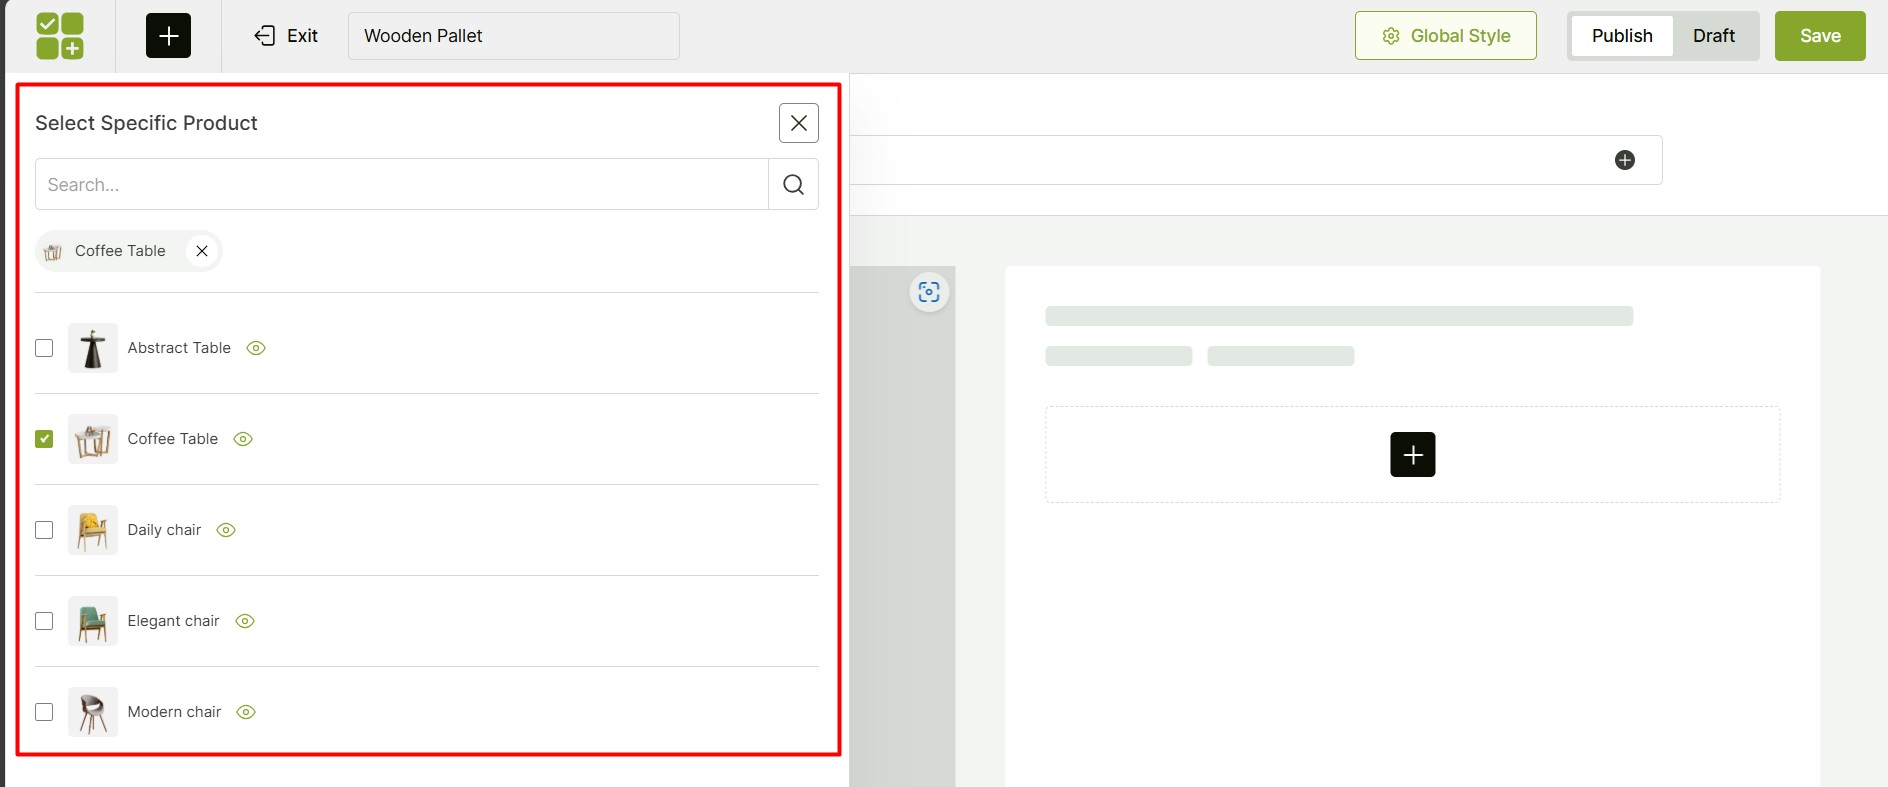
Next, assign the products where you want to add the checkbox. There are three options:
- All Products – This will apply the checkbox to every product.
- Specific Products – Pick the exact products where you want the checkbox.
- Product Categories – Add the checkbox to all products within a certain category.
Step #3: Add the Checkbox Element
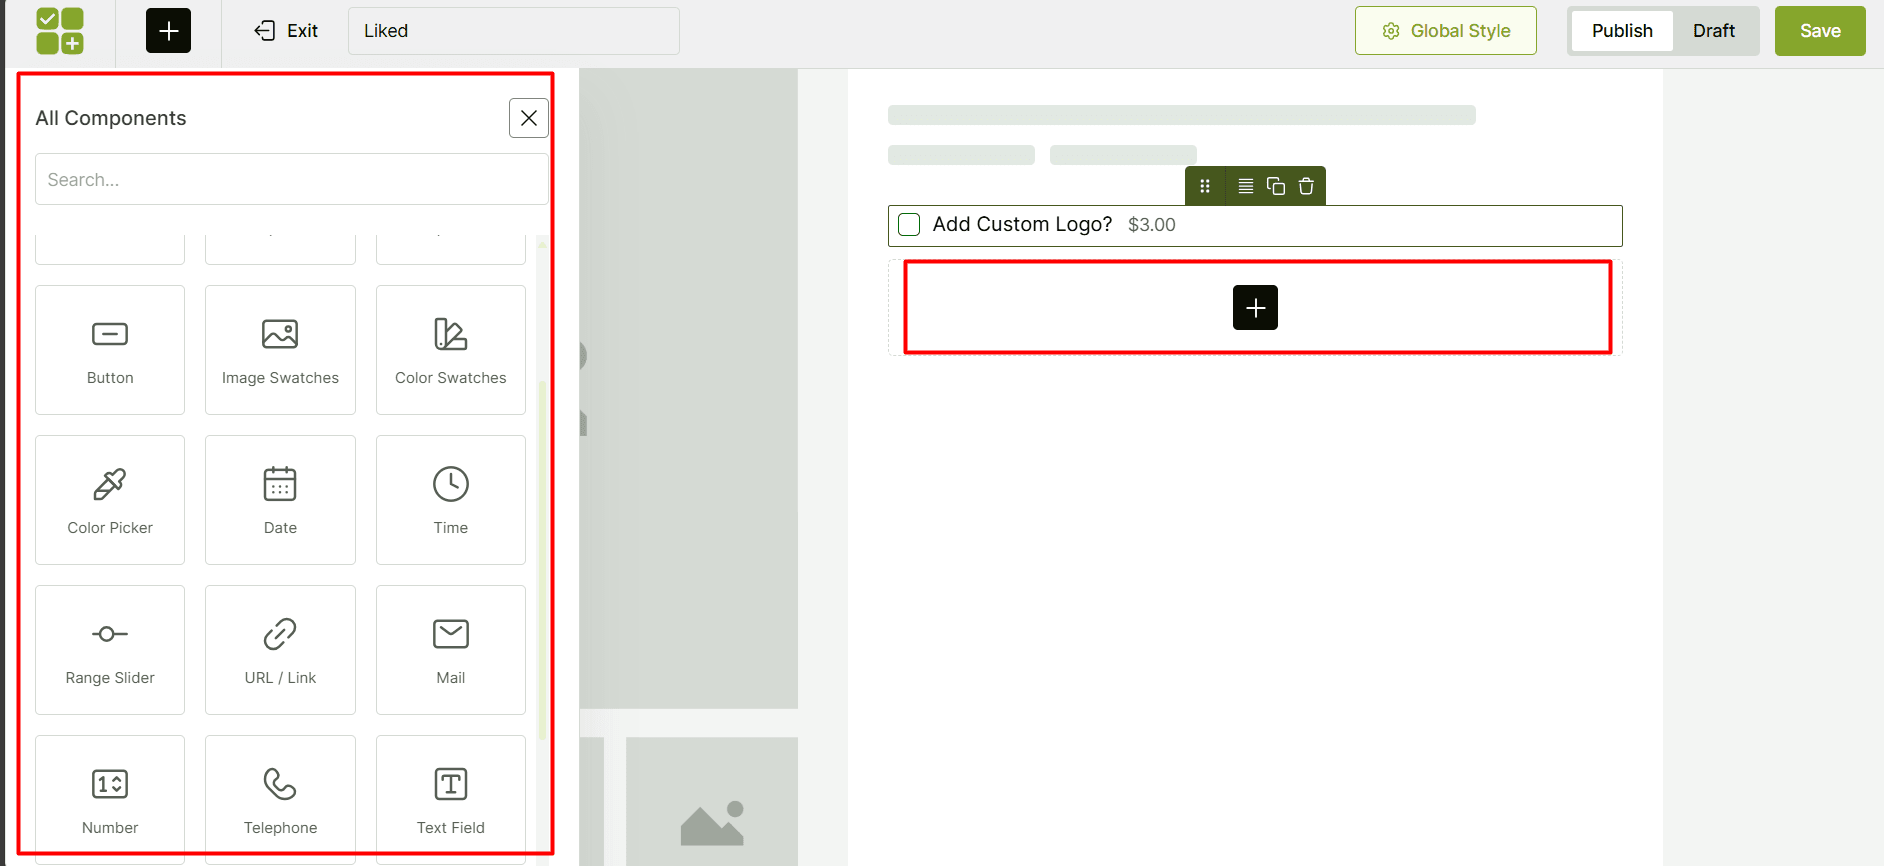
Alright, now let’s add the checkbox to your products. Here’s what you need to do:
- Click the “Plus” icon in the builder.
- Choose the “Checkbox” element from the tab on the left.
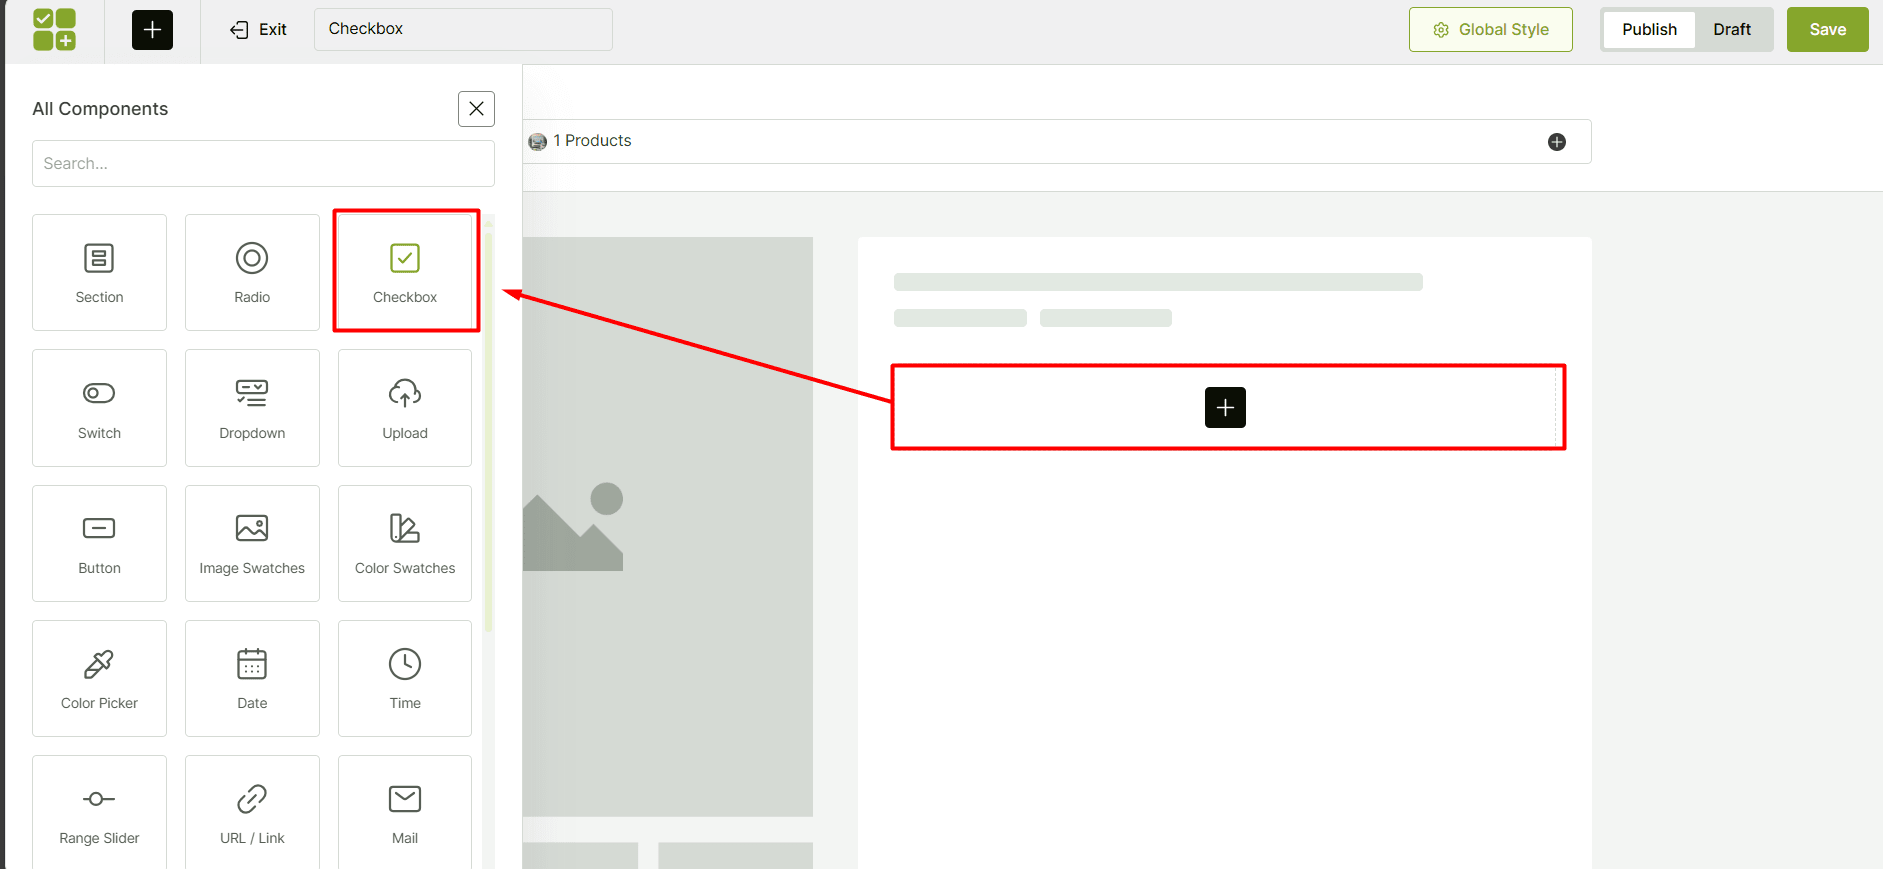
There are around 24 elements you can use to customize your products for different needs. So, besides checkboxes, you can also add elements like radio buttons, image swatches, color pickers, sliders, and even file uploads!
Step #4: Set Basic Settings
Now, let’s take care of some basic settings for each element. Here’s what you can do:
✔️ Enable Required – Turn this on if you want to make sure customers select this checkbox before adding it to their cart.
✔️ Hide Title – You can disable the title, but it’s recommended to keep it visible for clarity and a better user experience.
✔️ Quantity Selector – If you want to let customers order multiple quantities of each option, just enable this.

And that’s it! These small tweaks will help you fine-tune the options for your customers.
Step #5: Configure the Options
Alright, this is the most important and visible part for your customers – configuring the checkbox options. There are a few fields you need to set up. It’s easy! Let’s go through them:
- First, add the name of the checkbox item in the title field.
- Next, pick the right price type for your item. (Fixed, Percentage, No Cost)
- Then, set the regular price for this extra option in the regular price field.
- If you want, you can also set a sale price for each checkbox item.
- And finally, just choose which items you want to be pre-checked from the active column.
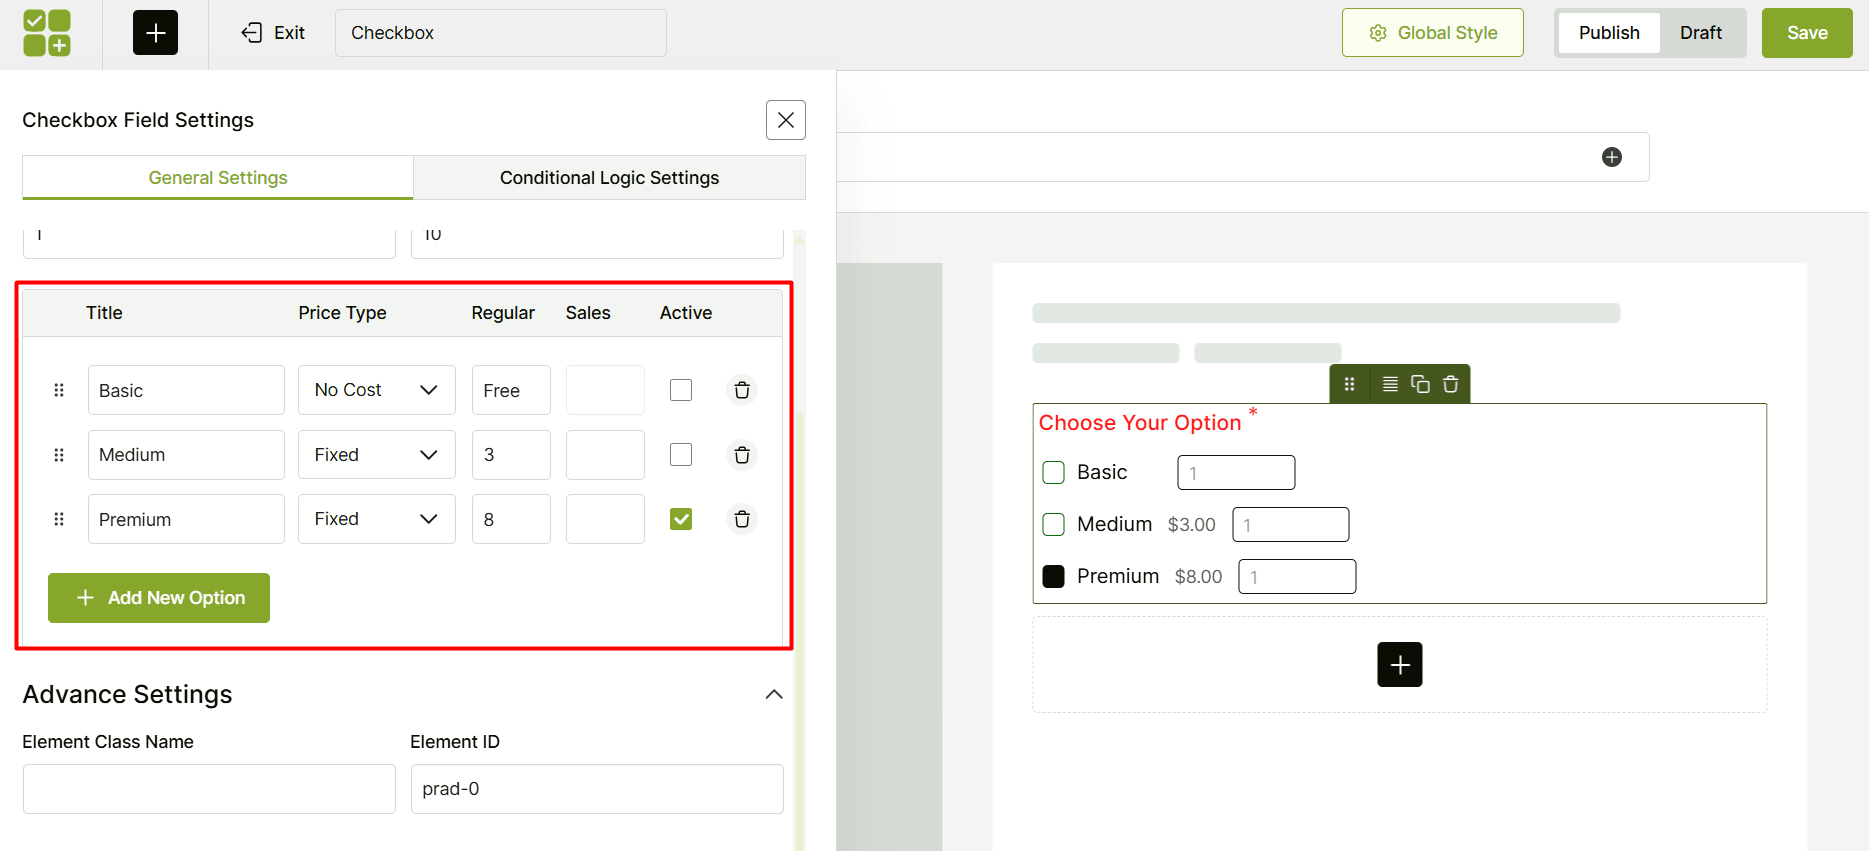
That’s it! Now your customers will have a smooth and personalized experience selecting their choices through a checkbox.
Can I Add Multiple Checkboxes to a WooCommerce Product?
So far, we’ve added just a single checkbox for the targeted product. But that’s not the limit. You may want to include multiple checkboxes within a group for a product.
This is incredibly easy to do with the WowAddons plugin. Let’s walk through an example to see how you can add multiple checkboxes for options like Installation Services for a Home Theater System:
- No Installation Needed
- Basic Installation (+ $100)
- Premium Installation (+ $150)
You can either edit the existing product addons or add a new one. Either way, the checkbox element settings will remain the same. Here’s how you can do it:
By default, the checkbox element offers three options. Simply configure them as shown in the example above.
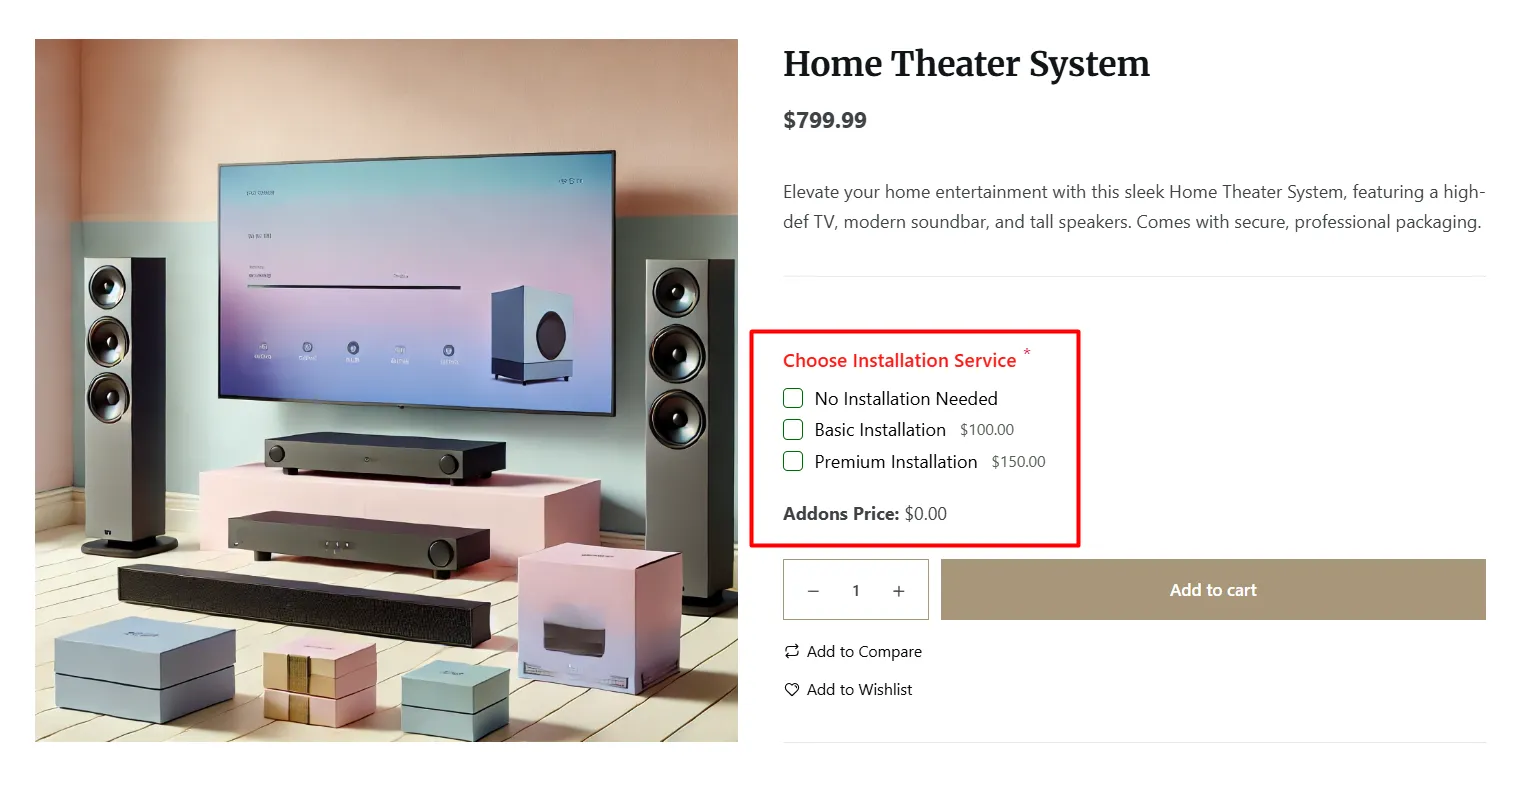
✔️ In the first row, enter the title “No Installation Needed” and select “No Cost” from the price type column.
✔️ In the second row, enter the title “Basic Installation.” Choose the “Fixed” price type and set the regular price to 100. Leave the sales field empty, as no price reduction applies to this specific option.
✔️ Repeat the same process for the third row, and you’re done. You can add more options in the same way, depending on your needs.
This approach allows you to give your customers the flexibility to choose their preferred level of installation.
How to Show/Hide Additional Fields Based on Checkbox Selection
Adding a checkbox as a customizer for your products is just the start. You can make it more interactive by showing or hiding other fields based on whether the checkbox is selected. This can greatly improve the user experience in your WooCommerce store.
Let’s say you are selling customizable T-shirts in your store. You offer customers the option to add a custom logo to their T-shirt for an additional fee.
To keep things simple and organized, you can use a checkbox to let customers choose if they want the logo.
- Checkbox: “Add Custom Logo?”
- Field to Show: “Upload Logo Image”
The setup might sound complicated, but it’s actually simple to do. Follow along step by step:
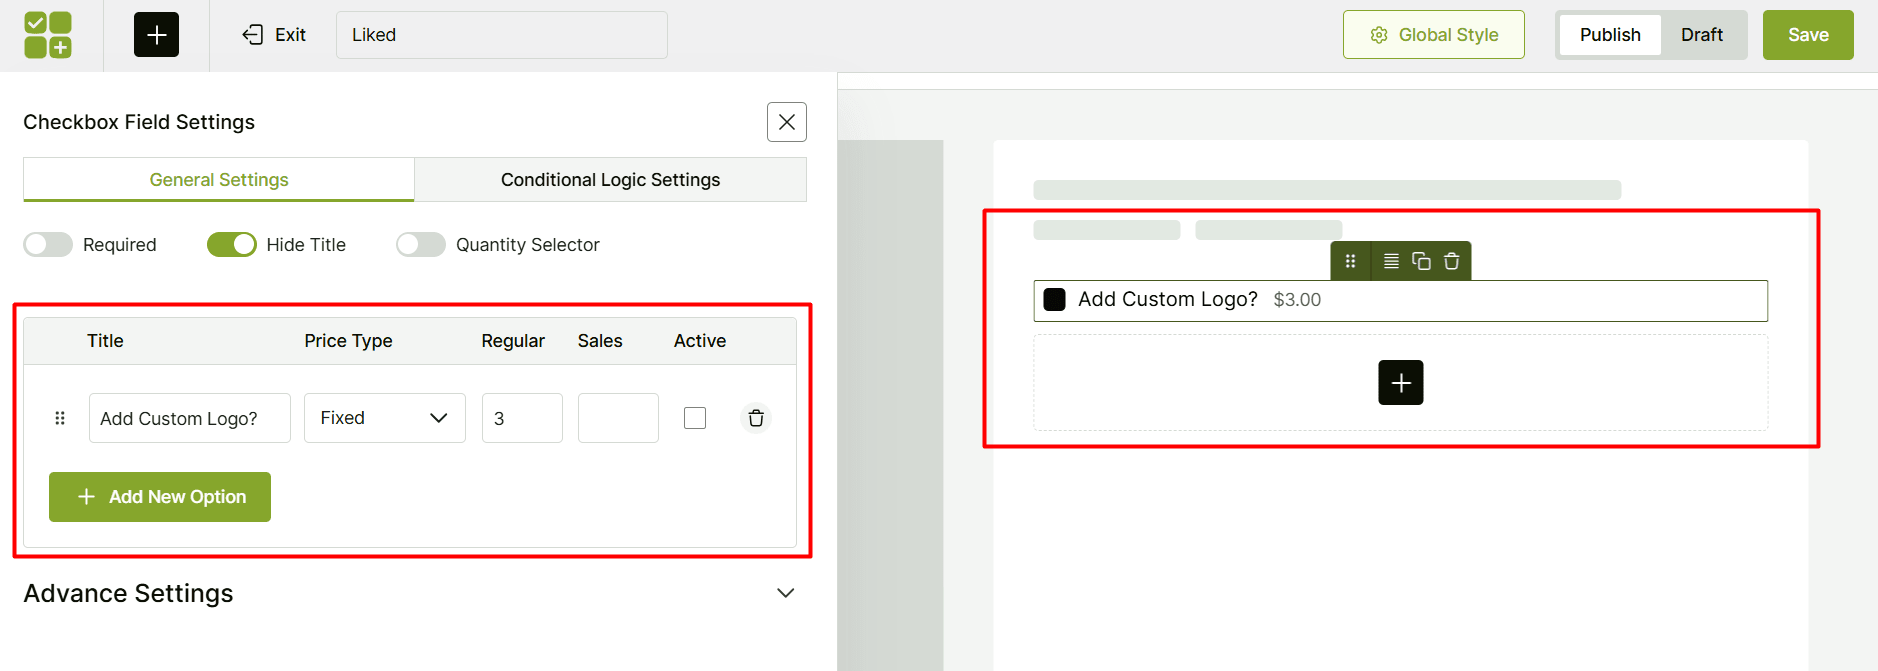
Step 1: Add a Checkbox Element
Start by adding a checkbox element. Set the title to “Add Custom Logo?” and make sure there’s only one option. For pricing, choose a fixed amount as an additional fee.
Step 2: Add Any Element
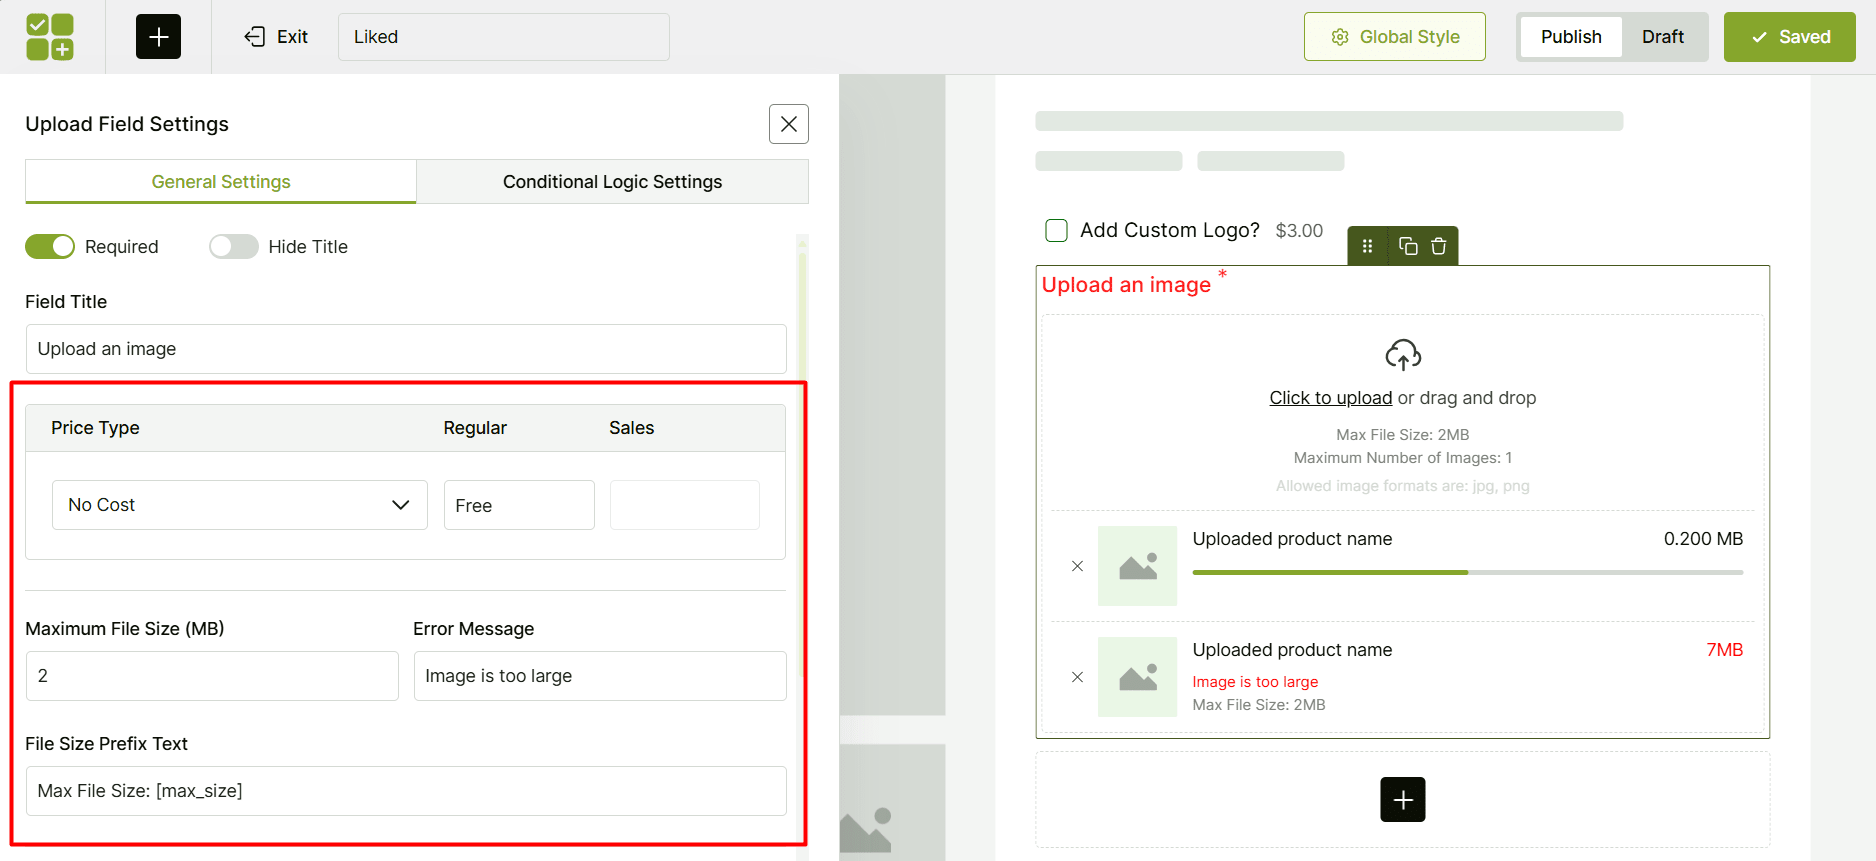
Next, add any element you want to make a condition on. You can even add additional checkbox elements. For this example, I’m taking the upload element. Make it required and title it “Upload an image.” Set the price as “No Cost” because the additional fee is covered by the checkbox.
Step 3: Configure the Element’s Settings
There are some additional settings to set up in the upload element. You need to:
- Set the maximum uploaded file size and create an error message if the limit is exceeded.
- Set the maximum number of file uploads and include an error message for too many files.
- From the “Allow file types” dropdown menu, select the file formats that are allowed for uploads.
Step 4: Set Conditional Logic
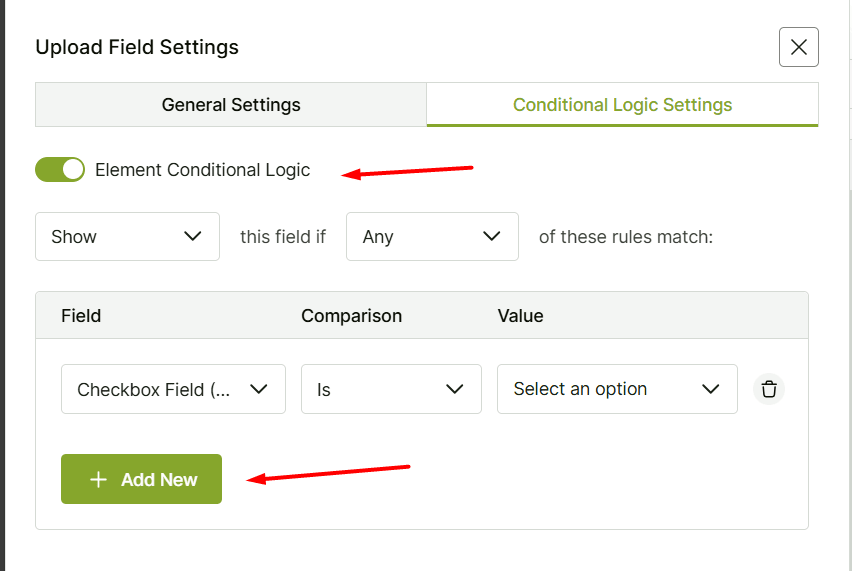
Now, the main part. You have to link the Checkbox element to the Upload element. So that, when the customer selects “Add Custom Logo?”, the upload field will appear. If they don’t check the box, the upload field will stay hidden.
As we want to keep the upload field hidden by default and show it when checked, we need to set the condition here. Follow these steps:
- Click on the upload element.
- Go to the “Conditional Logic Settings” tab.
- Enable “Element Conditional Logic.”
- Set the first field to “Show” and the next field to “All.”
- Click the “Add New” button and select the Checkbox element.
- Choose the relation “is” and select the “Add Custom Logo?” checkbox option.
- Click “Save,” and you’re done!
This setup ensures that your customers will only see the image upload option when they check the add custom logo option.
Why Add Checkboxes to Your WooCommerce Products?
Before we get into the how-to, it’s worth knowing why this matters for you – adding checkboxes to your WooCommerce products offers two key advantages: enhancing your customers’ shopping experience and boosting your average order value. But that’s just the beginning…
✅ Product Customization: These checkboxes give your customers the option to personalize their purchases with specific choices or add-ons, making their shopping experience feel more tailored.
✅ Smoother User Experience: It simplifies the decision-making process with clear, straightforward options, helping your customers find what they need faster and with less confusion.
✅ Increased Revenue Opportunities: Checkboxes open the door for upselling, offering optional add-ons or premium features that can increase your sales.
✅ Valuable Data Collection: It helps you to collect important customer details, such as consent for terms or special requests, directly through the product page, streamlining your workflow.
✅ Streamlined Order Processing: Customers can select their preferences upfront. That way, it helps to reduce the need for back-and-forth communication after the sale.
Resources You’ll Love
- You Can Learn How to Add a Color Picker Option in WooCommerce.
- A Complete Guide on Setting Different Prices for Different Product Sizes in WooCommerce.
- Step-by-Step Guide on Allowing File Uploads on WooCommerce Products.
- Learn in depth about WooCommerce Product Personalization.
- Also, know about WooCommerce Product Addons and the Best Plugins.
Let Customers Tailor Their Orders!
Adding smart checkboxes isn’t just about upselling (though that’s a nice bonus!). It’s about making the shopping experience smoother, more personal, and more aligned with what your customers actually want.
Next time you’re setting up a product page, think beyond the basics – you might be surprised how much a little checkbox can do!
And WowAddons is the ultimate companion in your product options/addons setup journey. Try it and boost your WooCommerce store like never before! 😊
🧠 FAQs about Adding Checkboxes to a Product in WooCommerce
I’m pretty sure you have a solid understanding of how to add checkboxes to WooCommerce products. But if you have any additional questions, here are a few more answers that might help.
How do I add a terms and conditions checkbox in WooCommerce?
You can add a terms and conditions checkbox on the WooCommerce checkout page with plugins like “WowAddons.” Typically, you create a terms and conditions page and link it to the checkbox. You can specify the checkbox label and error message if not checked.
Why use checkboxes instead of other field types?
Checkboxes are used when you want users to select one or more options from a predefined list. They are ideal for non-exclusive choices where multiple selections can apply.
Unlike radio buttons, which limit the selection to a single option, checkboxes allow for multiple selection.
Compared to dropdowns or text fields, checkboxes clearly display all available options at once, improving usability for multiple, independent choices.
What is the difference between a checkbox and a checkbox group?
A checkbox is a single, standalone option that a user can either check or uncheck, typically representing a binary choice (yes/no, on/off).
A checkbox group is a collection of multiple checkboxes presented together, often with a common purpose. It allows users to select multiple options from the group.
The key difference is that they are semantically grouped, which can be important for form organization and sometimes allows for group-level validation or styling.