The number of online shoppers is increasing every day, and so is the number of eCommerce websites. Thanks to WooCommerce, managing an online store is like cutting an apple with a knife.
However, the WooCommerce stores that are built by startup companies are often not able to satisfy potential buyers. Some store owners use powerful builder plugins or premade templates to give their stores professional looks.
Still, that’s not enough to impress vast audiences. The customers of these generations want full customization options so that they don’t need to waste their time while discussing with the support team.
Don’t worry: We have got your back; in this blog post, you will get all the information and the requirements to satisfy your customers. So be seated and keep reading if you really want to make your customers wow.
Key Takeaways
I know you are very curious and excited to know what things we will cover in this blog. Below are the things you can learn after completing this post.
- What is Product Personalization in WooCommerce?
- The Benefits of Product Personalization.
- 7 Effective Strategies with Use Cases.
- Best Product Personalization Plugins for WooCommerce.
- How to Create a Personalizable Product in WooCommerce.
What is WooCommerce Product Personalization?
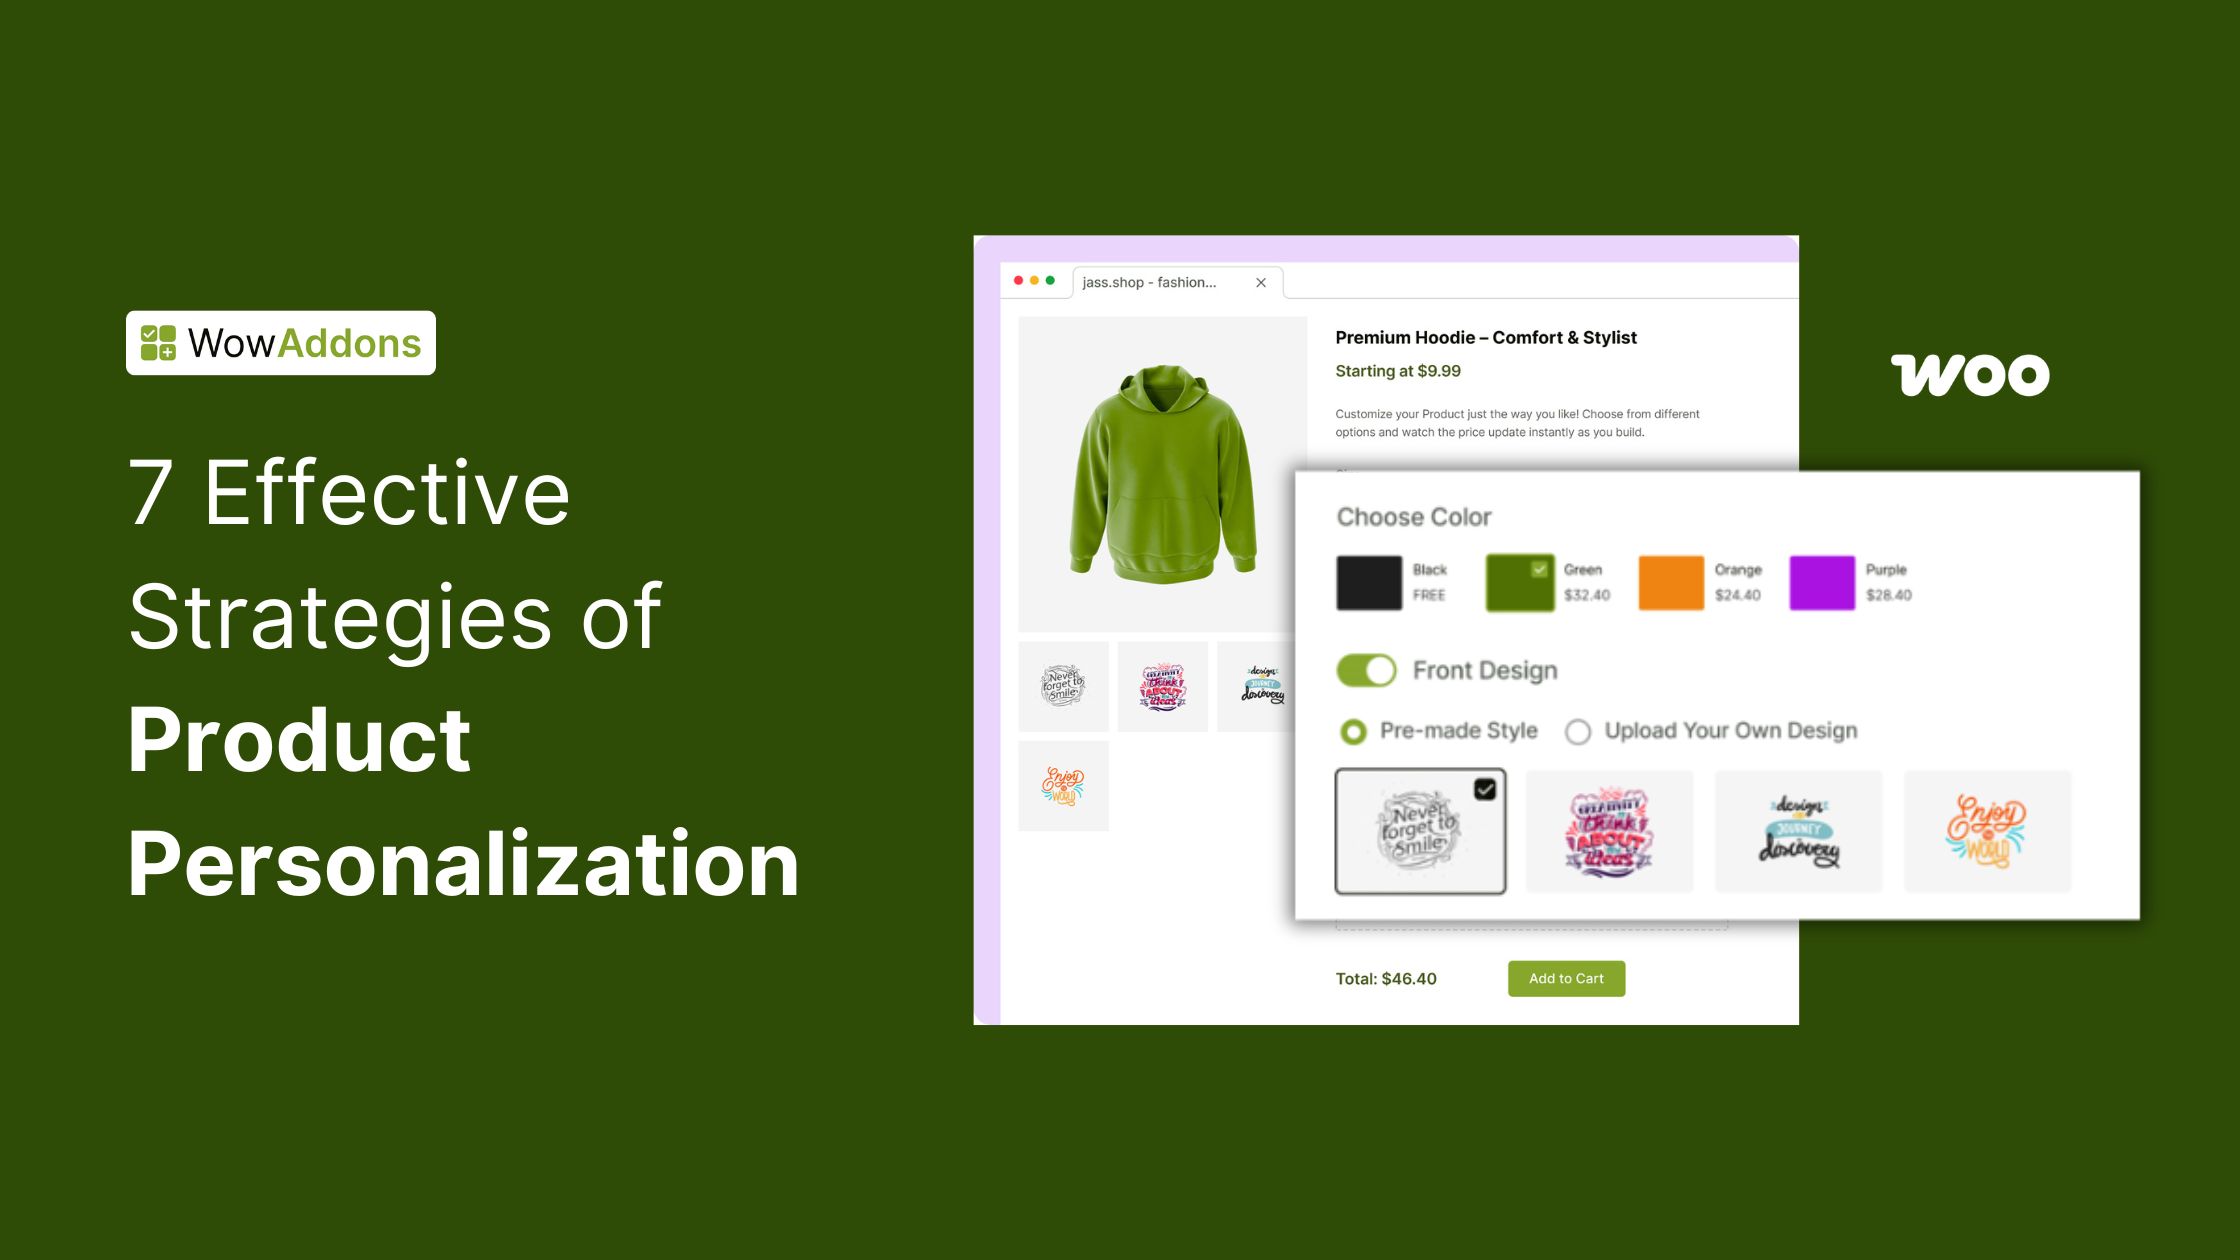
WooCommerce product personalization refers to the process of empowering buyers to personalize their desired products with custom options, such as text fields, file uploads, checkboxes, colour swatches, image swatches and more.
This is a must-have feature for stores that get too many customization requests. It not only satisfies the costumes but also increases the conversion rates along with the order value, as you can add additional charges for extra options.
Here is an example:
Suppose you sell birthday cakes online. Without the personalization opportunities, The customers will find it hard to choose their desired variations and birthday wishes. Yes, they can add a custom note on the checkout page or contact customer support. But it doesn’t give a good user experience.
If you are also in a similar situation, you should let your customers choose their flavour variation and add a custom message that will be written on the Cake. Most importantly, you can also showcase sparkling candles as cross-selling items. As a result, the conversion rate and order value of your WooCommerce will increase.
Why Product Personalization Matters in WooCommerce Stores
You can skip this section if you are already determined to offer product personalization to your customers. However, if you are still wondering whether it is right for you or not, explore the following benefits.
User Satisfaction (Wow Your Customers)
The first and most obvious reason is ensuring the customer’s satisfaction. The personalization feature gives potential buyers an experience that makes them feel like they are shopping in a traditional shop. So, it will not only make the customers happy but also increase the conversion rate.
Increase the Average Order Value
Increasing the number of customers is very difficult and risky as we need to spend the acquisition cost. On the other hand, increasing the order value gives you higher revenue with the same number of customers. With the personalization functionality, you can smartly execute the upselling and cross-selling strategies and effortlessly boost the order value.
Reduces Returns and Increases loyalty
Empowering customers to personalize their requirements on the product page reduces the return rates as there is less chance of miscommunication. It also helps to create a loyal user base towards your brand.
Stand Out from the Competition
Ensuring an effective personalization experience is difficult as the feature doesn’t come with the default WooCommerce setup. That is why most of the companies don’t try to implement it. So ensuring this feature will surely make your store stand out from the competition.
7 Effective WooCommerce Product Personalization Strategies
Now that you know why product personalization is required for WooCommerce stores, it’s time to explore the common practices that can bring the best results for your store. I have mentioned some effective strategies with example use cases below.
1. Let Customers Add Custom Text (Name, Message, etc.)
The first and most common personalization option is letting users write their names and custom messages on the products they are considering purchasing. It adds an extra value to the products you are selling. Let’s explore a use for this:
Use Case: Personalized Mugs or T-shirts
Suppose you sell Mugs or T-shirts and add the option to write a custom name and special messages such as “World’s Best Dad” that will be printed on the product. So, it will upgrade your ordinary products to priceless items.
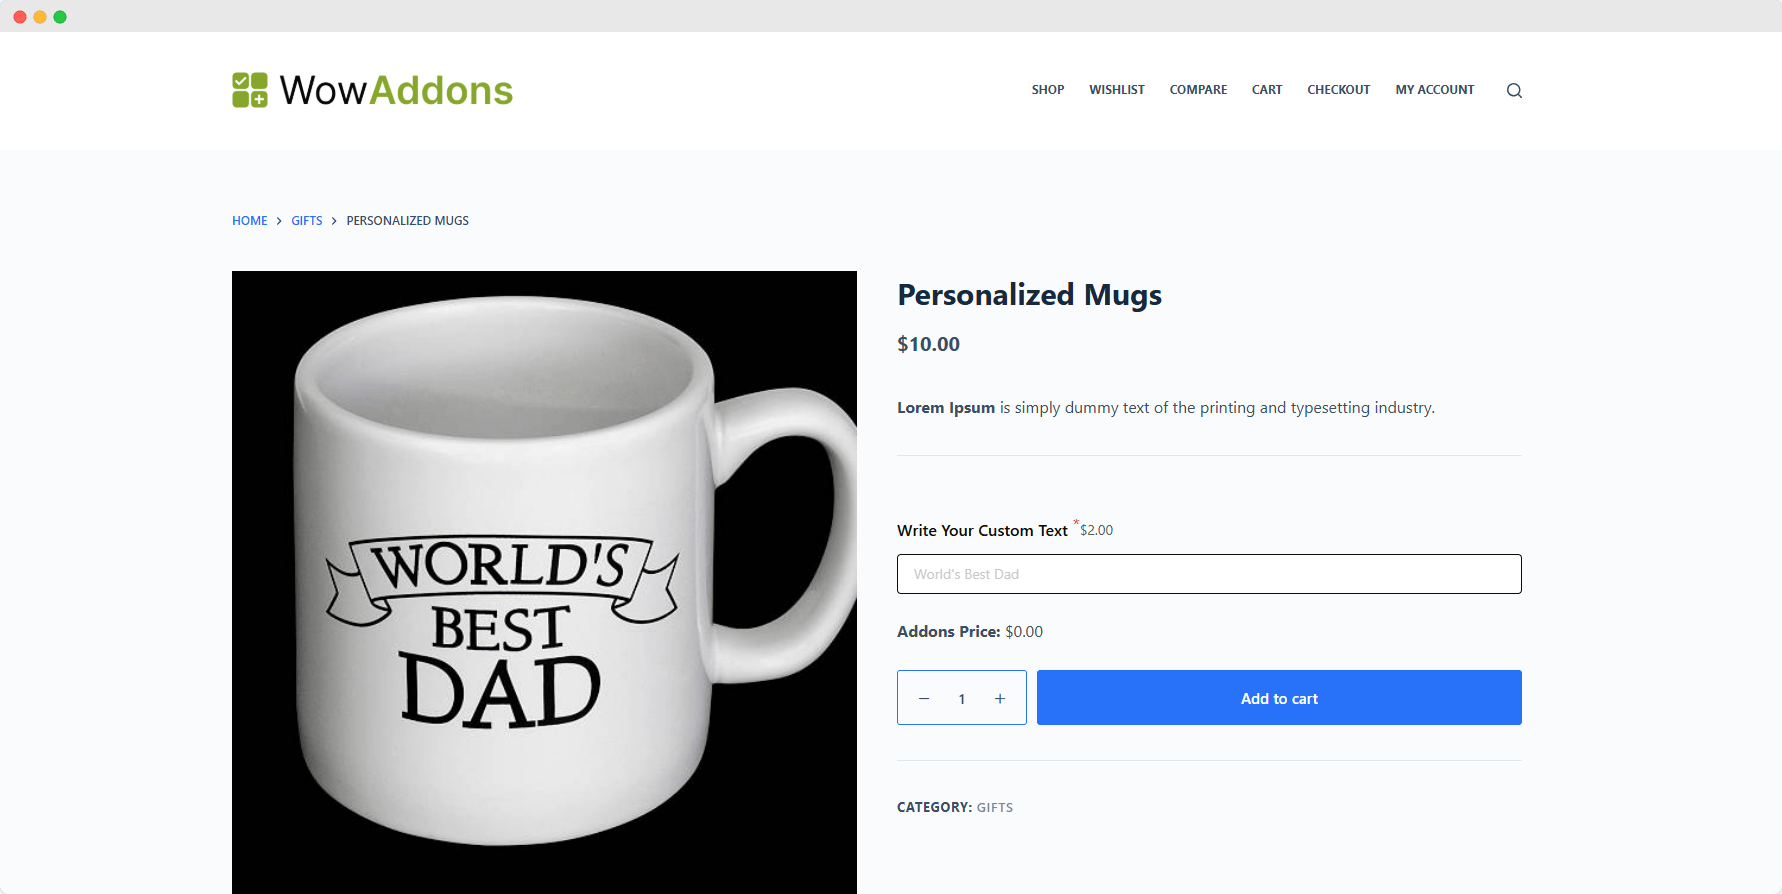
Customers can personalize basic products and make them special for their loved ones. Yes, I know you will be required to spend some extra bucks to fulfil the customer’s needs. But you can also charge for these extra benefits. As a result, the customers of your store will be happy, and you can increase the order value too.
2. Allow Image Uploads for Print-on-Demand Products
Another common practice is letting shoppers upload their desired images that will be printed on the products. It will also increase the value of your ordinary products and increase the order value.
Use Case: Create Your Own Phone Case
You can use this option if you are running an on-demand printing business. For example, you sell phone cases, so what if your customers can add their desired images on the backside of the cover?
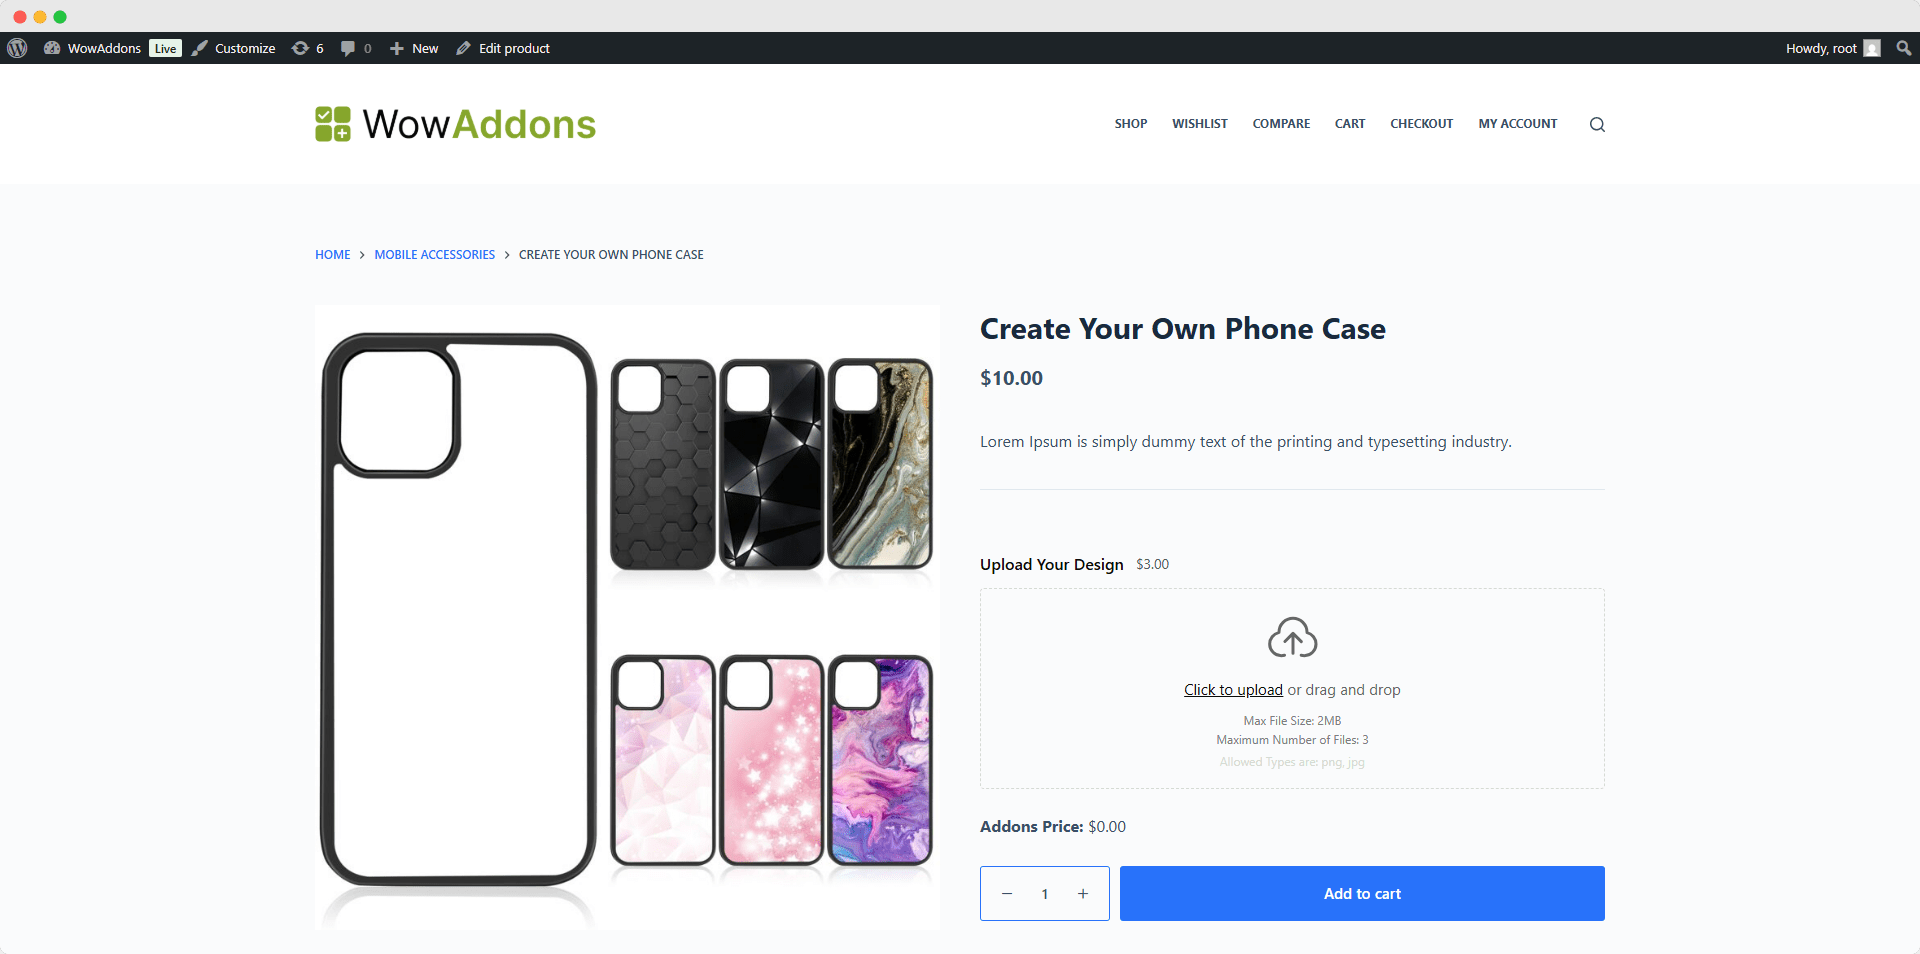
It will not only make the customers happy, but you can also reduce your inventory cost. You don’t need to manufacture too many cases with different designs, as you will already be adding extra value for the customers.
3. Build-Your-Own Bundle or Product Kit
Product personalization covers more than just some additional fields; it also covers the flexibility of making their own version of product bundles from a variety of options. So, you can also sell complex products with a simplified interface without leaving the WooCommerce ecosystem.
Use Case: PC Builder
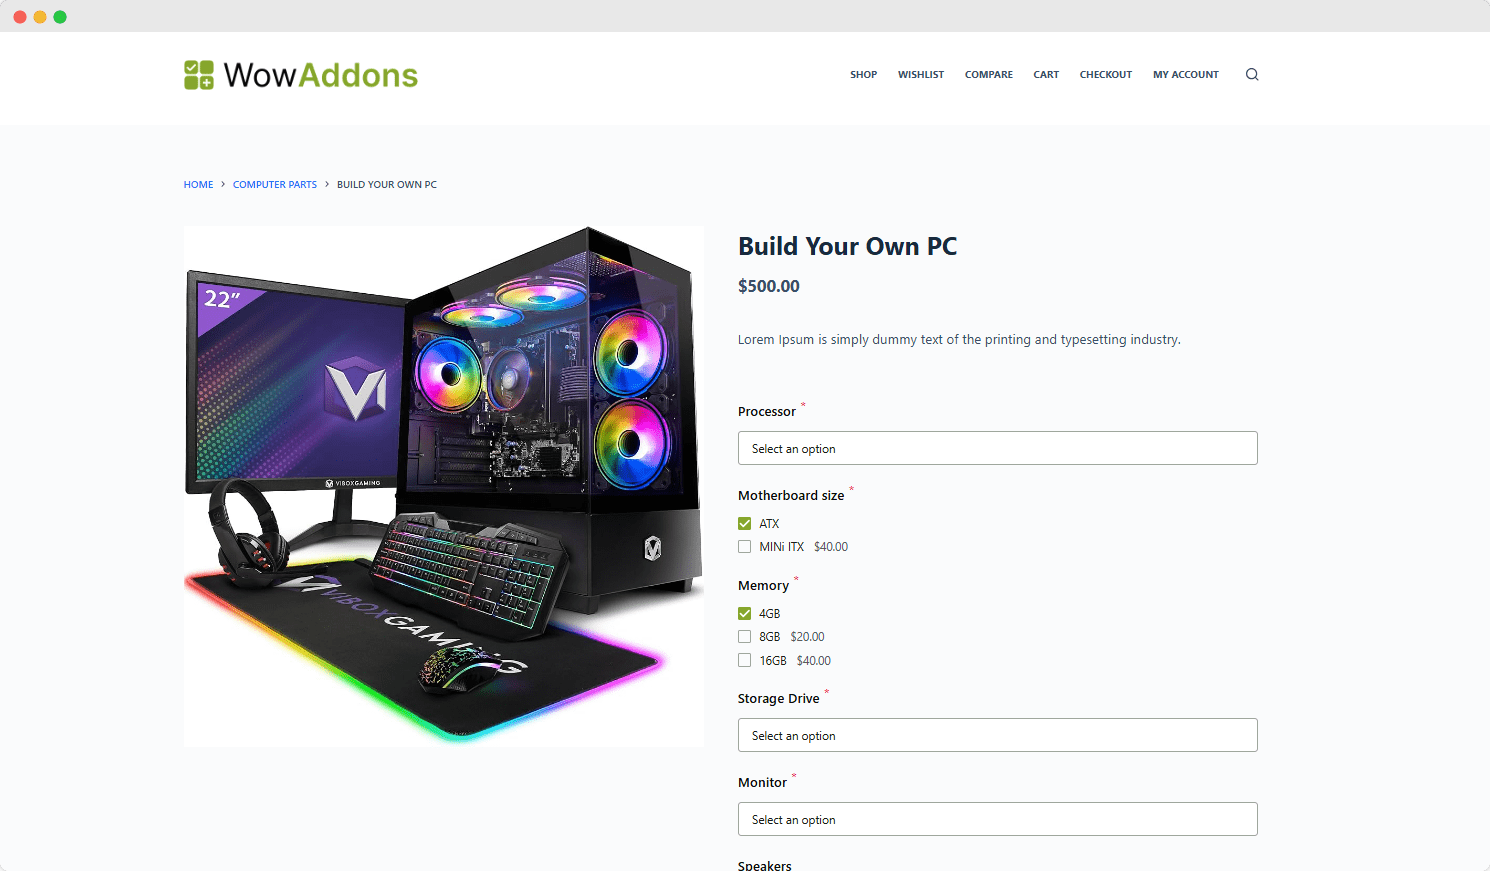
Suppose you sell computer parts; with the personalization option, you can sell a full computer within a single product page. Yes, you read it right; You can let the buyers choose their required parts from multiple options and adjust the total price based on the customers’ selections. So you can use the product page as a PC builder and wow your shoppers.
4. Use Conditional Logic to Show Relevant Options
Do you want to surprise the shoppers along with personalization flexibility? Guess what! You can display and hide or hide additional options based on customers’ inputs. It will help you fulfil customers’ needs dynamically.
Use Case: Jewelry with Gift Wrapping
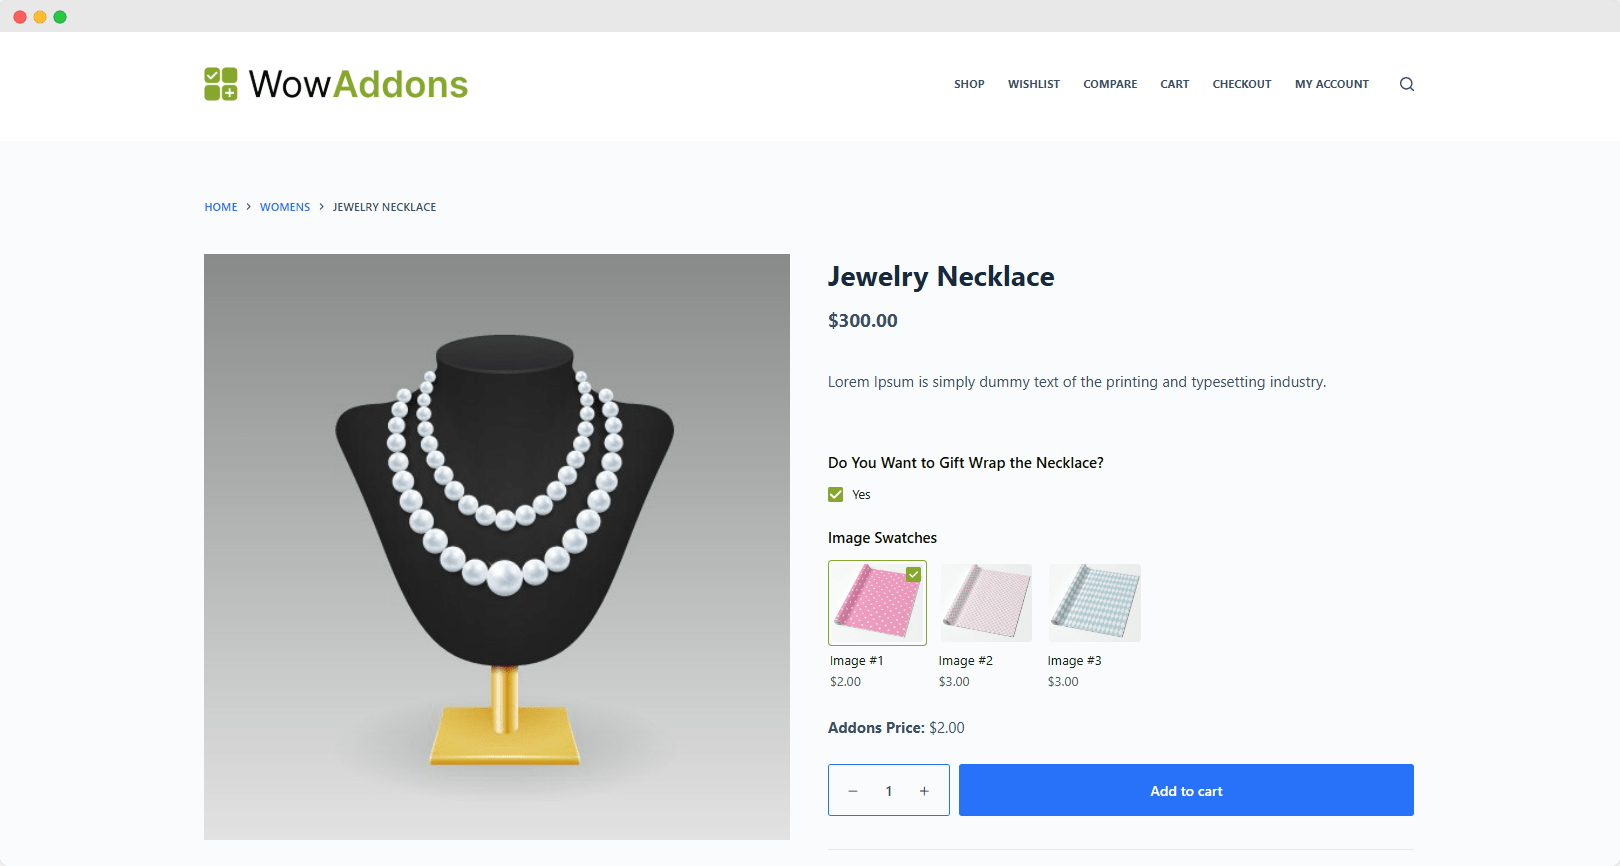
If you sell Jewelry or similar types of products, you can ask your shoppers whether they need custom wrapping or not. So, once they decide and select their desired wrapping paper, you can display multiple options. And, of course, you can charge extra for them. You can use conditional logic not only for jewellery but also for any kind of business purpose and get the best out of it.
5. Collect Email and Phone Numbers
You can also collect email and phone numbers while offering personalization requests. Later, these can be used to fulfil customers’ requests and as a lead as well.
Use Case: Send Custom Messages
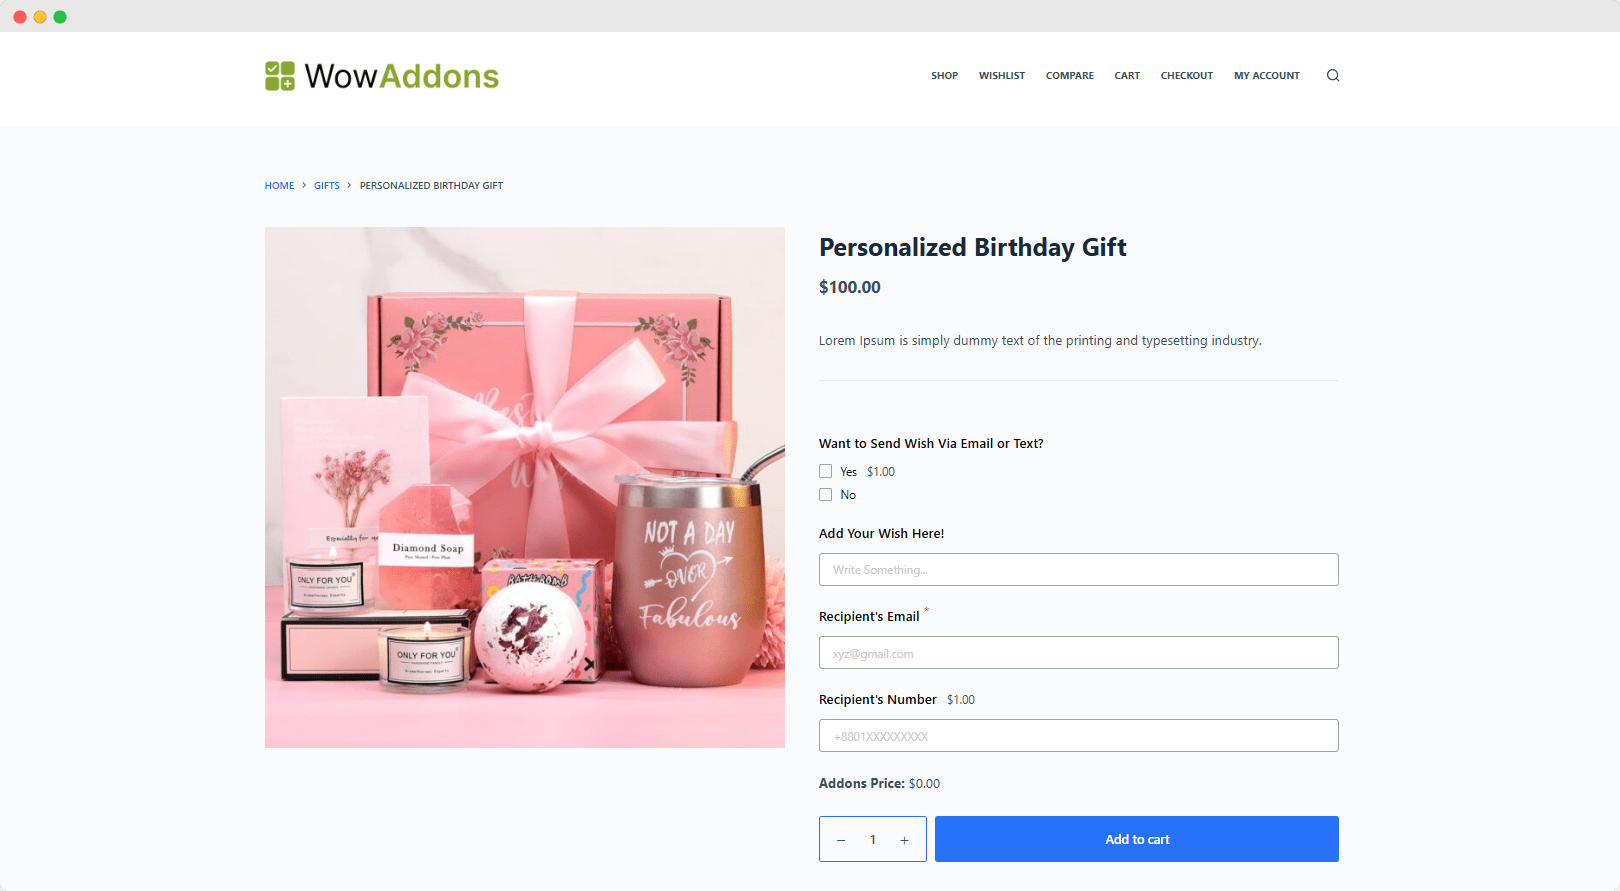
Customers are always concerned about whether the gift will be delivered at the right time or not. But you can offer a solution for that. Suppose you sell birthday gifts, so you can not send the gift at 12 AM, right? But you can collect the recipient’s phone numbers and emails and send custom wishes along with the estimated delivery time, for example, Happy Birthday to Amelie from John. You will get the gift by tomorrow.
6. Delivery Date Selection
If you ask me, I don’t usually like to shop online because of the delivery date. Even if I order online, I always request that the item be delivered on my preferred date. So there would be numerous customers who think like me. However, you can easily solve this problem with an expected delivery date selection option.
Use Case: Express Delivery with Custom Date
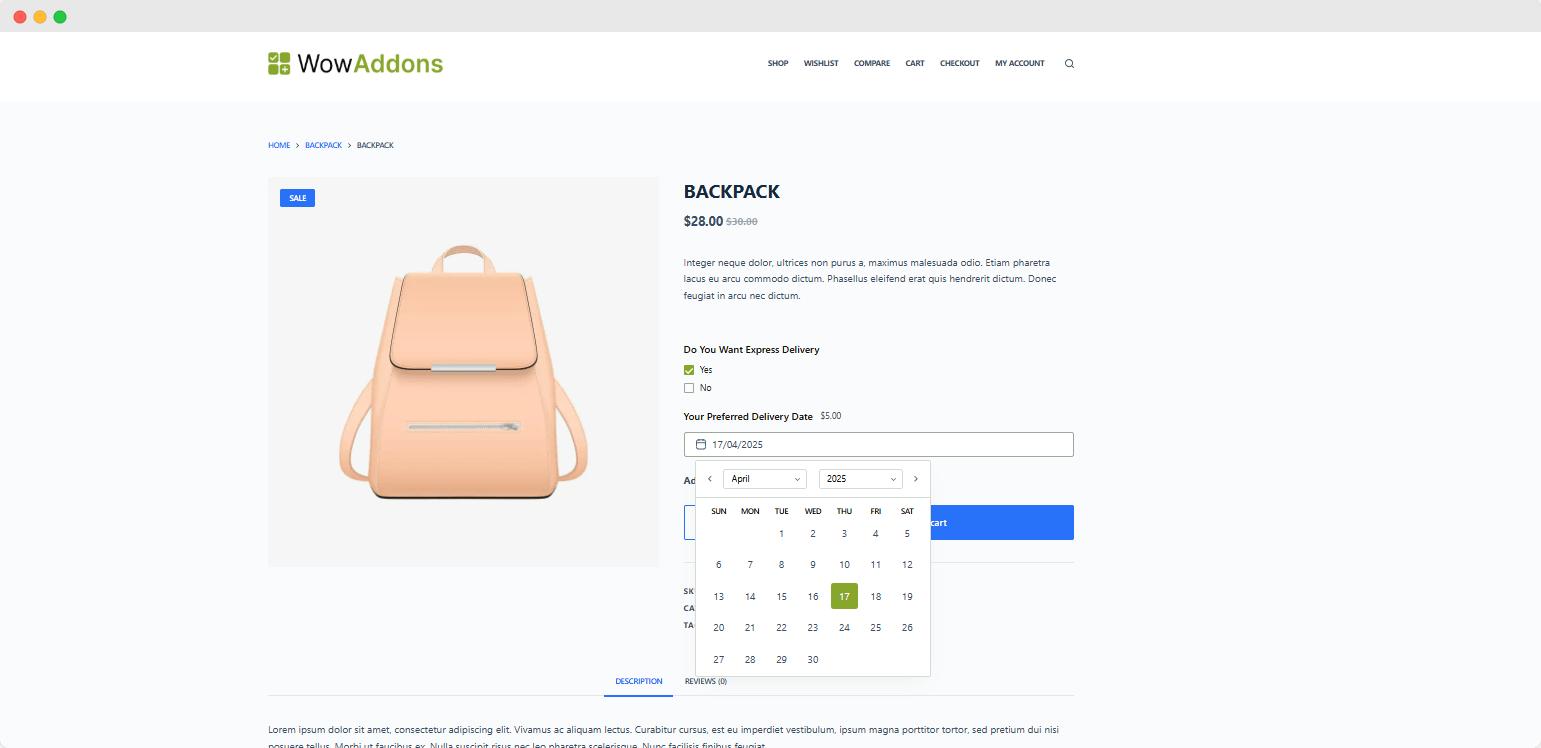
No matter which type of products you sell, this additional option will be effective for your business. You can let your buyers choose the express delivery option along with the exact date they prefer. It will not only make them happy, but you can also earn some extra bucks by charging for this option.
7. Suggest Better Variations and Related Products
Last but not least, product personalization is a great way to increase order value and boost revenues. So, you should not miss the opportunity to increase your store’s earnings while offering a great customer experience.
Use Case: Product Suggestions
Suppose you are selling Wall Art; you can effortlessly upsell by offering a custom size option with additional charges. Another example is if you sell smartphones, you can offer additional items, like chargers, headphones, phone cases, etc and execute cross-selling smartly.
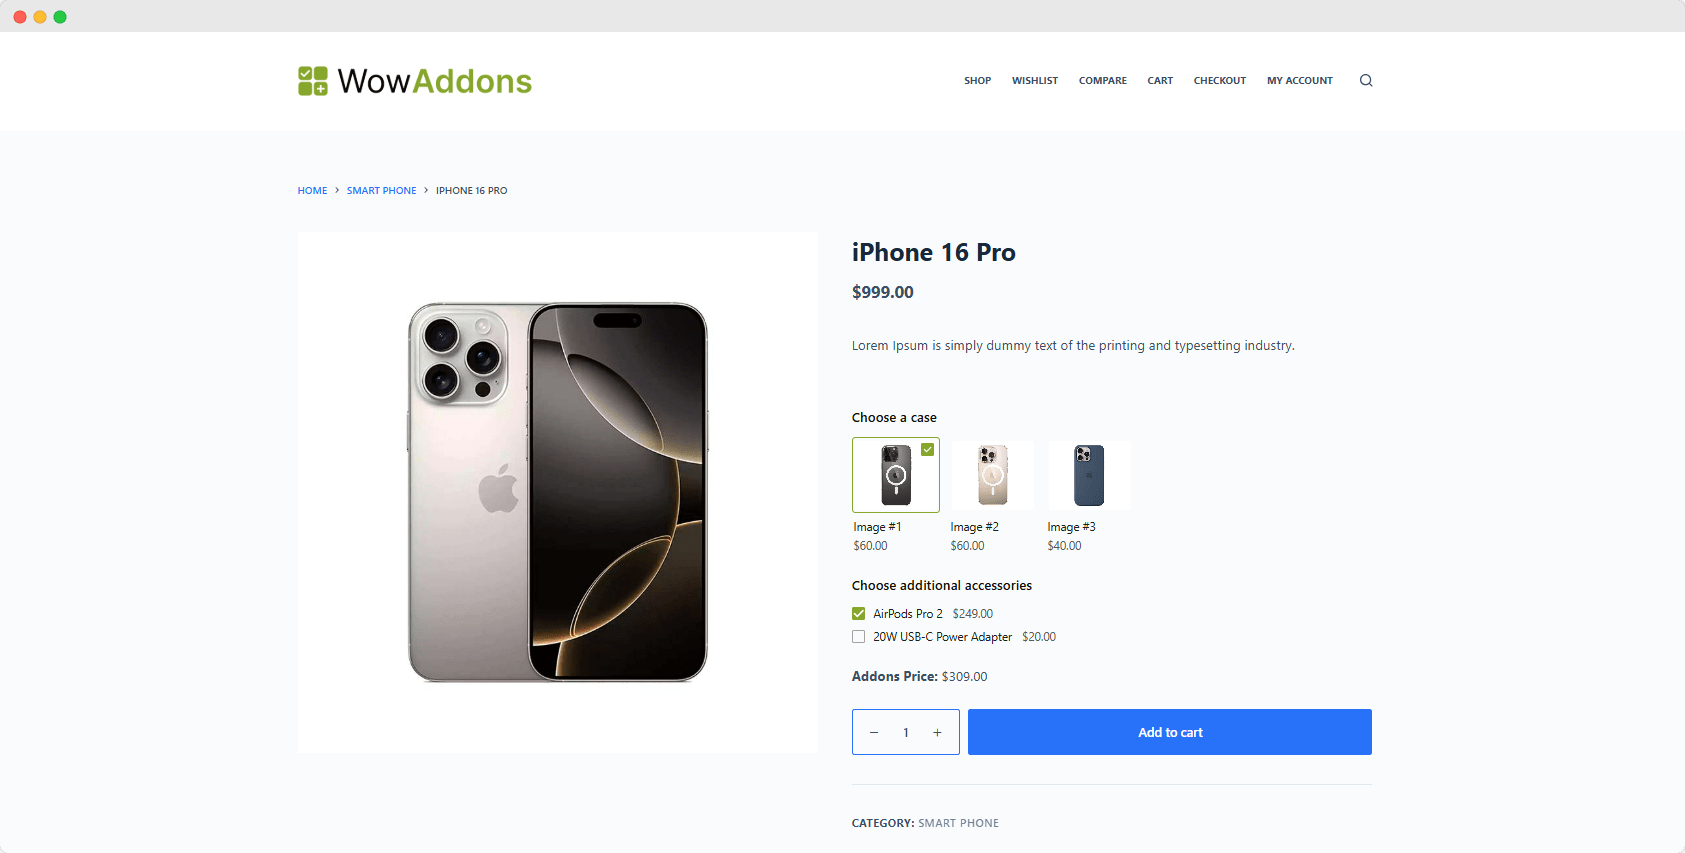
Both upselling and cross-selling opportunities can be used for any kind of business. It will surely increase the order value while satisfying the customers.
Best WooCommerce Plugins for Product Personalization
Now that we know what product personalization is and why it is important, it’s time to start implementing it. But as you may already know, WooCommerce doesn’t offer this kind of feature by default.
However, there are various plugins that offer the feature. You just need to explore the available options and find the one that suits your needs. And Guess What! We have already explored the numerous plugins to help you choose the best one.
Product Add-ons for WooCommerce
The Product Add-ons for WooCommerce is an official extension available in its marketplace. It could be a good choice if you need some basic options. However, we would not recommend it if you need advanced options for your product pages.
It offers multiple basic add-ons like Image switches, Text Input, Drop-down lists, Checkboxes, custom pricing and more.
Key Features:
- Multiple Product Addons
- Image Based Options
- Custom Pricing Based on Options
- Multiple Pricing Types
Pricing: You can start using this plugin at just $79 for a year and save 20% ($158, $126.40) if you go for the two-year plan.
WooCommerce Product Options
The WooCommerce Product Options by Barn2 is one of the best and most advanced plugins for creating personalizable products. It would be a good choice for you if you are seeking advanced options and ready to spend a little bit extra.
It comes with numerous add-ons, such as text fields, image buttons, file uploads, etc. The best part is you can also try its demo before making the final decision.
Key Features:
- Numerous Product Options
- Essential Conditional Logic
- Custom Pricing Options
- Live Preview on Image Uploads
Pricing: You get a single site license at $149 for a year. For lifetime access, you need to spend between $599 to $2299 based on your website’s count.
WowAddons (Available for Preorder Only!)
The WowAddons is the newest addition for our loyal Wow users. For now, it’s only available as a preorder and will be released soon. It would be a great choice for you if you are looking for advanced options with an easy-to-understand user interface. And you can get it at a very low price if you go for the preorder.
Initially, WowAddons will come with all essential product add-ons with custom pricing options. Not only that, but you can also create conditional logic between two or more product options.
Key Features:
- All Essential Product Options
- Advanced Conditional Logic
- Custom Pricing for Components
- Beginner-Friendly User Interface
Pricing: You can preorder WowAddons at just $149 for unlimited sites and get lifetime access. One-time payment; no renewal charges are required!
| Plugin | Key Features | Ease of Use | Conditional Logic | Pricing |
| Product Add-ons for WooCommerce | – Basic Input Fields – Image Swatches – Dropdowns – Checkboxes – Multiple Pricing Types | ⭐⭐⭐ | ❌ | $79/year or $126.40 for 2 years |
| WooCommerce Product Options (Barn2) | – Advanced Input Fields – File Uploads, Image Buttons – Live Preview for Uploads – Conditional Logic | ⭐⭐⭐⭐ | ✅ | $149/year for 1 site. Lifetime: $599–$2299 |
| WowAddons (Preorder Available) | – All Essential Addons – Advanced Conditional Logic – Custom Pricing on All Fields – Beginner-Friendly Interface | ⭐⭐⭐⭐⭐ | ✅ | $149 one-time for Unlimited Sites (Lifetime) |
Why Should You Wait for WowAddons?
If we are not wrong, you are already considering WowAddons. However, you might be wondering how much you need to wait for it.
You would be glad to know that the initial development has already been completed. We are doing the final testing so that you can get a better experience at the very beginning. You just need to wait for a few days before you start using it. But don’t miss the preorder offer, as this special pricing will be available for a limited time only.
Want to see WowAddon in Action?
You can watch the video below and the tutorial on creating product personalization to learn about the capabilities of WowAddons.
Own It for Life – No Recurring Fees!
How to Create a Personalizable Product using WowAddons
Now, let’s see how easy it is to use product add-on plugins to help you offer personalization. For instance, we are using WowAddons. However, you can try multiple plugins and choose the one that suits your needs.
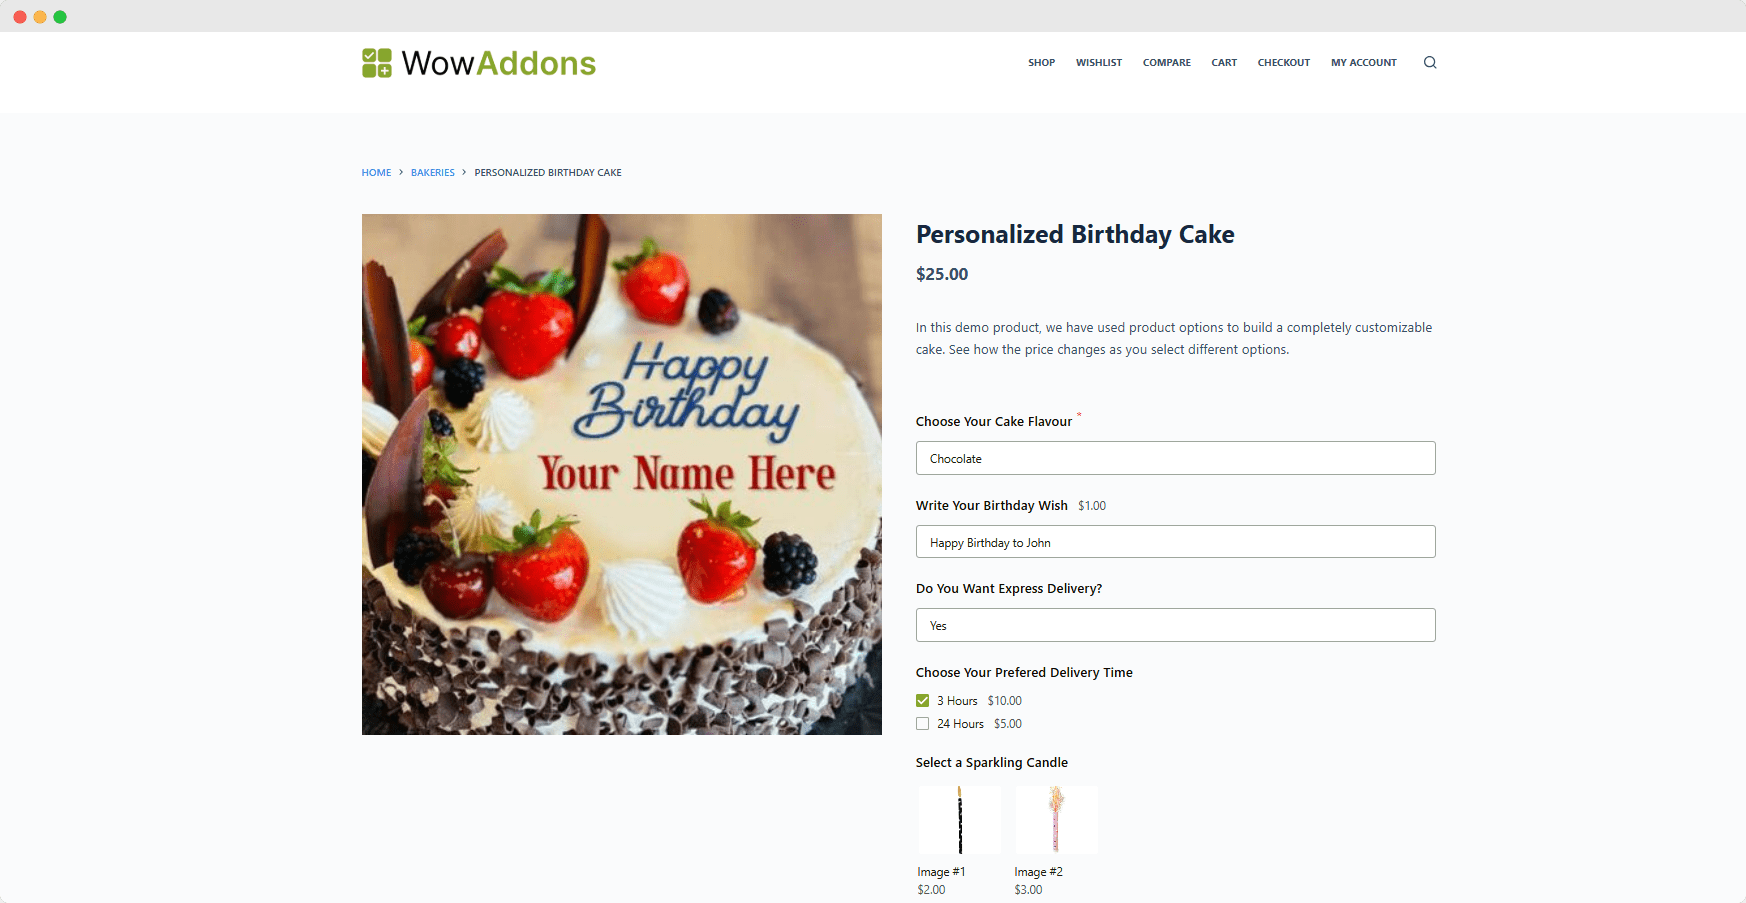
In this tutorial, we are going to add additional options to the product page of Birthday Cake. You can do the same by following the below steps:
Step 1: Start Creating Product Addons
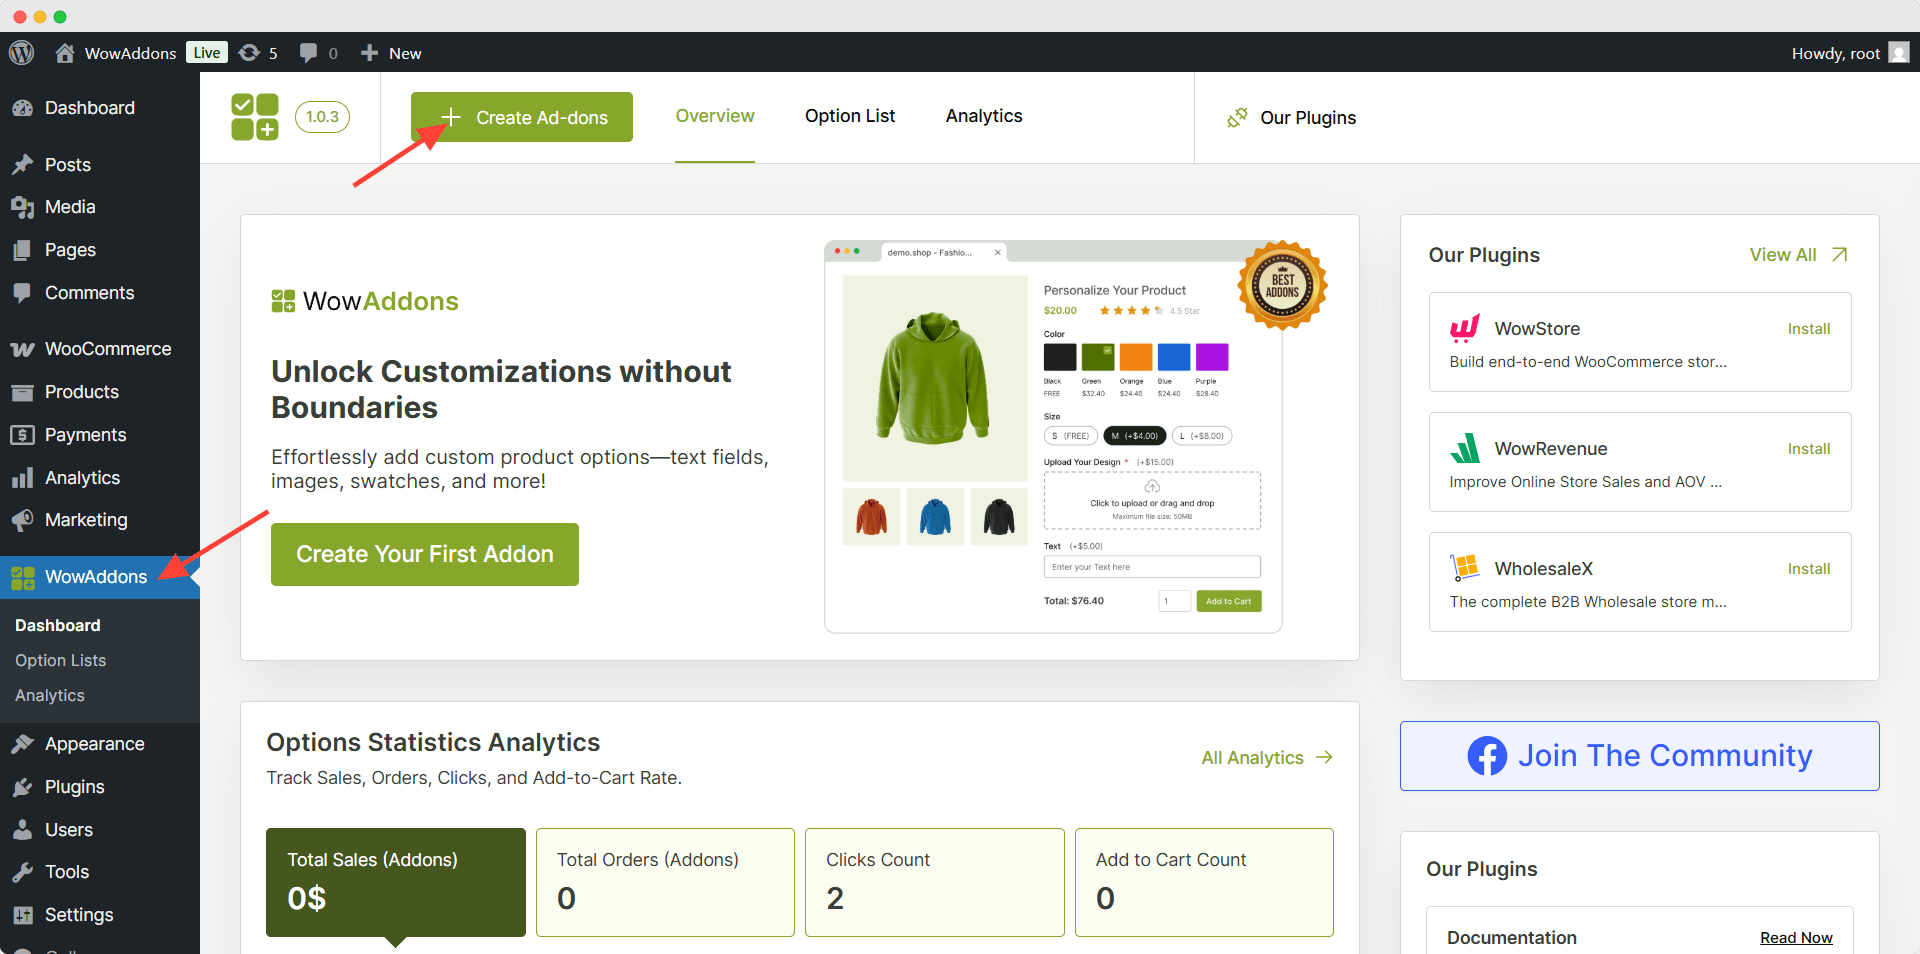
Now, let’s see how we can add additional options to our desired products. To do so, we need to go to the WowAddons plugin section and click on the “Add New Addons” button.
Step 2: Drag and Drop Required Components
From the placeholder, you can understand that it is a product page. We can add the add-ons on the right side of the product page just before the add-to-cart button.
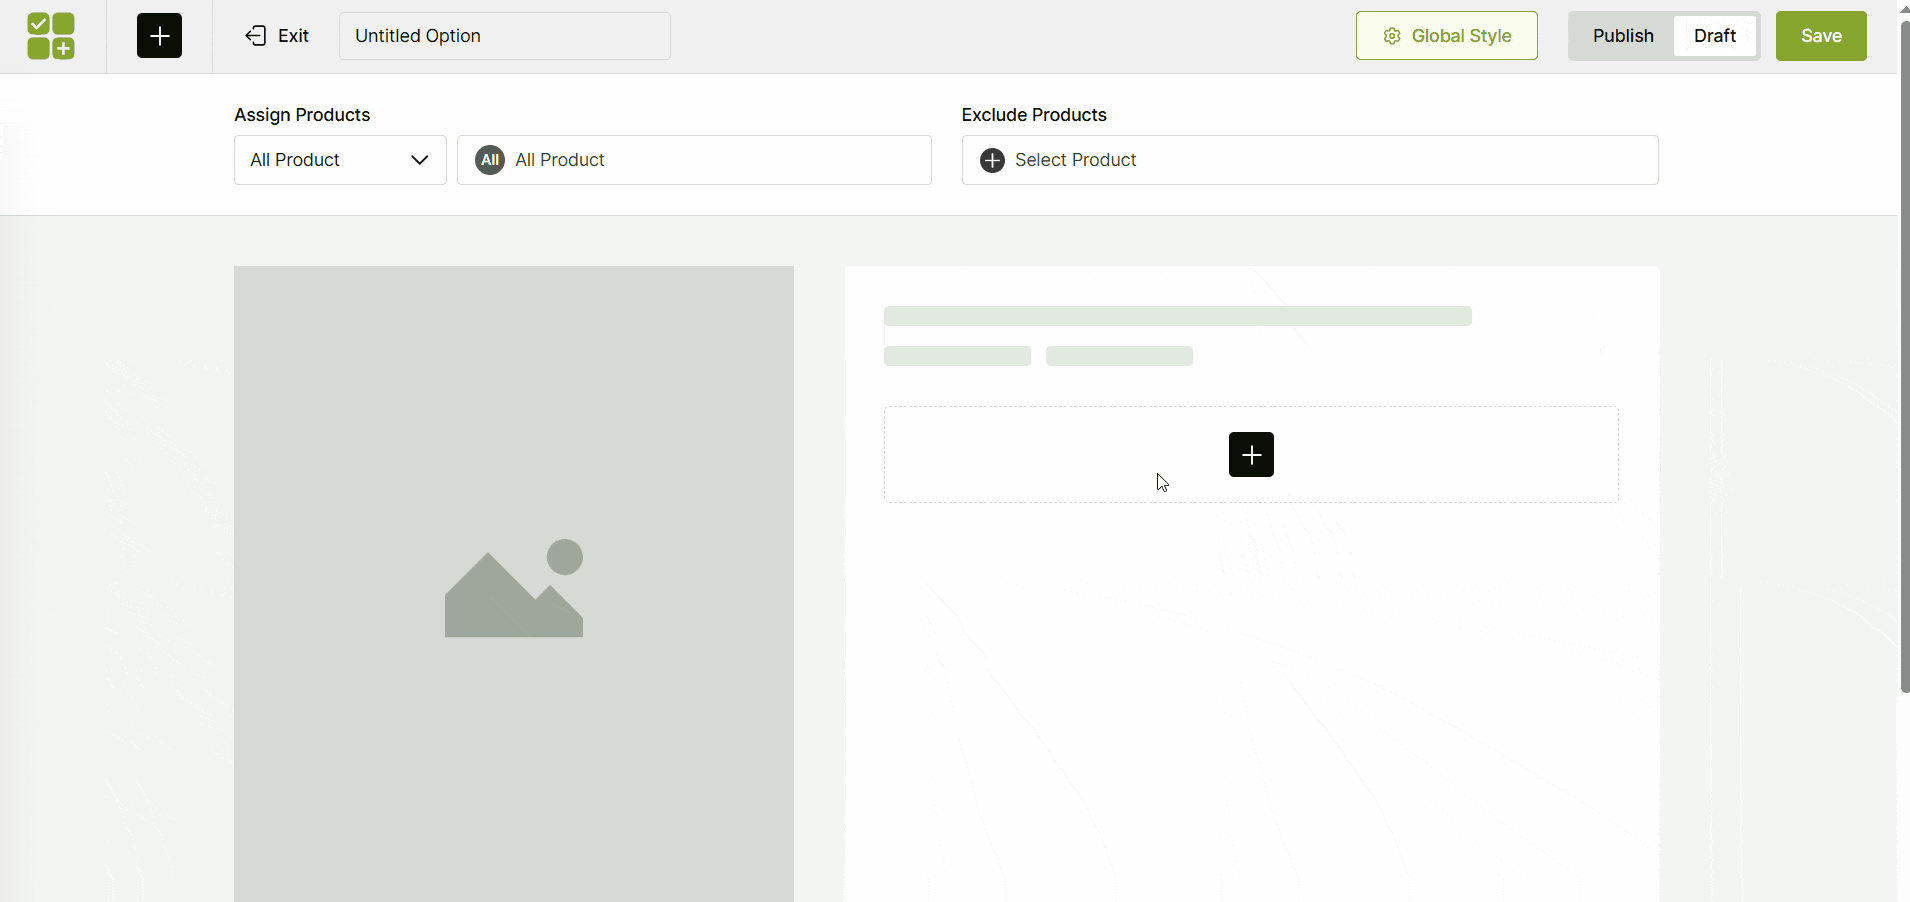
We can see all available options on the left side once we click on the plus icon. Then, we can drag and drop the required components.
Step 3: Customize the Add Ons
Now, let’s see how we can customize the add-ons. The customization options will be available on the left side once we click on an add-on. Let’s customize the Dropdown option and explore the process, as all of the options have similar types of customization options.
First, we are going to make this field mandatory. So, the shoppers do not need to choose a flavour from the drop-down options.
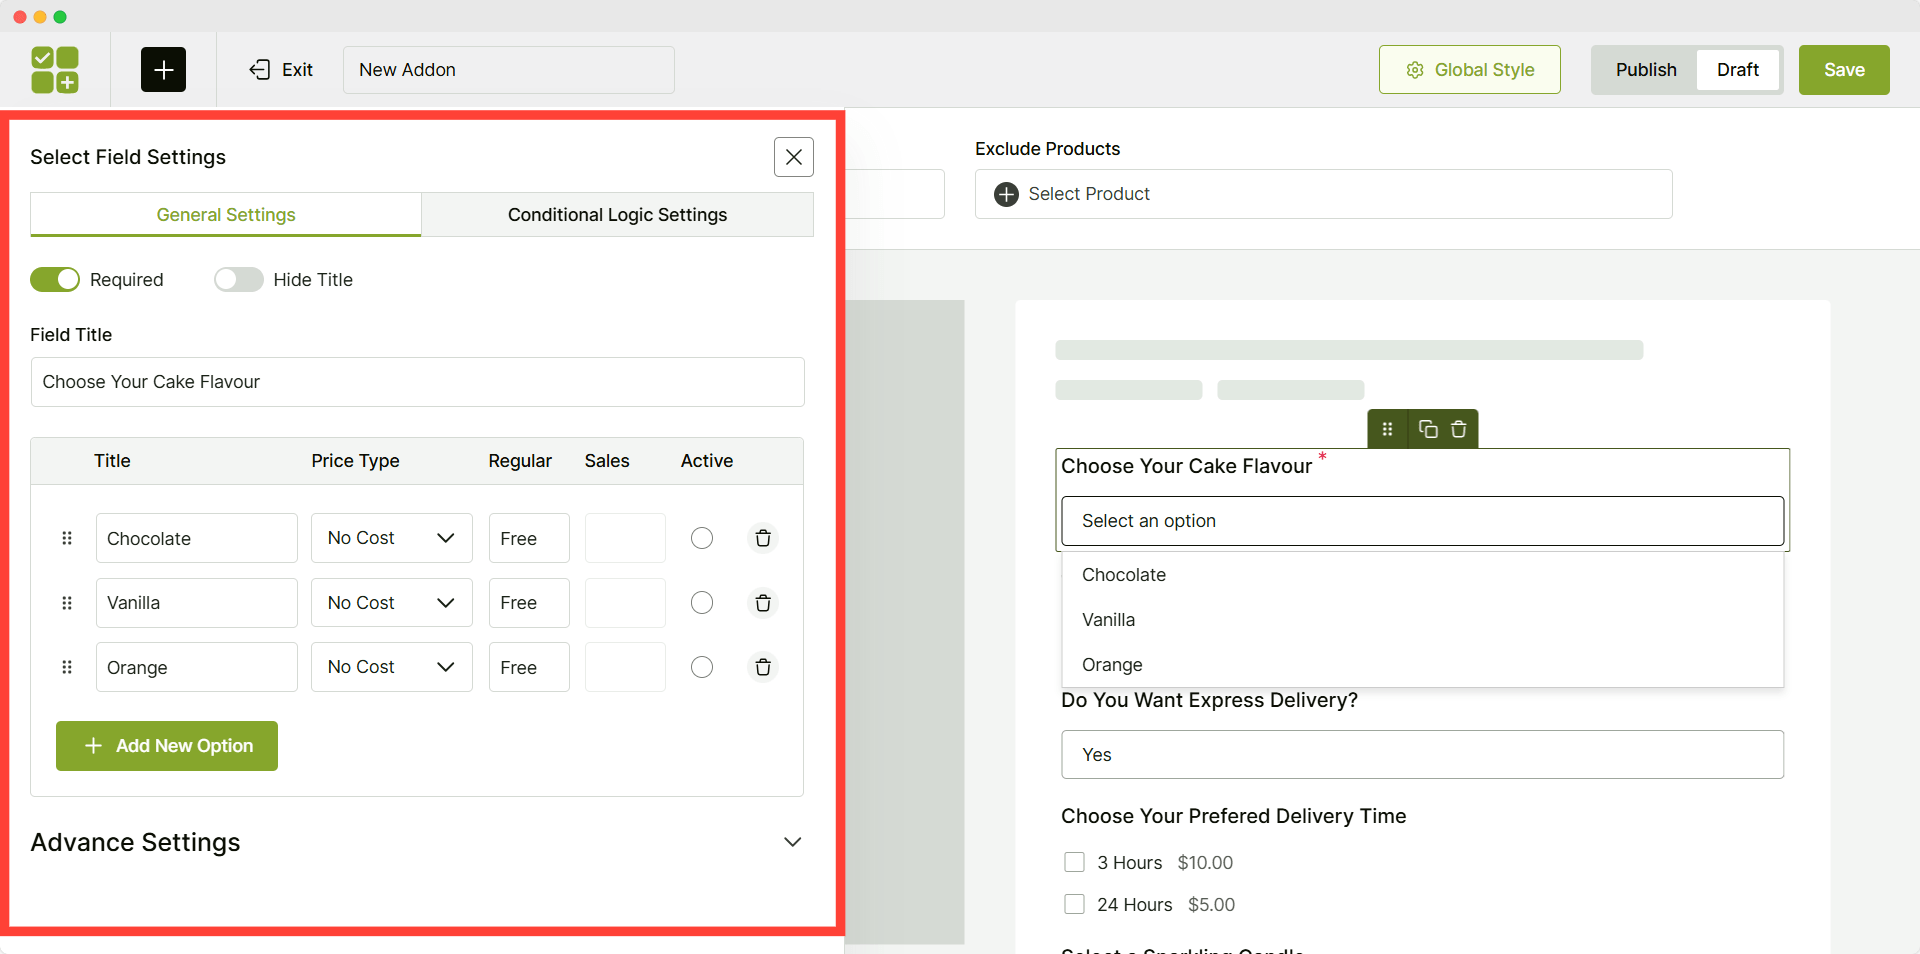
Then, we need to decide whether we want to enable or disable the title of components. Let’s not disable it; instead, we can add a custom heading such as “Choose Your Cake Flavour.”
Now, we can add the flavour names by replacing the default option names. We can also add more options by clicking on the add new options.
Then, we can also add extra charges for the options. For now, we don’t want to charge extra for the flavours, so we are selecting “No Cost” as the price type. Similarly, we can customize all of the components that we have added.
Step 4: Charge Extra for Additional Options
Now, let’s see how to add additional charges for add-ons. We would like to add extra for adding custom notes on the Cake. For that, we need to choose the price type and add our desired amount.
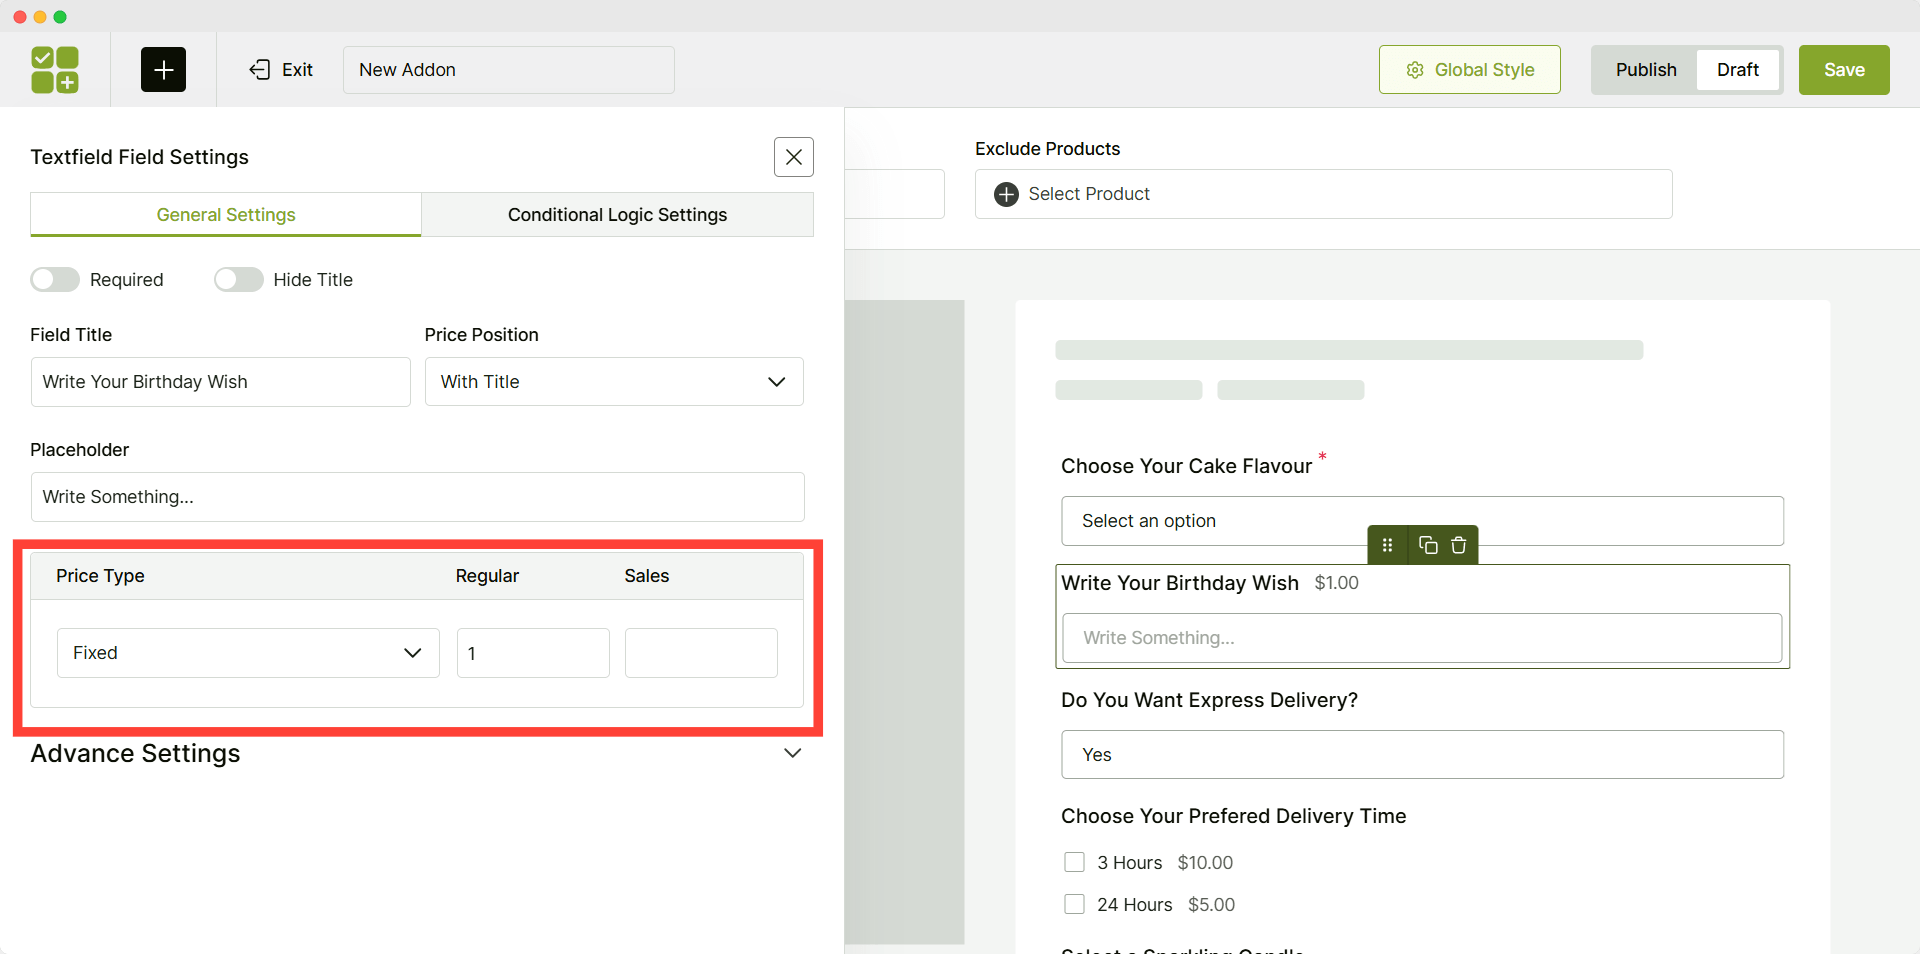
Similarly, we will also charge extra for uploading images by selecting the price type and adding the amount.
Step 5: Add a Conditional Logic
Now, let’s explore adding conditional logic between the two fields. For example, we want to show the delivery time selection options upon selecting “Yes” on the Express delivery option.
For that, we need to open the customization section of the Delivery times field. Then we need to go to the “Conditional Logic” section and enable “Element Conditional Logic.”
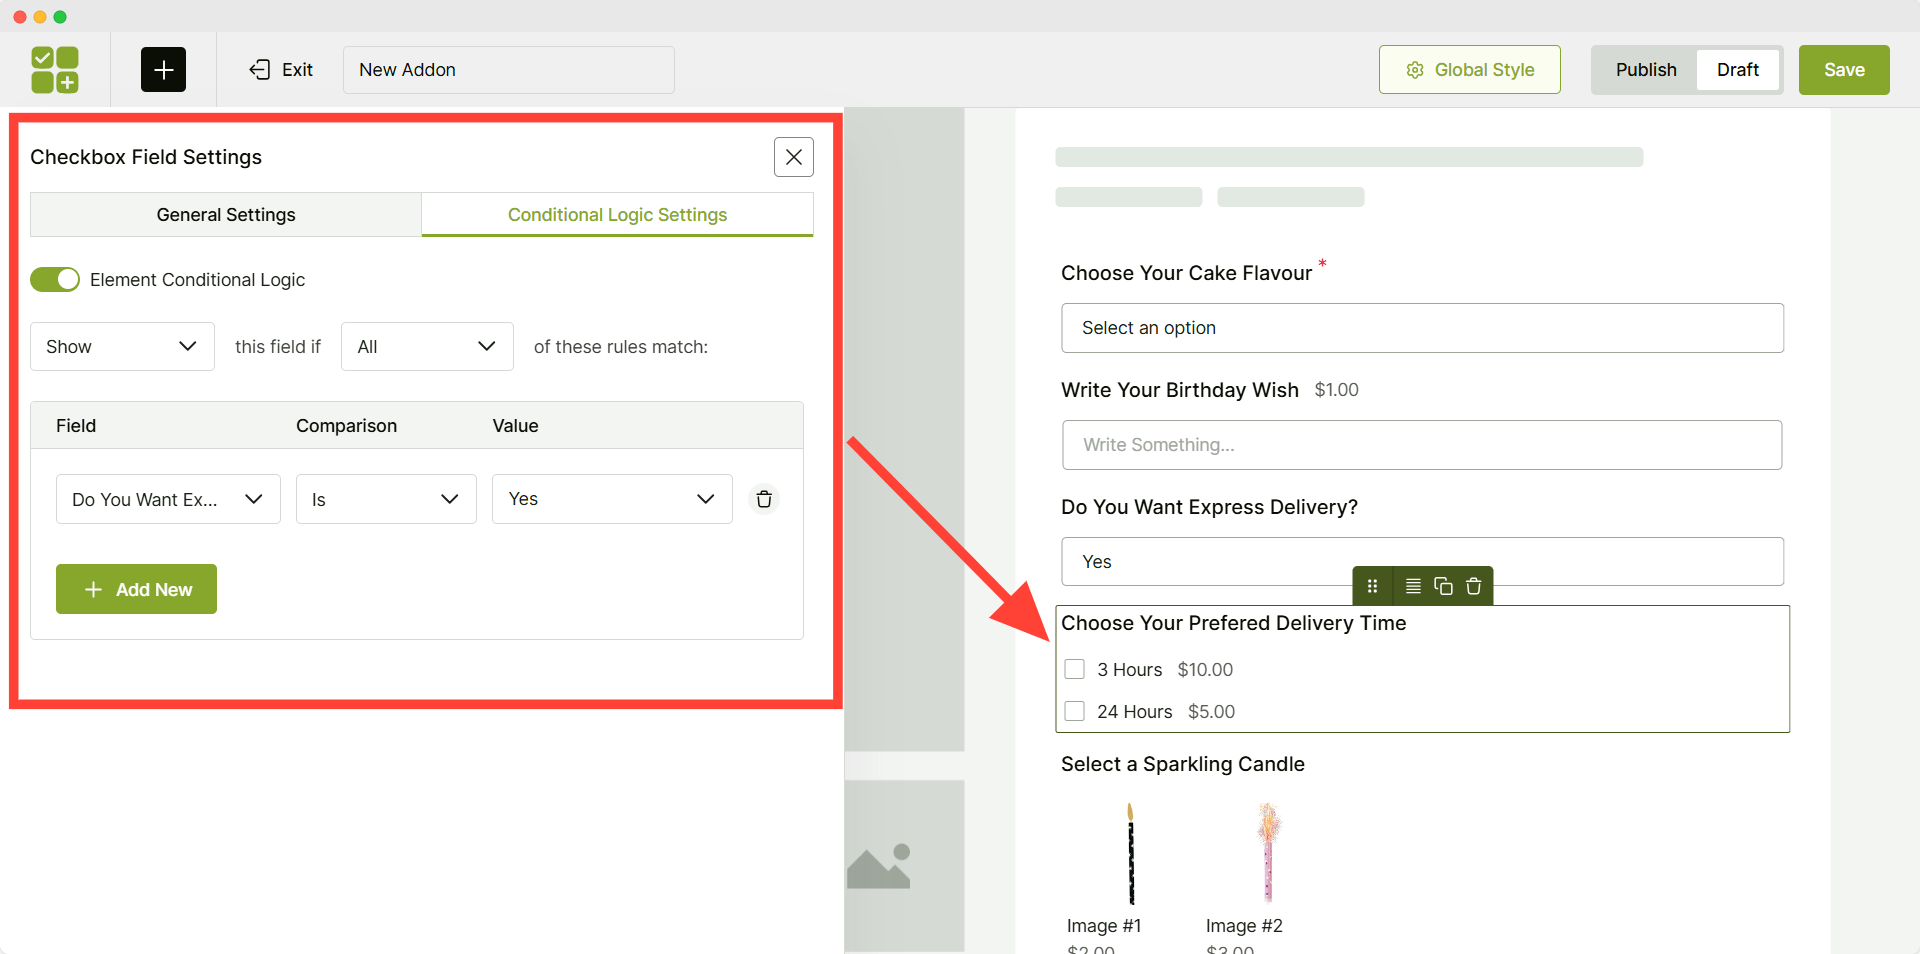
Then, we need to decide whether we want to show or hide the option upon meeting the condition. For now, we are selecting “Show”. Then, we need to select whether all conditions need to be fulfilled or any of the conditions that we are going to add.
Finally, we can add the conditions by clicking on the “Add New” button. Then, select the conditional add-on; for this example, we are selecting the Checkbox. At last, we can set the “Yes” option as the requirement.
So once the customers select the “Yes” option, they will be able to choose their preferred express delivery time.
Step 6: Offer Cross Selling Items

We can also offer additional sub-products to implement cross-selling strategies. For instance, let’s add a Sparkling Candle with an additional charge so that we can increase the order value.
Step 7: Assigning Addons to Products
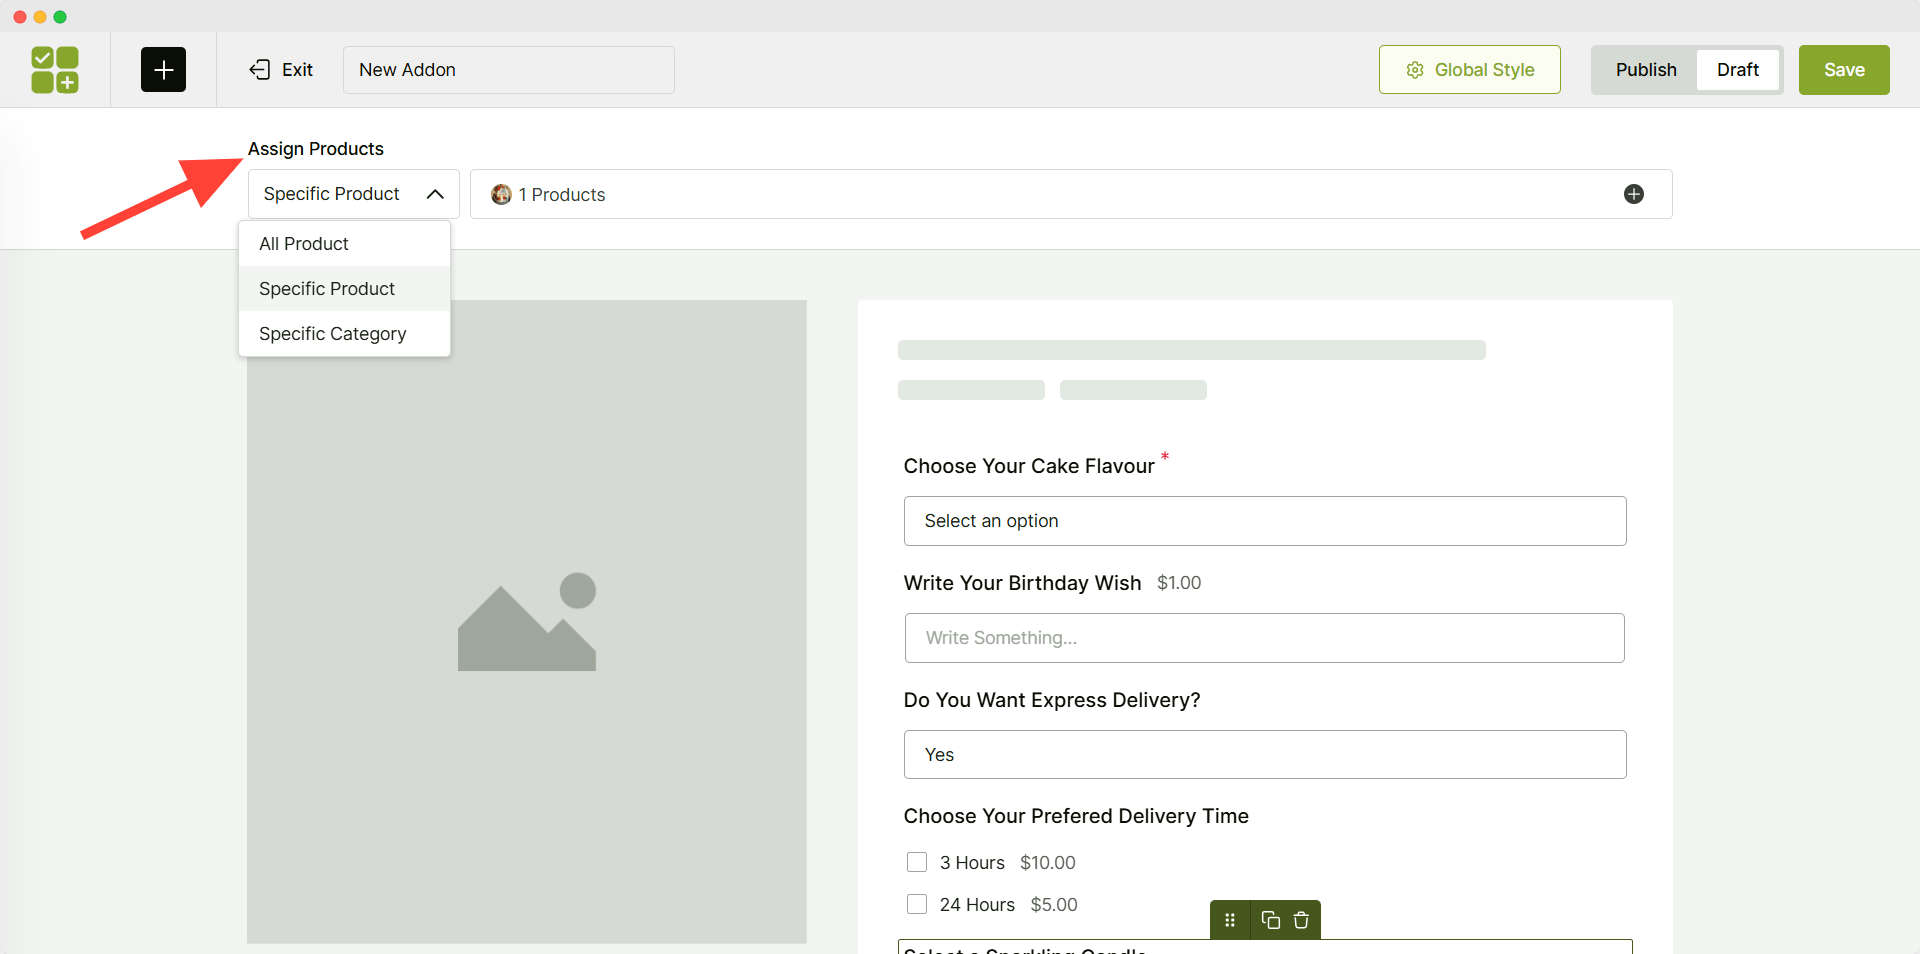
Once the configuration is done, we need to assign the addons to our desired products. We can assign to specific products, products from specific categories, or all products in our store. At last, we need to change the status to publish and click on the save button. Now, let’s see how it looks at the front end.
You may also like to read:
- WooCommerce Product Addons: Types, Examples & Best Plugins
- Introducing WowAddons: The Ultimate Product Options Plugin for the Masses!
Conclusion
Product personalization is an essential and powerful feature for all WooCommerce stores. If you are not ensuring it, you will be able to satisfy your shoppers. So, you should choose a plugin and start implementing it as soon as possible. Feel free to share your feedback and suggestions in the comment section.